标签:Color text cells T1 cell macro table Next FORMATWIKI
Advanced table cells formatting
- General information
- Use cases
- Changing alignment
- Changing column width
- Adding line breaks
- Adding text color
- Text formatting
- Escaping special characters for wiki markup
- Adding bullet, numbered list
- Adding background, text color
- Conditional inserting of values and coloring cells background
- Conditional formatting
- Conditional inserting of statuses
- Creating clickable links
- Preserving initial cell formatting
General information
The Table Transformer macro supports Confluence Wiki Markup (the FORMATWIKI function) and Markdown syntax (the FORMATMARKDOWN function) for the purposes of cell formatting.
These functions don't support formatting of complex macros that dynamically change the content, get data from someplace ( e.g User List Macro, Expand Macro etc.)
Below you can find how Table Transformer helps to enhance the formatting abilities of tables in Confluence.
Use cases
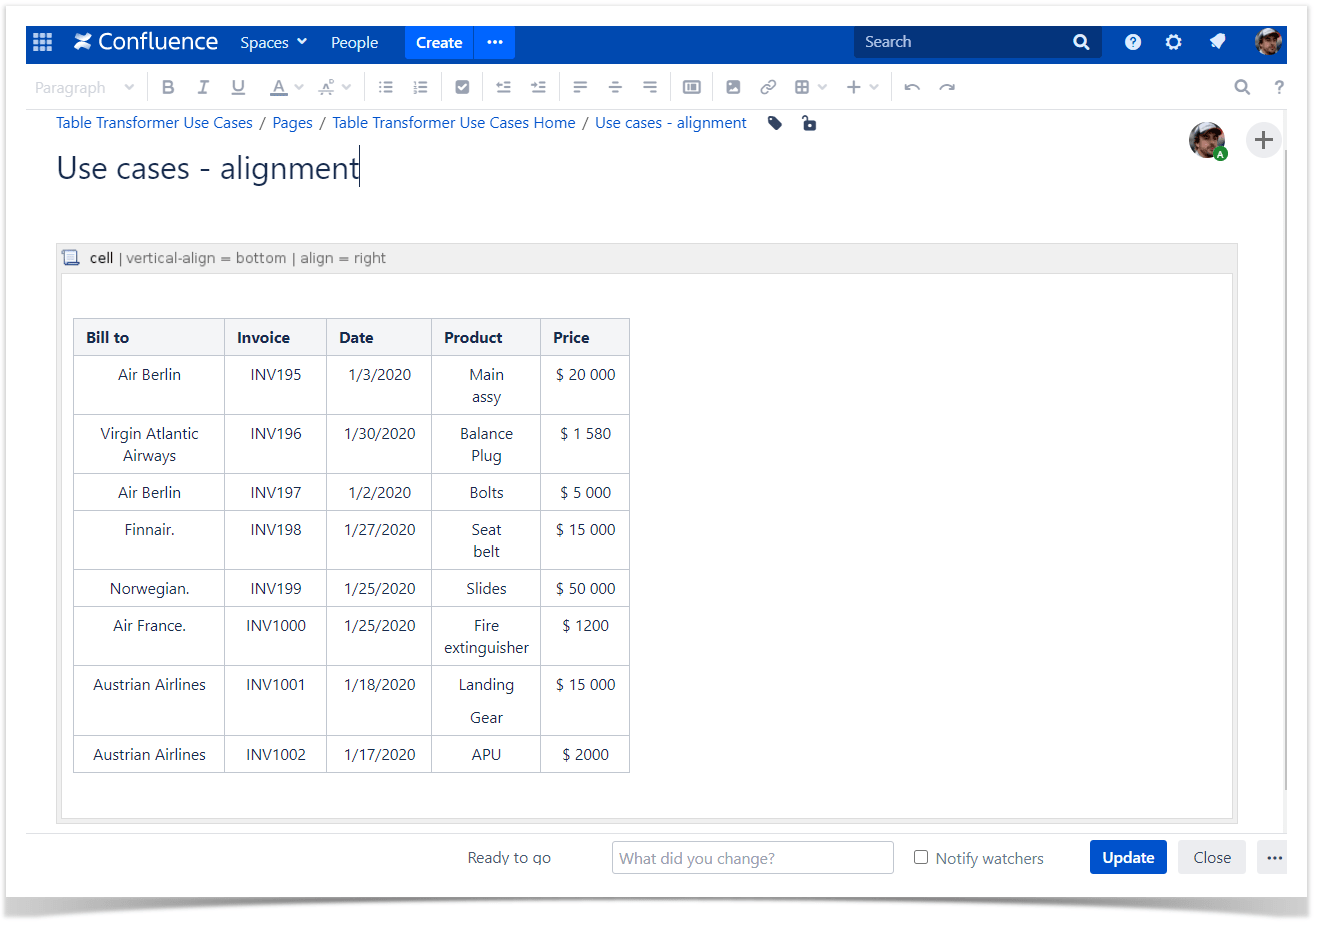
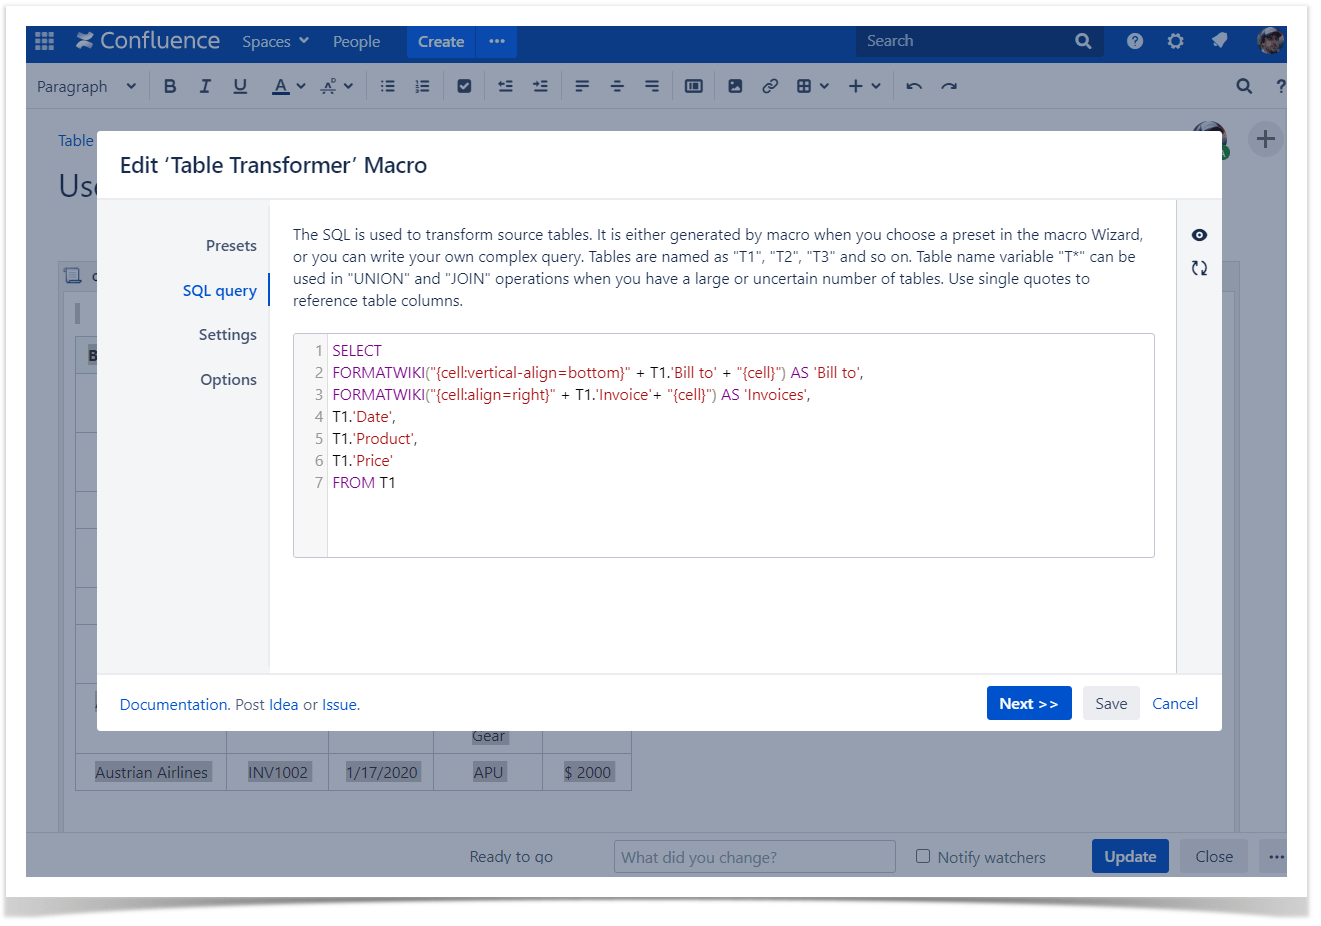
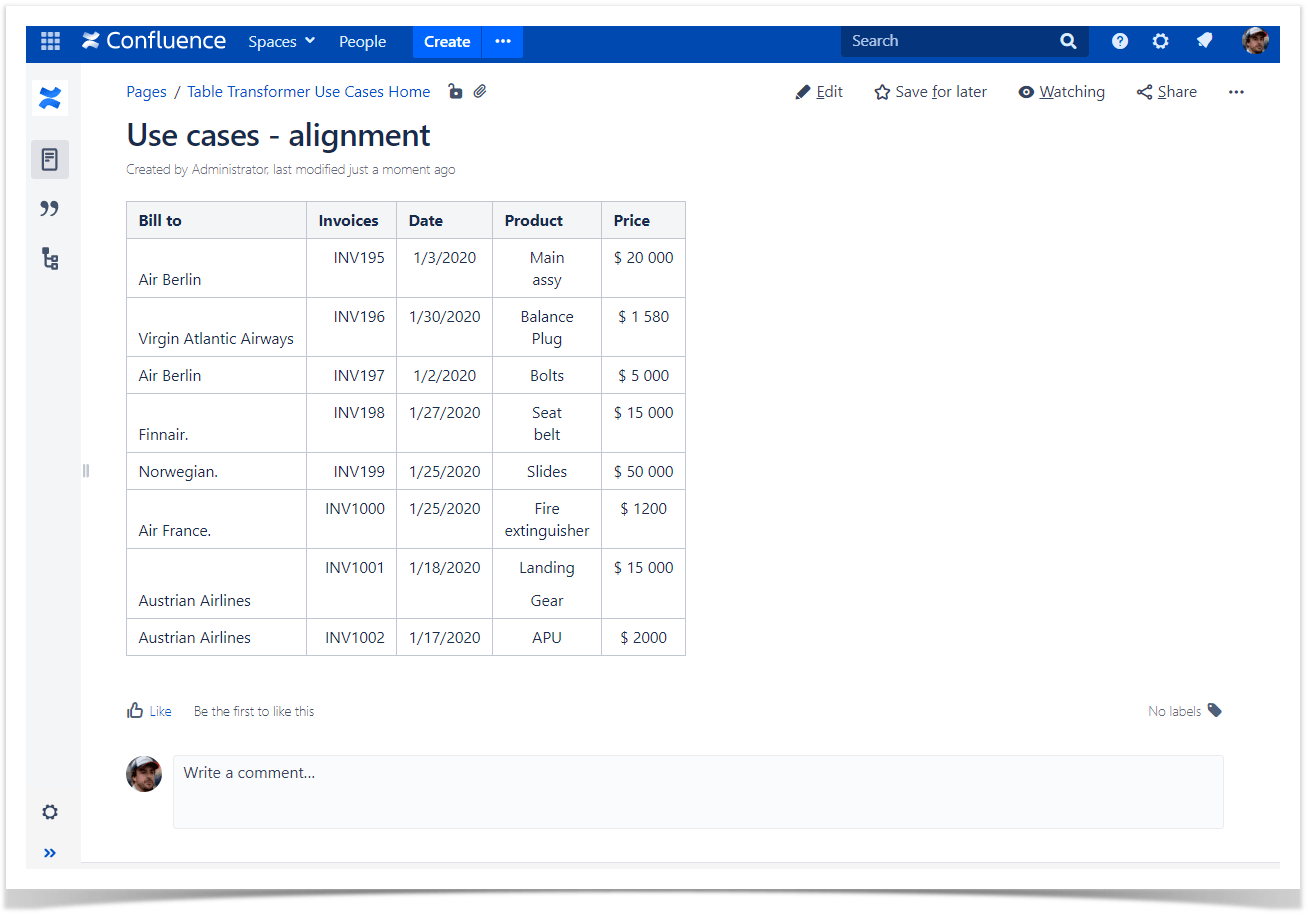
Changing alignment
Use case:
You need to align text in some columns of the table.
Solution:
- Switch the page to the edit mode.
- Insert the Table Transformer macro and paste the table or the macros outputting tables within the macro body.
- Select the macro and click Edit.
- In the Presets tab select Custom transformation and click Next.
-
Enter the following SQL query:
SELECTFORMATWIKI("{cell:vertical-align=bottom}"+ T1.'Bill to'+"{cell}")AS'Bill to',FORMATWIKI("{cell:align=right}"+ T1.'Invoice'+"{cell}")AS'Invoices',T1.'Date',T1.'Product',T1.'Price'FROMT1 -
Click Next.
- Define the table settings and view options if needed.
-
Save the macro and the page.
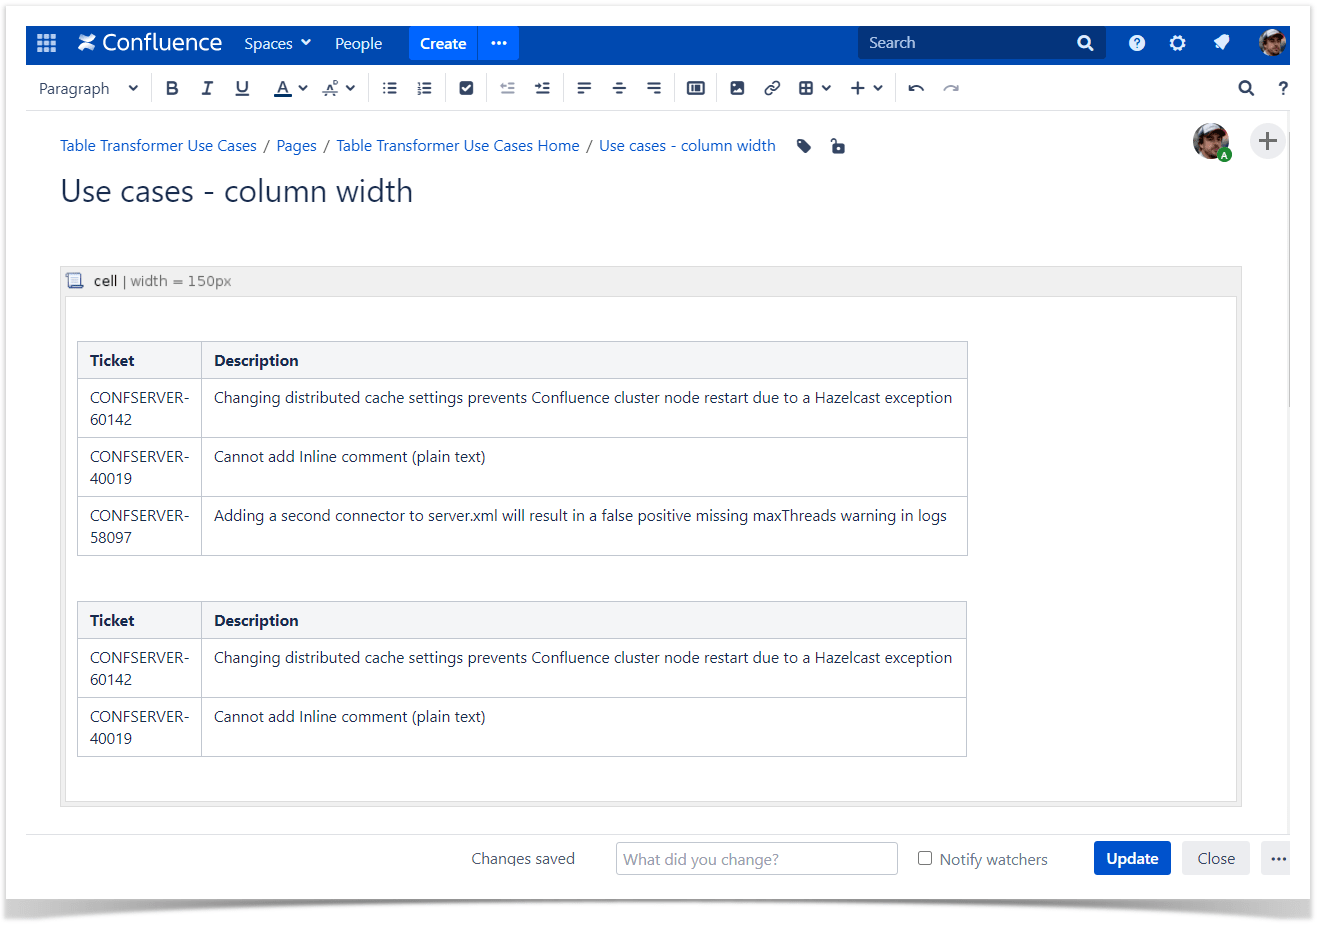
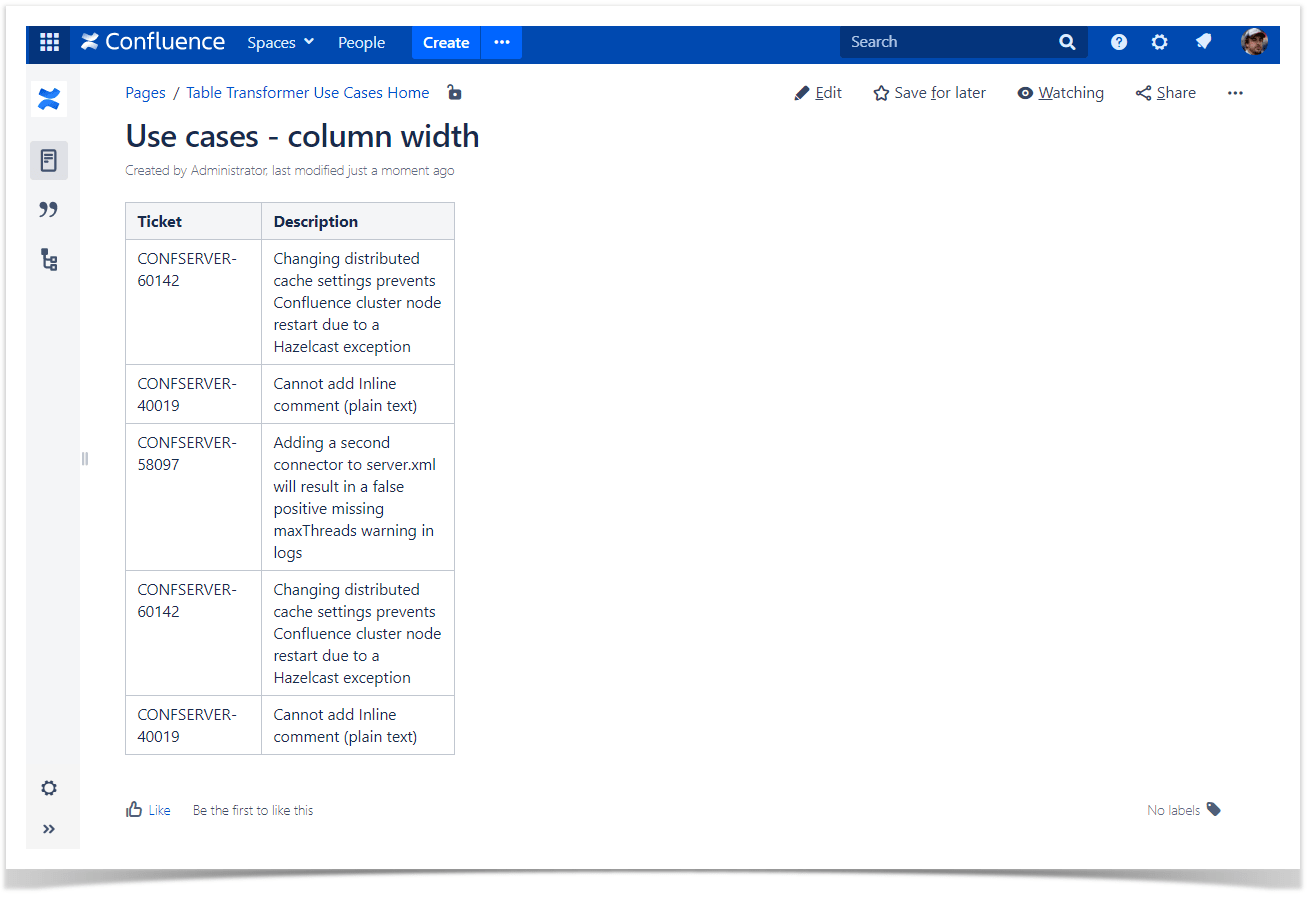
Changing column width
Use case:
You need to change columns width in the merged table.
Solution:
- Switch the page to the edit mode.
- Insert the Table Transformer macro and paste the table or the macros outputting tables within the macro body.
- Select the macro and click Edit.
- In the Presets tab select Custom transformation and click Next.
-
Enter the following SQL query:
SELECT*,FORMATWIKI("{cell:width=100px}"+'Ticket'+"{cell}")AS'Ticket',FORMATWIKI("{cell:width=150px}"+'Description'+"{cell}")AS'Description'FROMT* -
Click Next.
- Define the table settings and view options if needed.
-
Save the macro and the page.

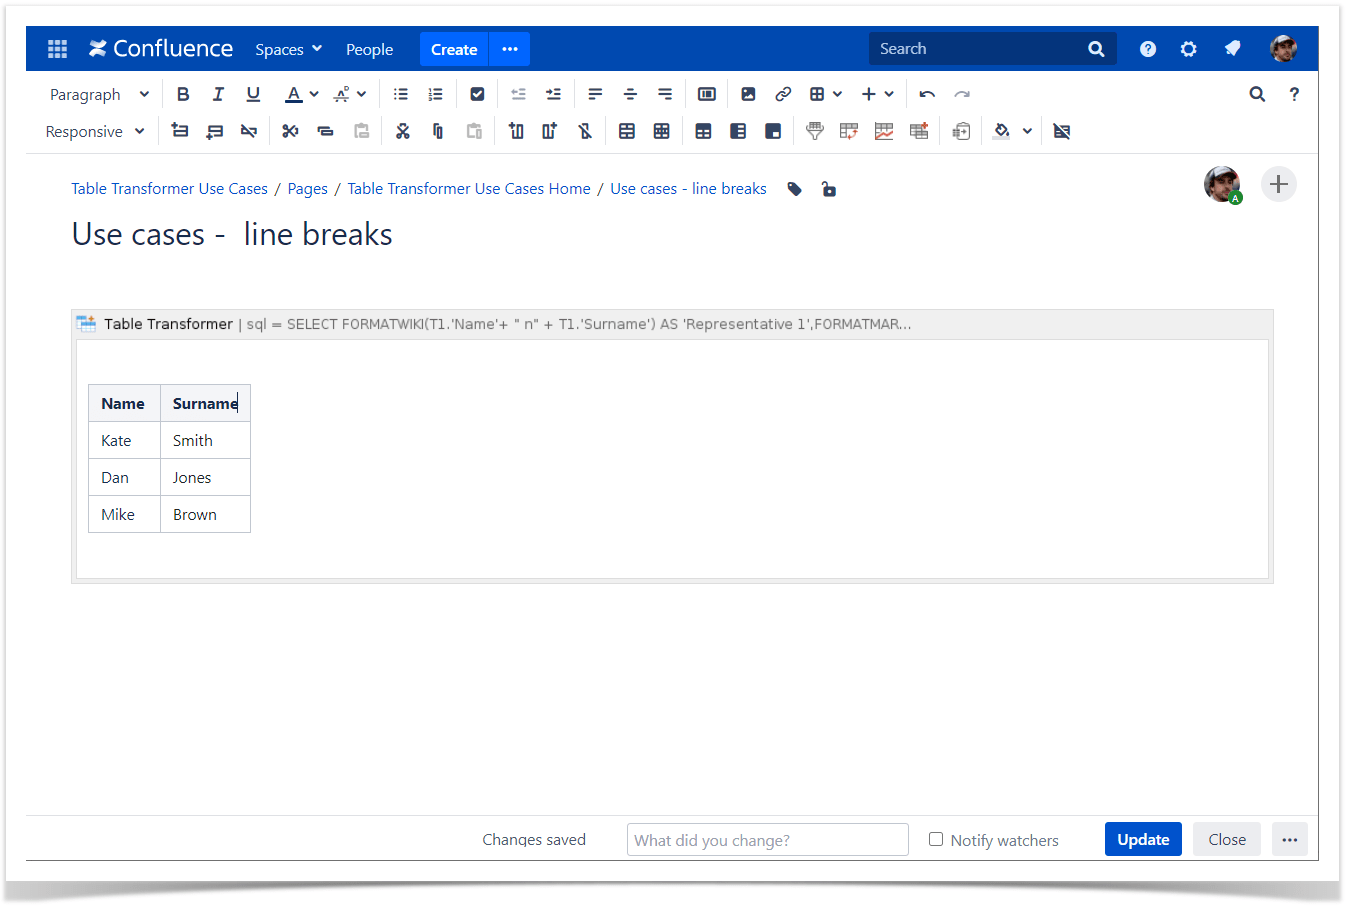
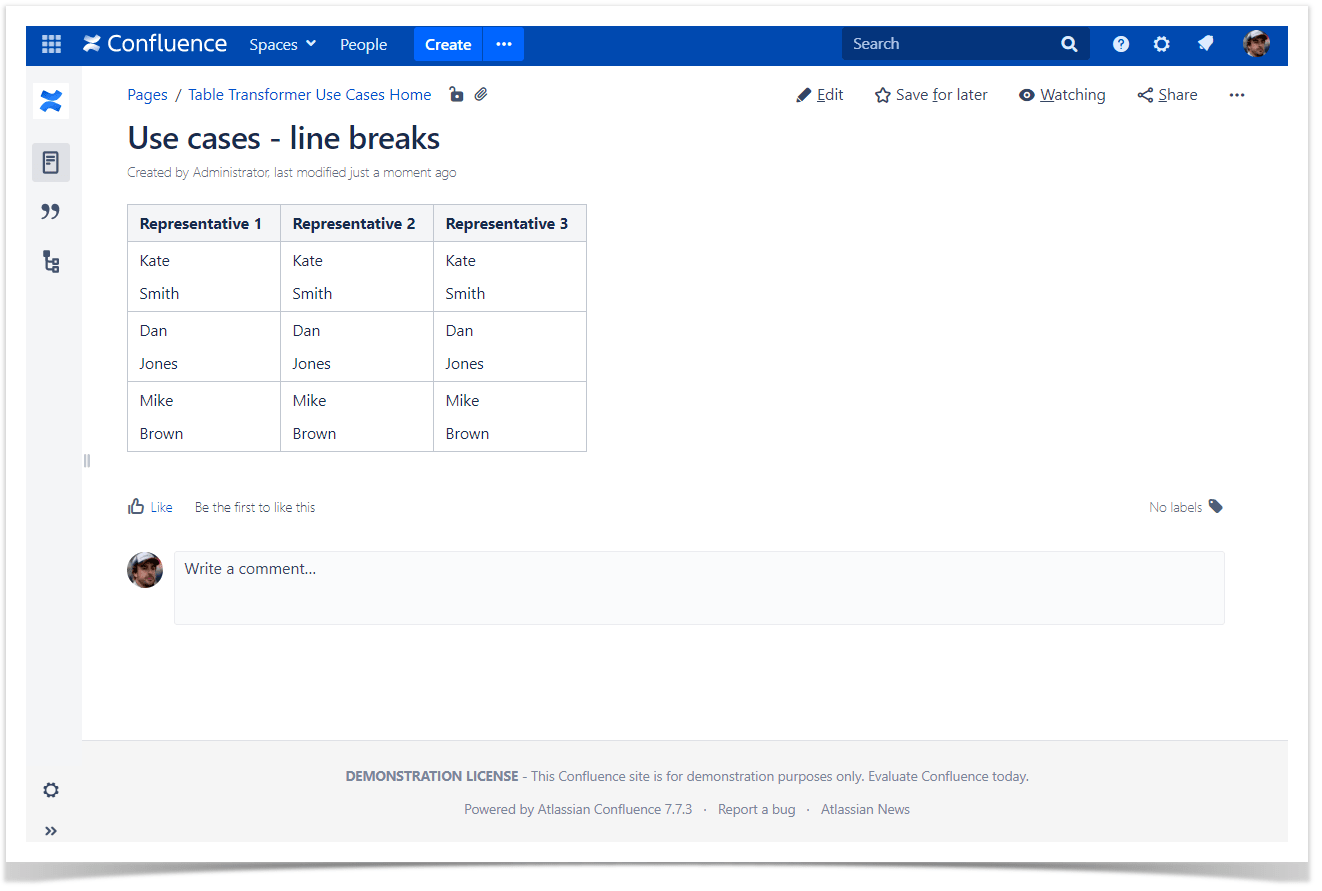
Adding line breaks
Use case:
You need to add a line break.
Solution:
- Switch the page to the edit mode.
- Insert the Table Transformer macro and paste the table or the macros outputting tables within the macro body.
- Select the macro and click Edit.
- In the Presets tab select Custom transformation and click Next.
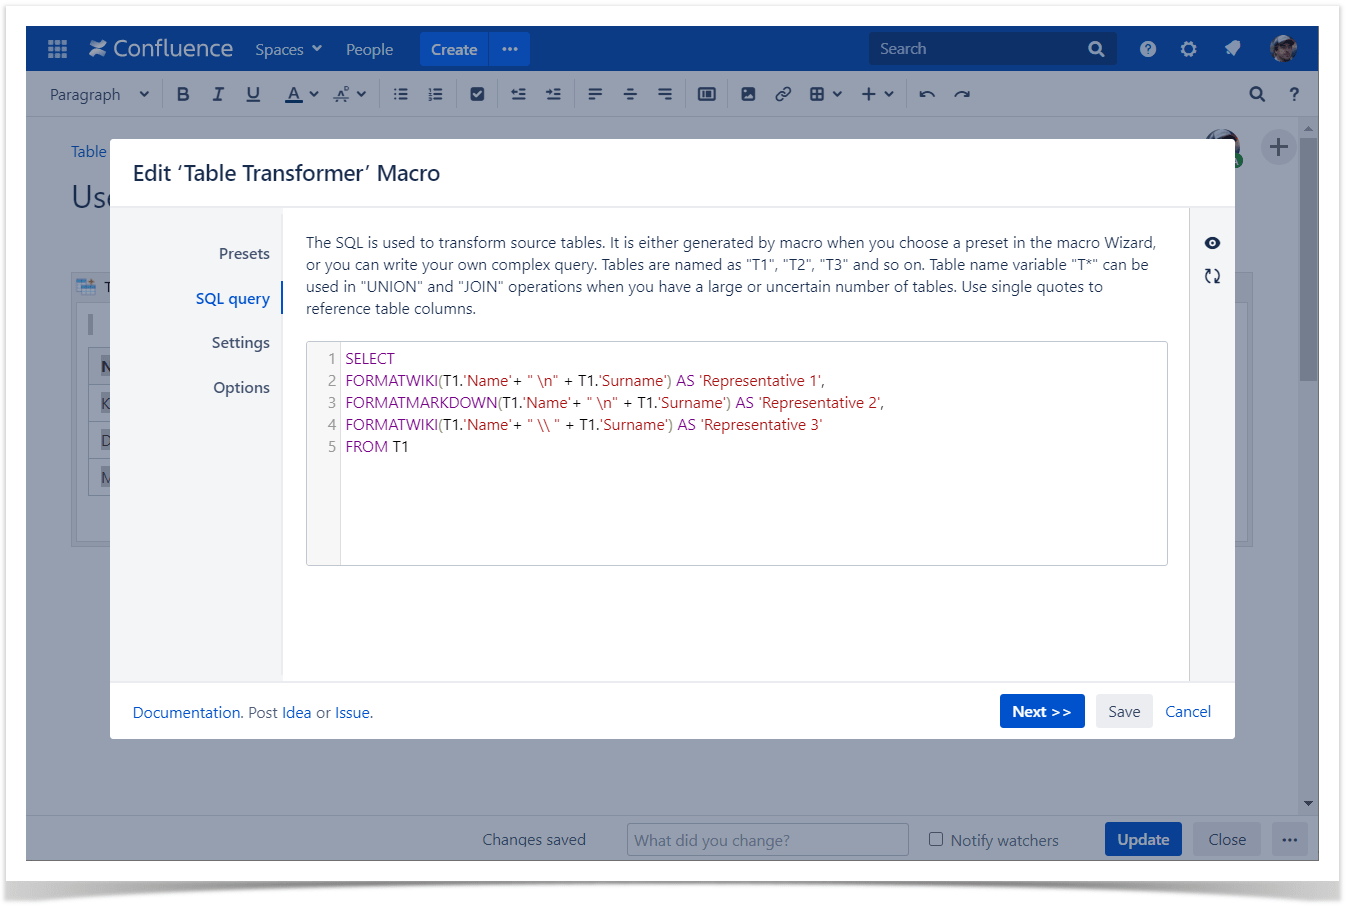
-
Enter the following SQL query:
SELECTFORMATWIKI(T1.'Name'+" \n"+ T1.'Surname')AS'Representative 1',FORMATMARKDOWN(T1.'Name'+" \n"+ T1.'Surname')AS'Representative 2',FORMATWIKI(T1.'Name'+" \\ "+ T1.'Surname')AS'Representative 3'FROMT1Three alternative ways of adding line breaks are shown in the SQL query.
-
Click Next.
- Define the table settings and view options if needed.
-
Save the macro and the page.
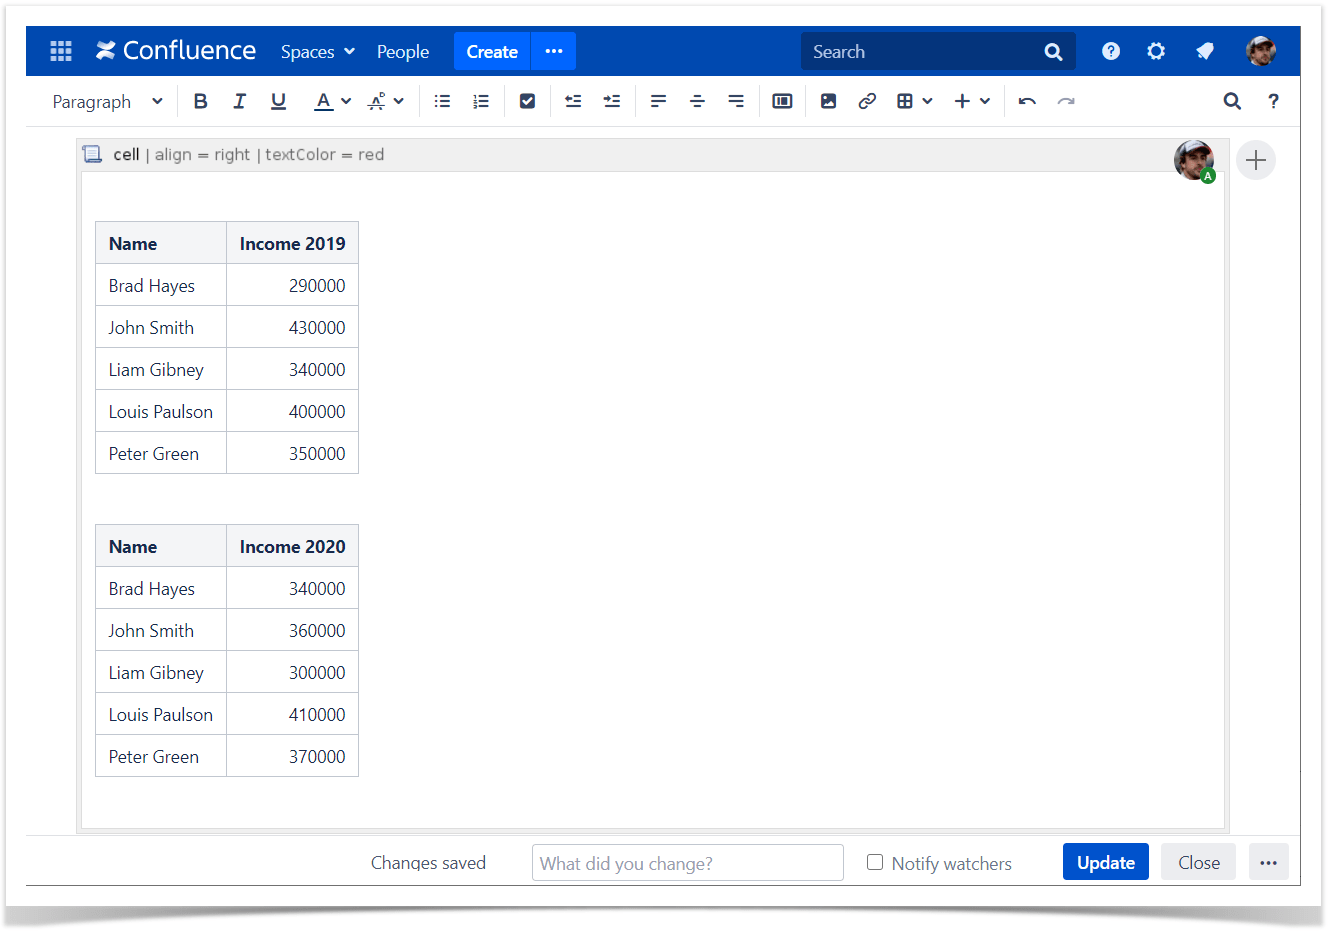
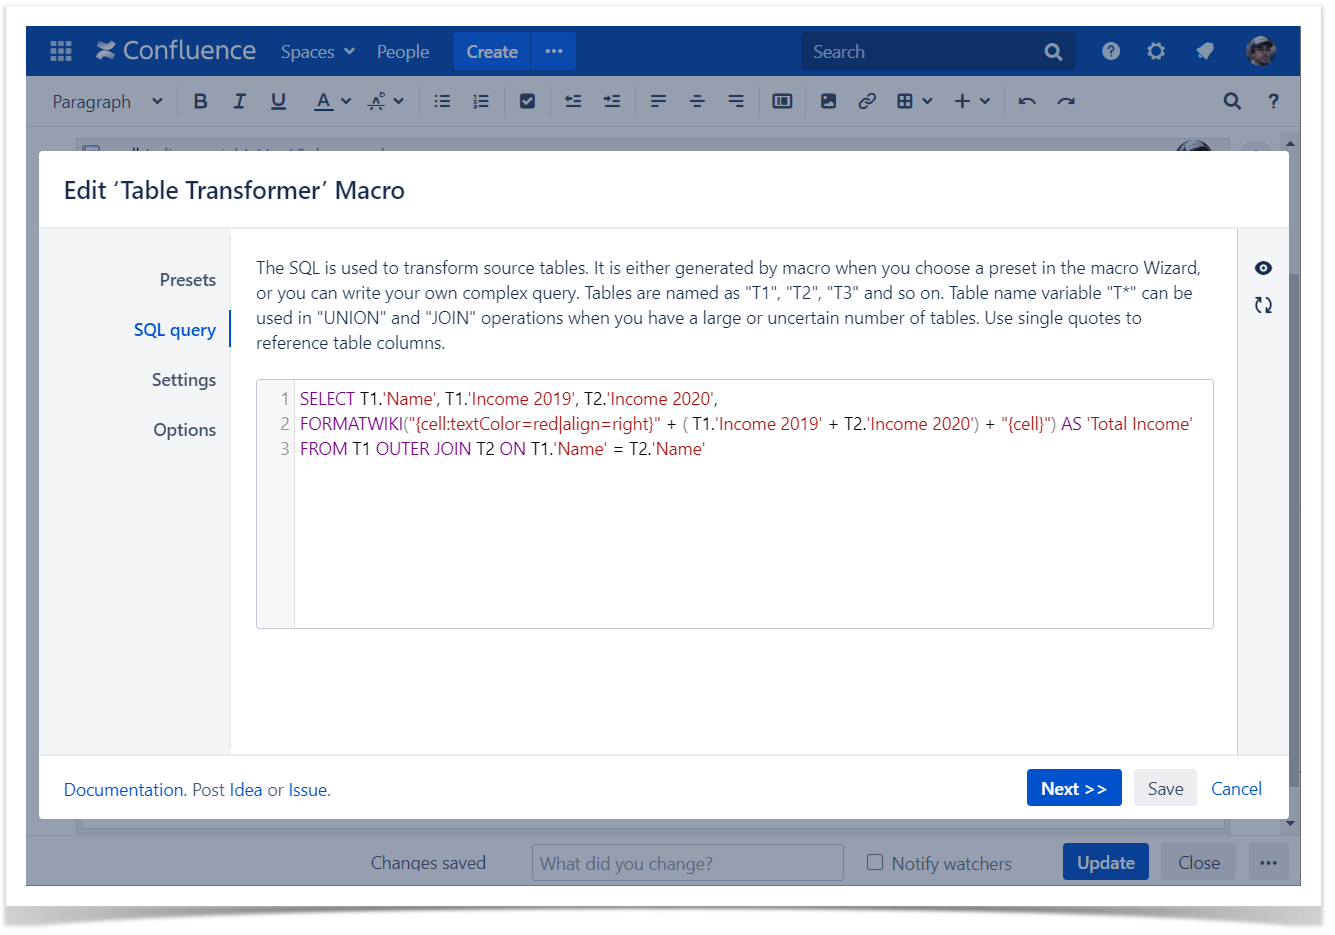
Adding text color
Use case:
You need to merge tables, create a new column with the sum of two others, and then highlight and align text.
Solution:
- Switch the page to the edit mode.
- Insert the Table Transformer macro and paste the table or the macros outputting tables within the macro body.
- Select the macro and click Edit.
- In the Presets tab select Custom transformation and click Next.
-
Enter the following SQL query:
SELECTT1.'Name', T1.'Income 2019', T2.'Income 2020',FORMATWIKI("{cell:textColor=red|align=right}"+ ( T1.'Income 2019'+ T2.'Income 2020') +"{cell}")AS'Total Income'FROMT1OUTERJOINT2ONT1.'Name'= T2.'Name' - Click Next.
- Define the table settings and view options if needed.
-
Save the macro and the page.

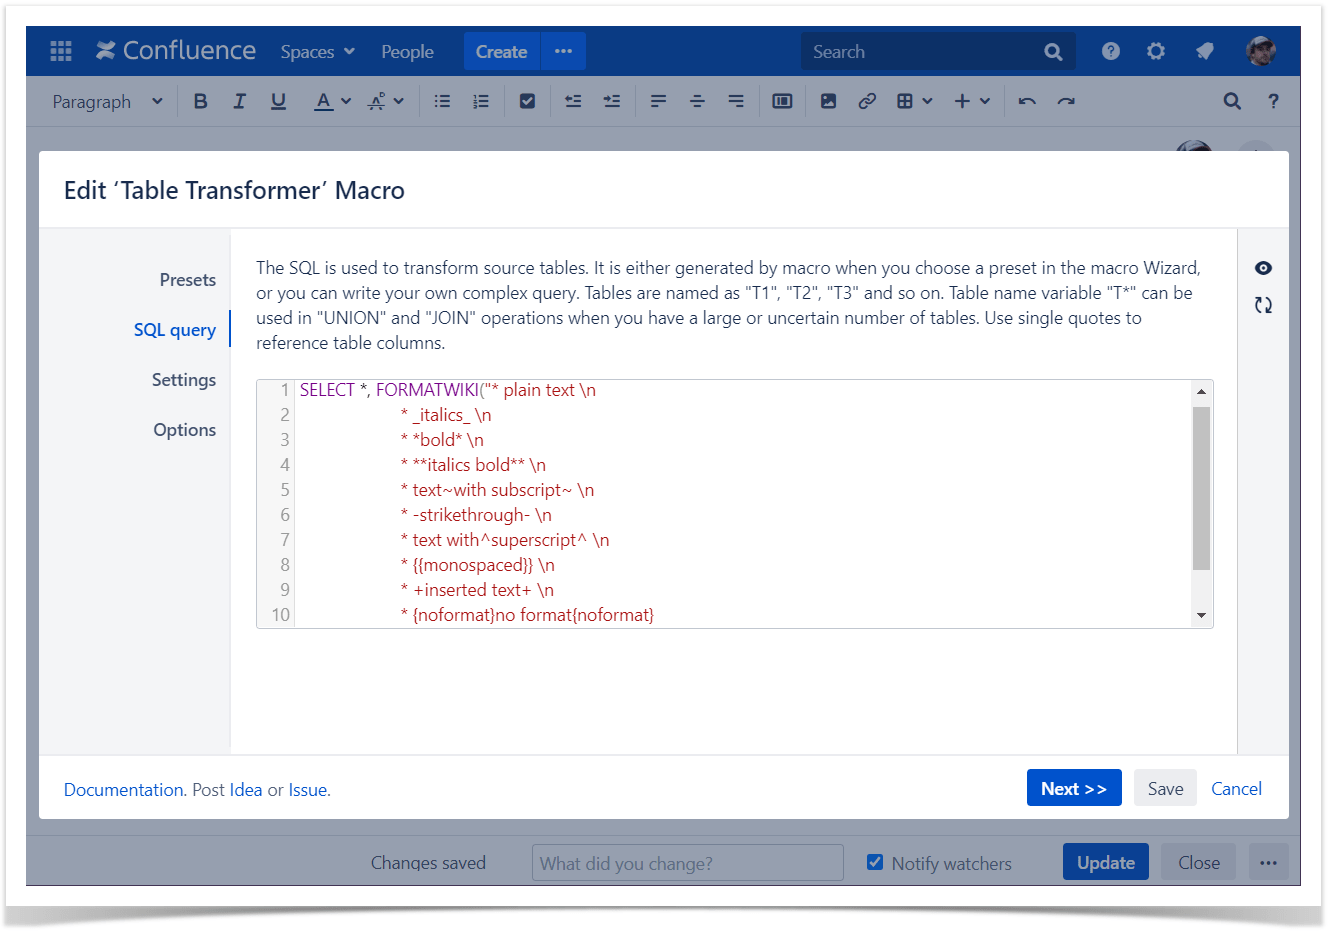
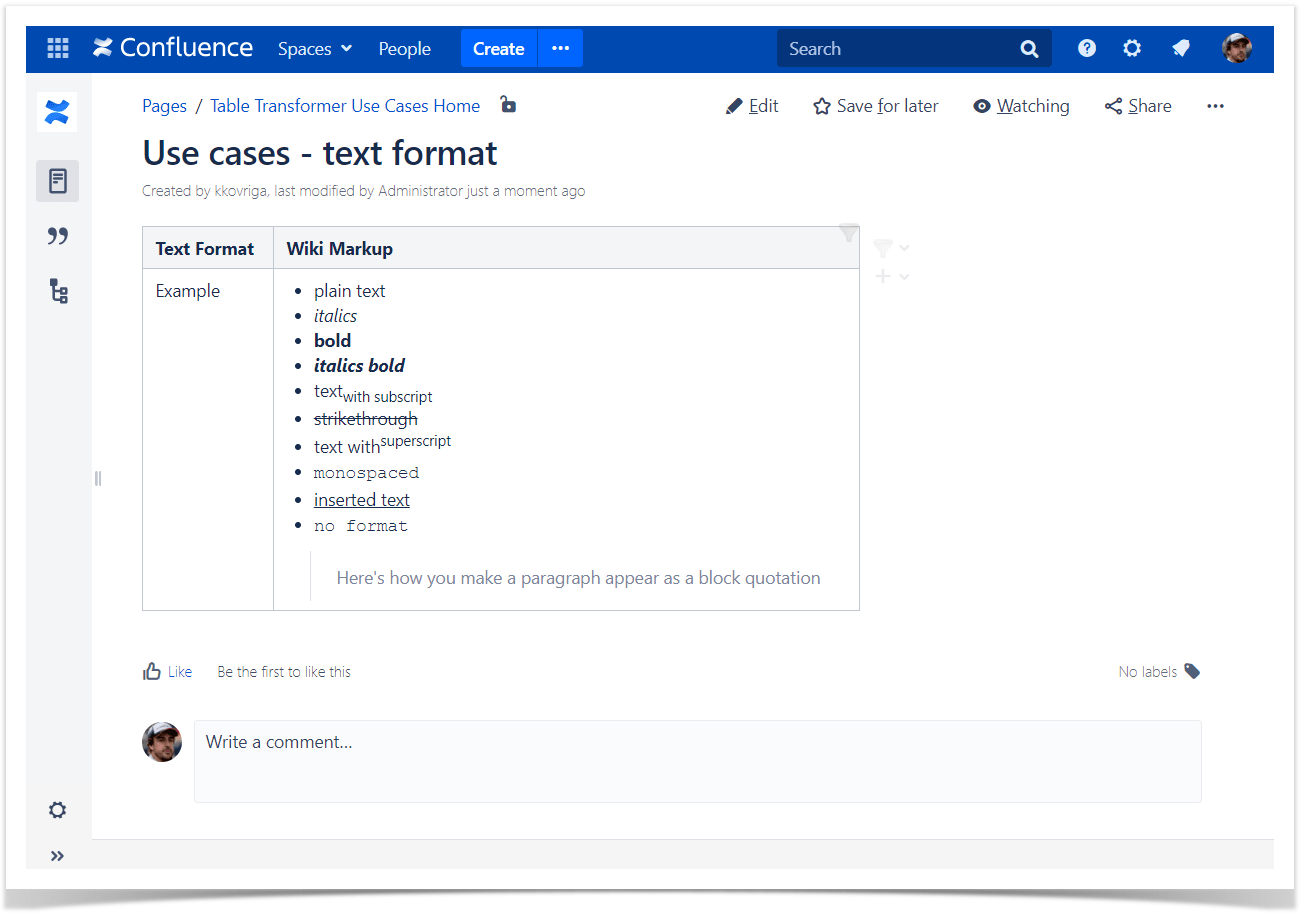
Text formatting
Use case:
You need to format some text.
Solution:
- Switch the page to the edit mode.
- Insert the Table Transformer macro and paste the table or the macros outputting tables within the macro body.
- Select the macro and click Edit.
- In the Presets tab select Custom transformation and click Next.
-
Enter the following SQL query:
SELECT*,FORMATWIKI("* plain text \n* _italics_ \n* *bold* \n* **italics bold** \n* text~with subscript~ \n* -strikethrough- \n* text with^superscript^ \n* {{monospaced}} \n* +inserted text+ \n* {noformat}no format{noformat}\nbq. Here's how you make a paragraph appear as a block quotation")AS'Wiki Markup'FROMT* - Click Next.
- Define the table settings and view options if needed.
-
Save the macro and the page.
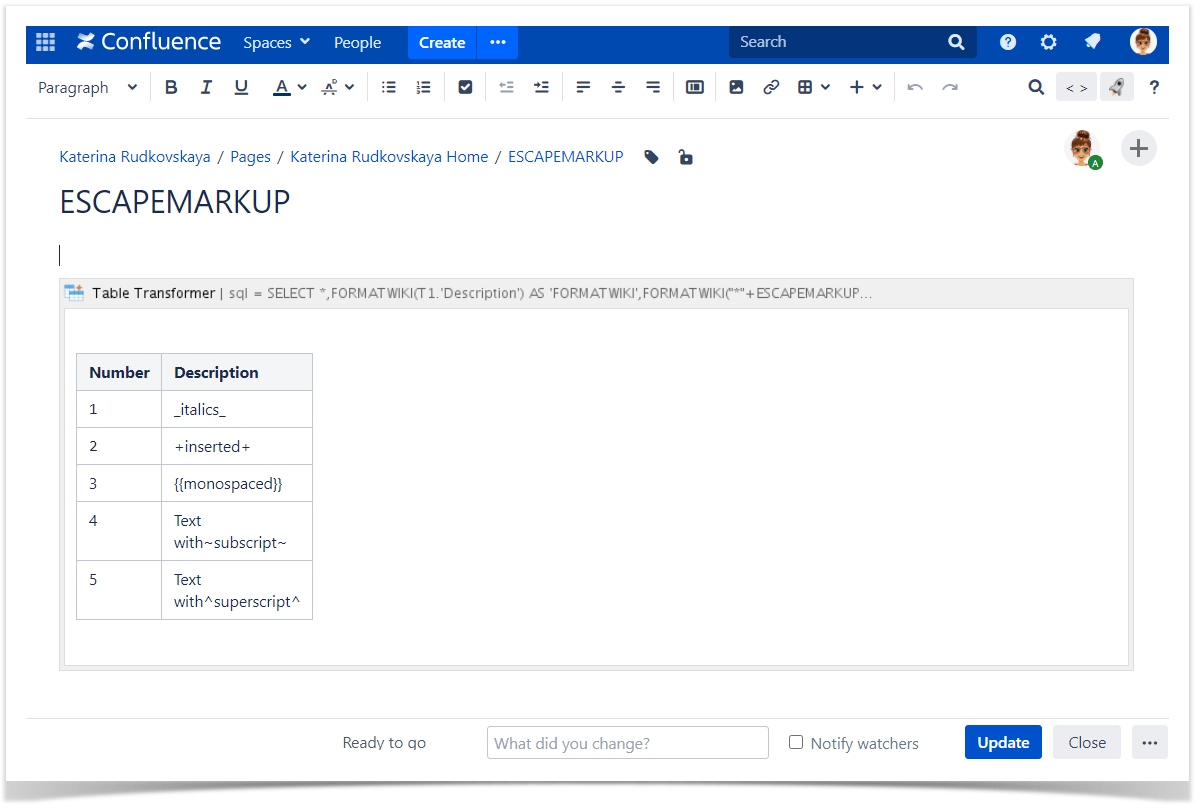
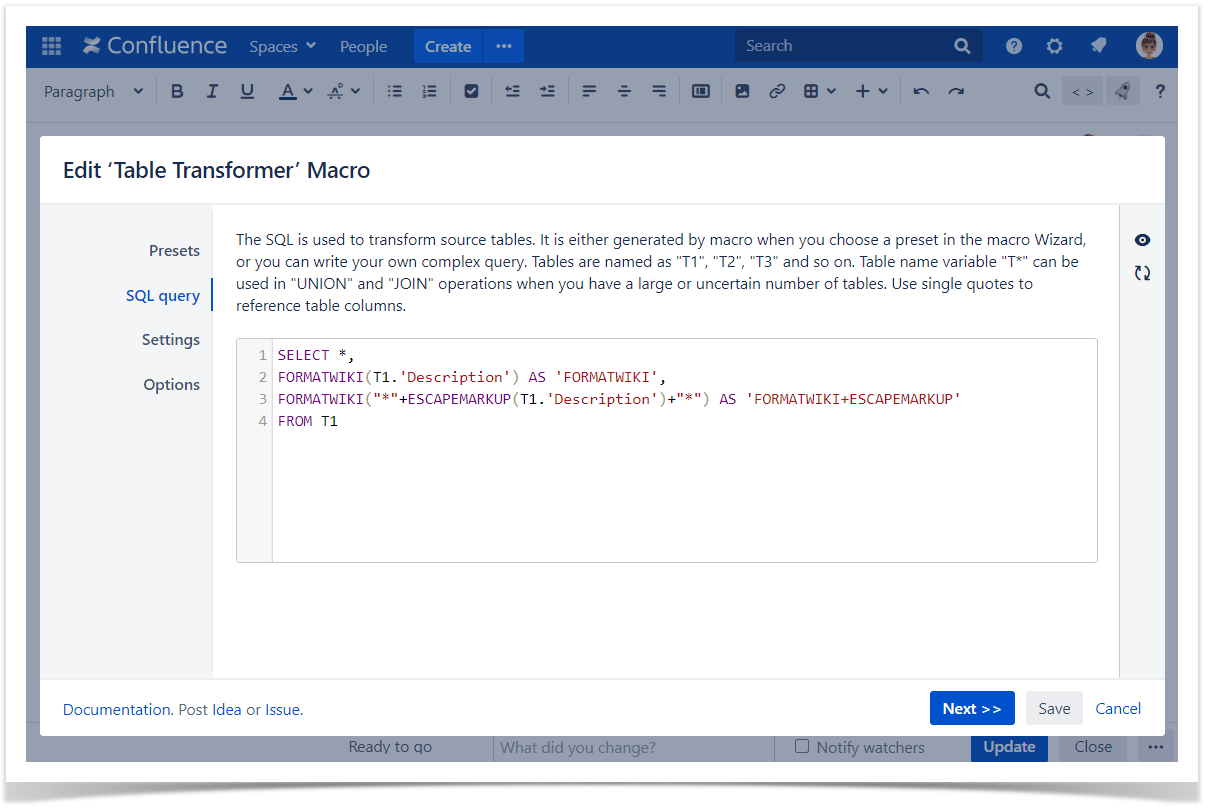
Escaping special characters for wiki markup
Use case:
You need to escape special characters for wiki markup.
Solution:
- Switch the page to the edit mode.
- Insert the Table Transformer macro and paste the table or the macros outputting tables within the macro body.
- Select the macro and click Edit.
- In the Presets tab select Custom transformation and click Next.
-
Enter the following SQL query:
SELECT*,FORMATWIKI(T1.'Description')AS'FORMATWIKI',FORMATWIKI("*"+ESCAPEMARKUP(T1.'Description')+"*")AS'FORMATWIKI+ESCAPEMARKUP'FROMT1 - Click Next.
- Define the table settings and view options if needed.
-
Save the macro and the page.

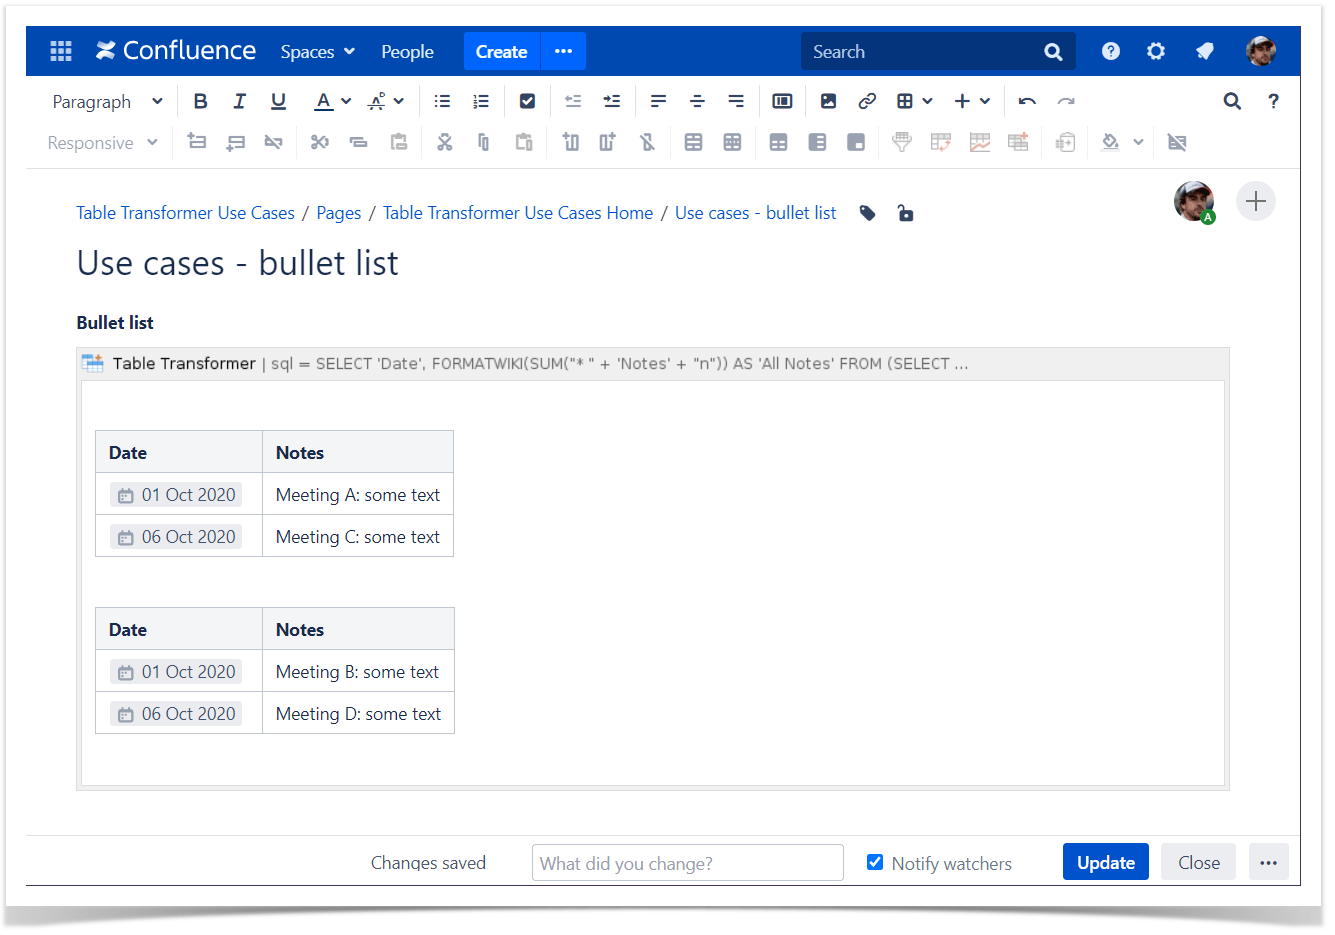
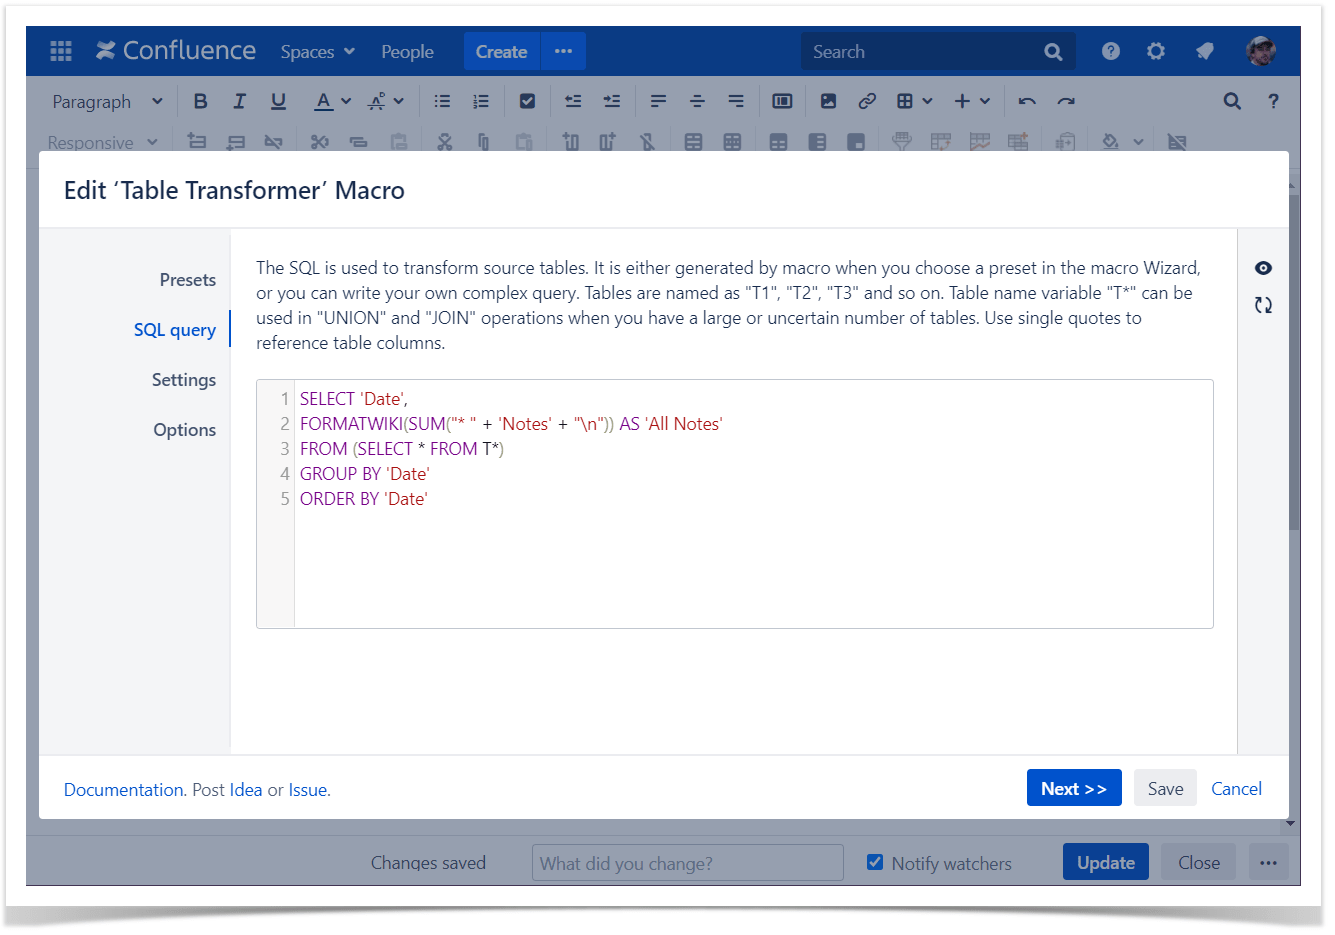
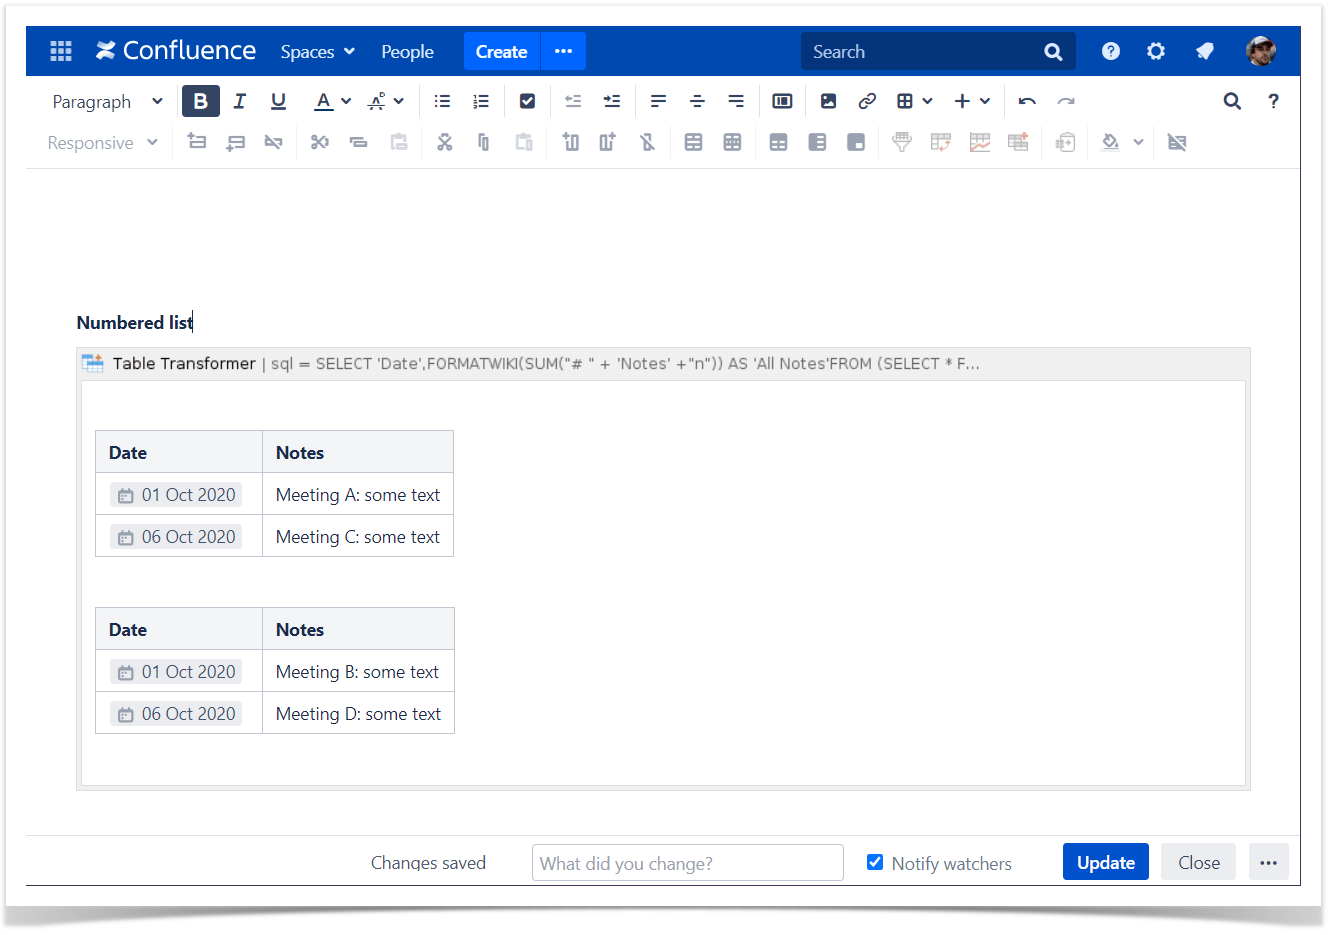
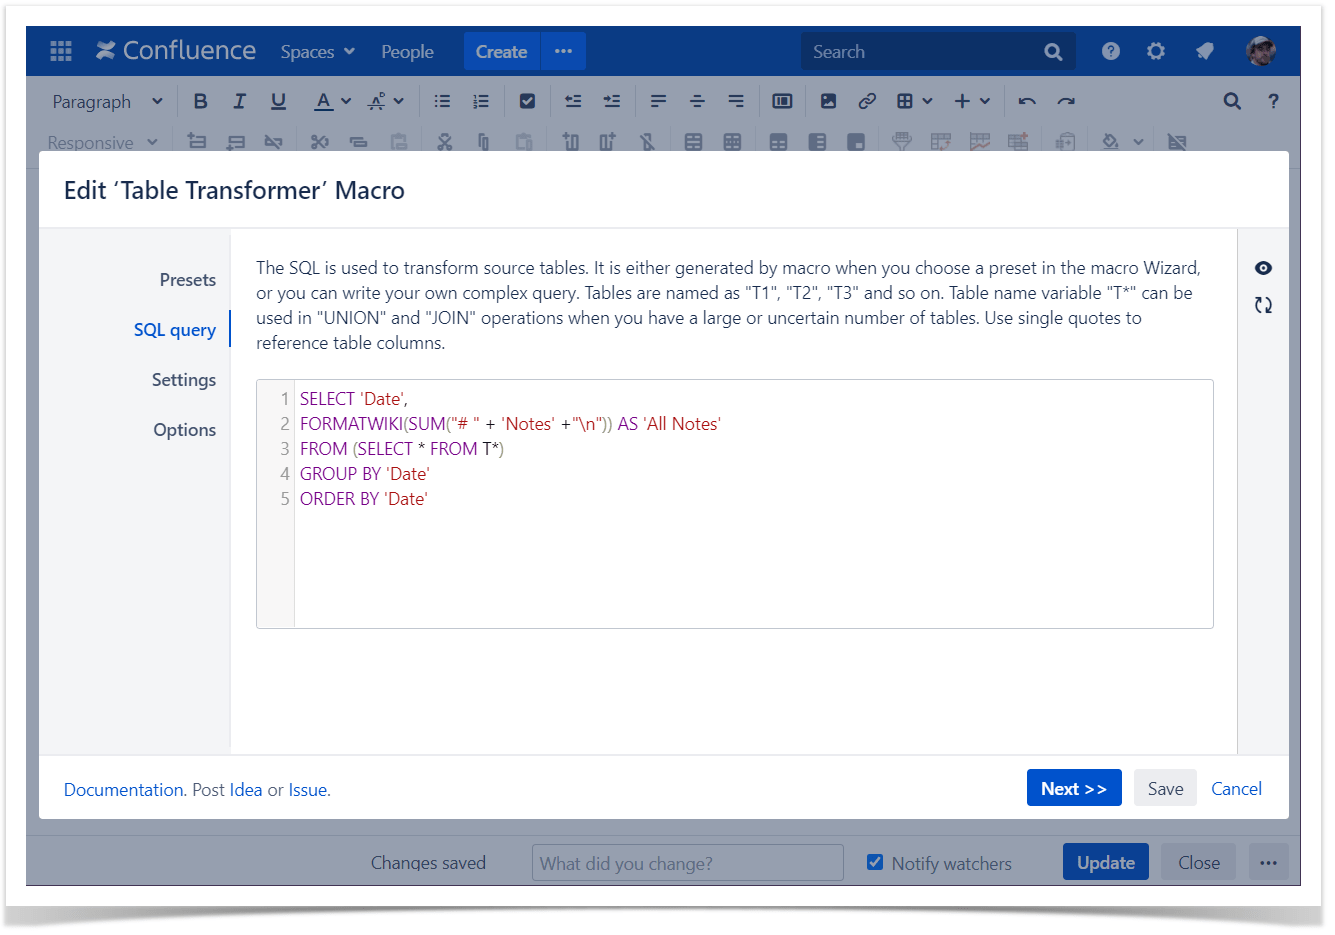
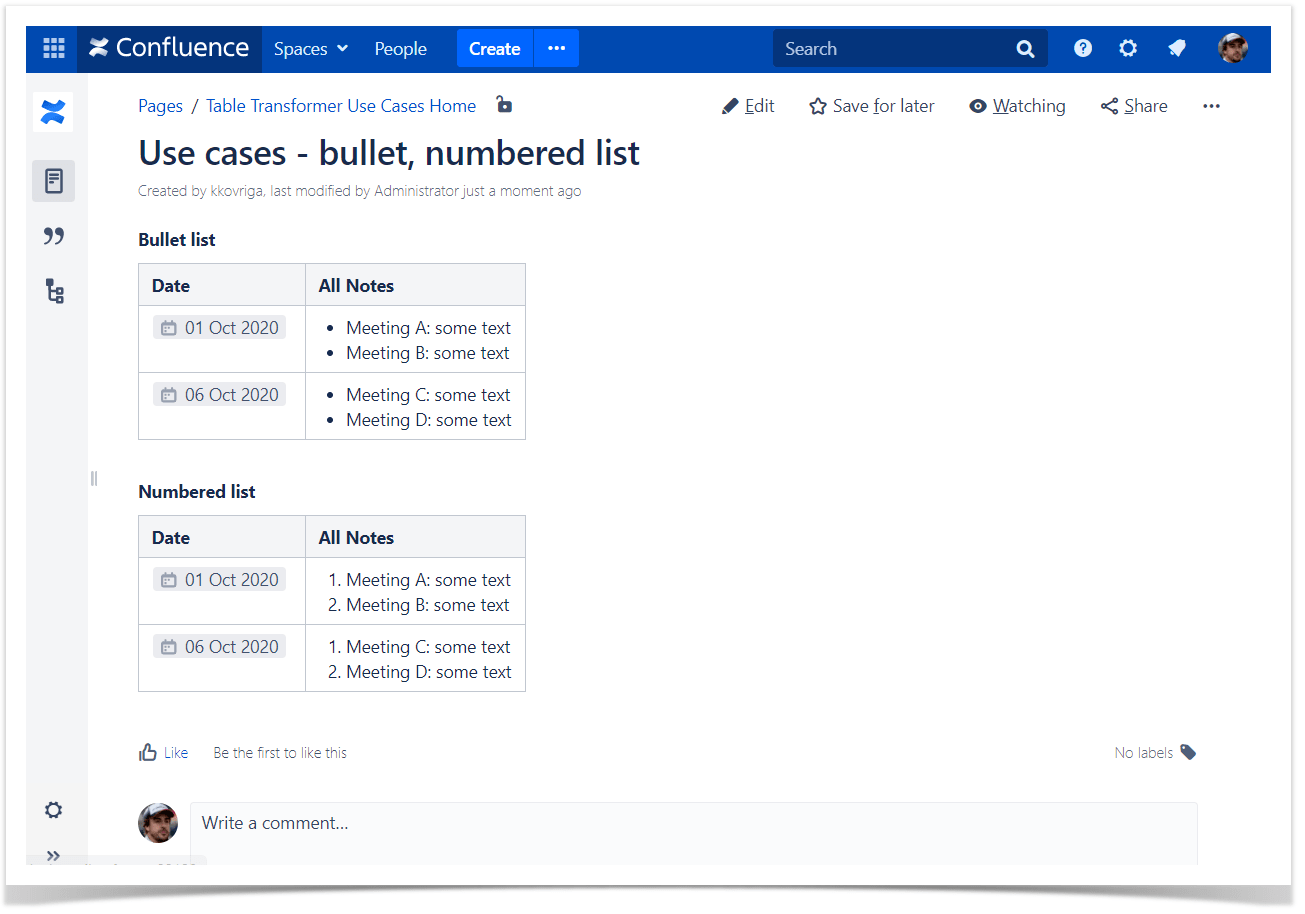
Adding bullet, numbered list
Use case:
You need to merge tables and apply bullet or numberd list to merged data.
Solution:
- Switch the page to the edit mode.
- Insert the Table Transformer macro and paste the table or the macros outputting tables within the macro body.
- Select the macro and click Edit.
- In the Presets tab select Custom transformation and click Next.
-
Enter the following SQL query:
SELECT'Date',FORMATWIKI(SUM("* "+'Notes'+"\n"))AS'All Notes'FROM(SELECT*FROMT*)GROUPBY'Date'ORDERBY'Date'or
SELECT'Date',FORMATWIKI(SUM("# "+'Notes'+"\n"))AS'All Notes'FROM(SELECT*FROMT*)GROUPBY'Date'ORDERBY'Date' - Click Next.
- Define the table settings and view options if needed.
-
Save the macro and the page.
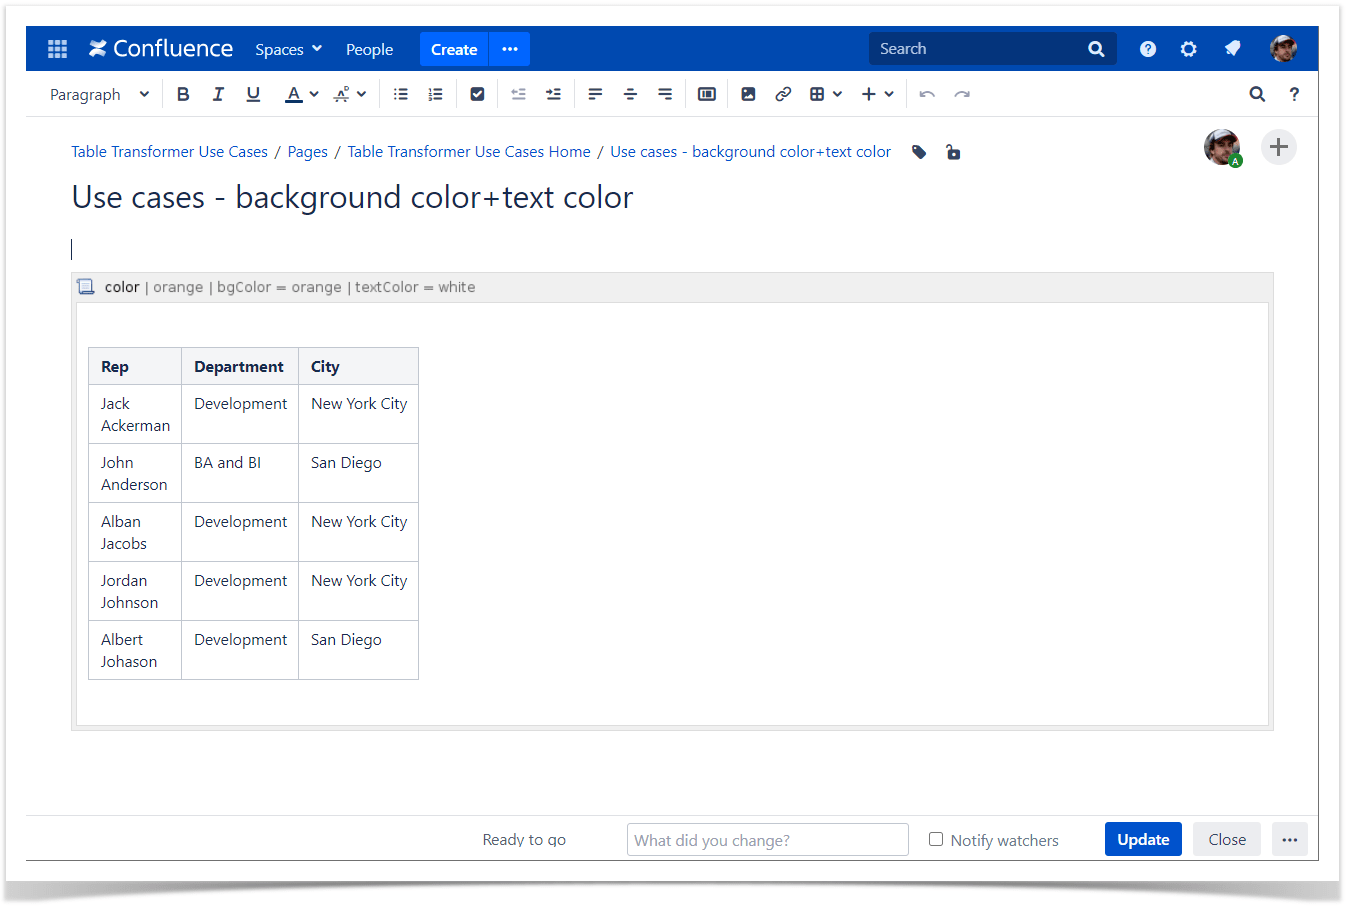
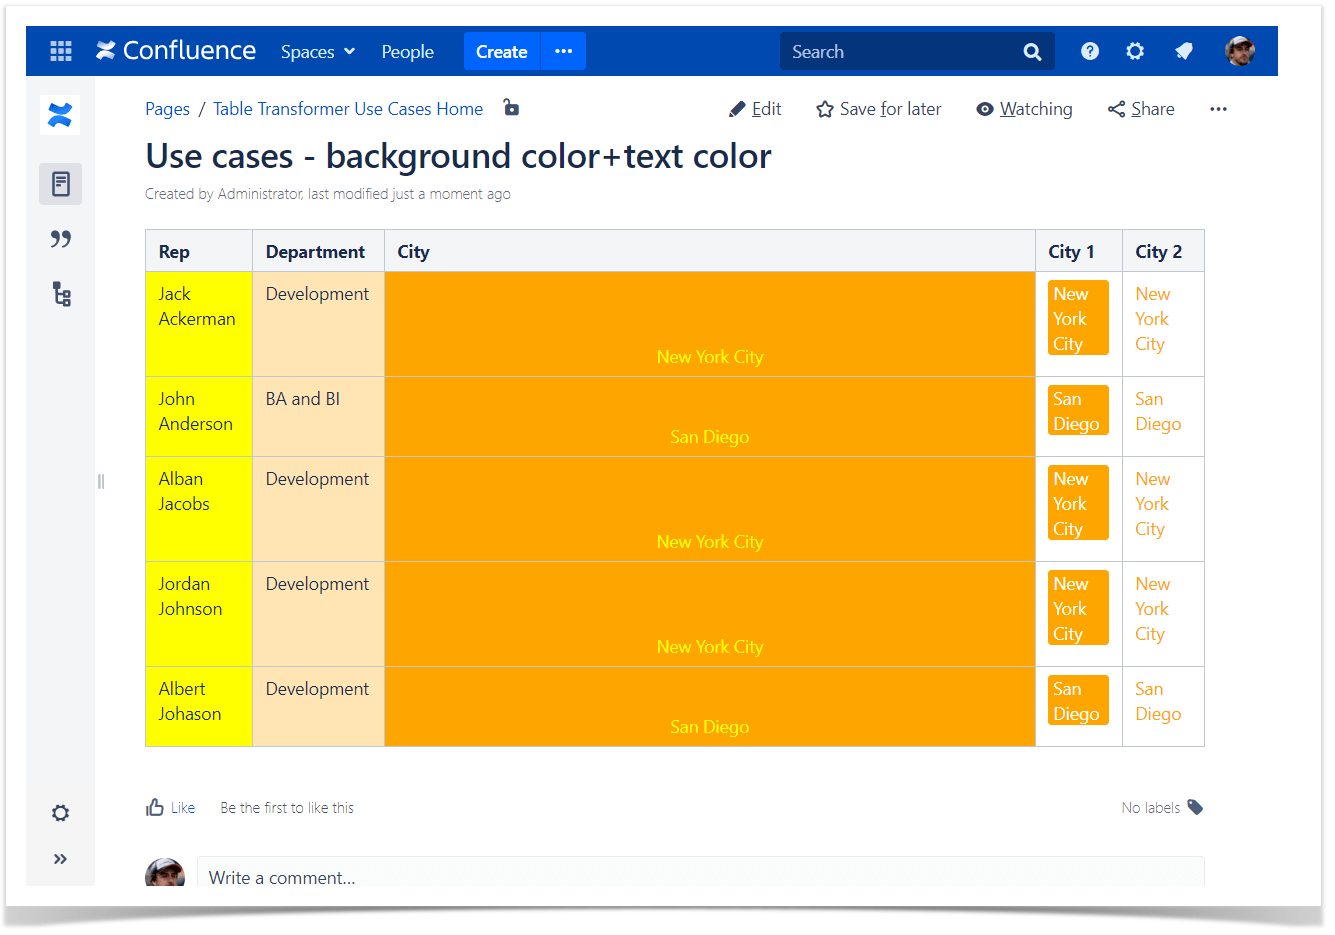
Adding background, text color
Use case:
You need to add background and text color.
Solution:
- Switch the page to the edit mode.
- Insert the Table Transformer macro and paste the table or the macros outputting tables within the macro body.
- Select the macro and click Edit.
- In the Presets tab select Custom transformation and click Next.
-
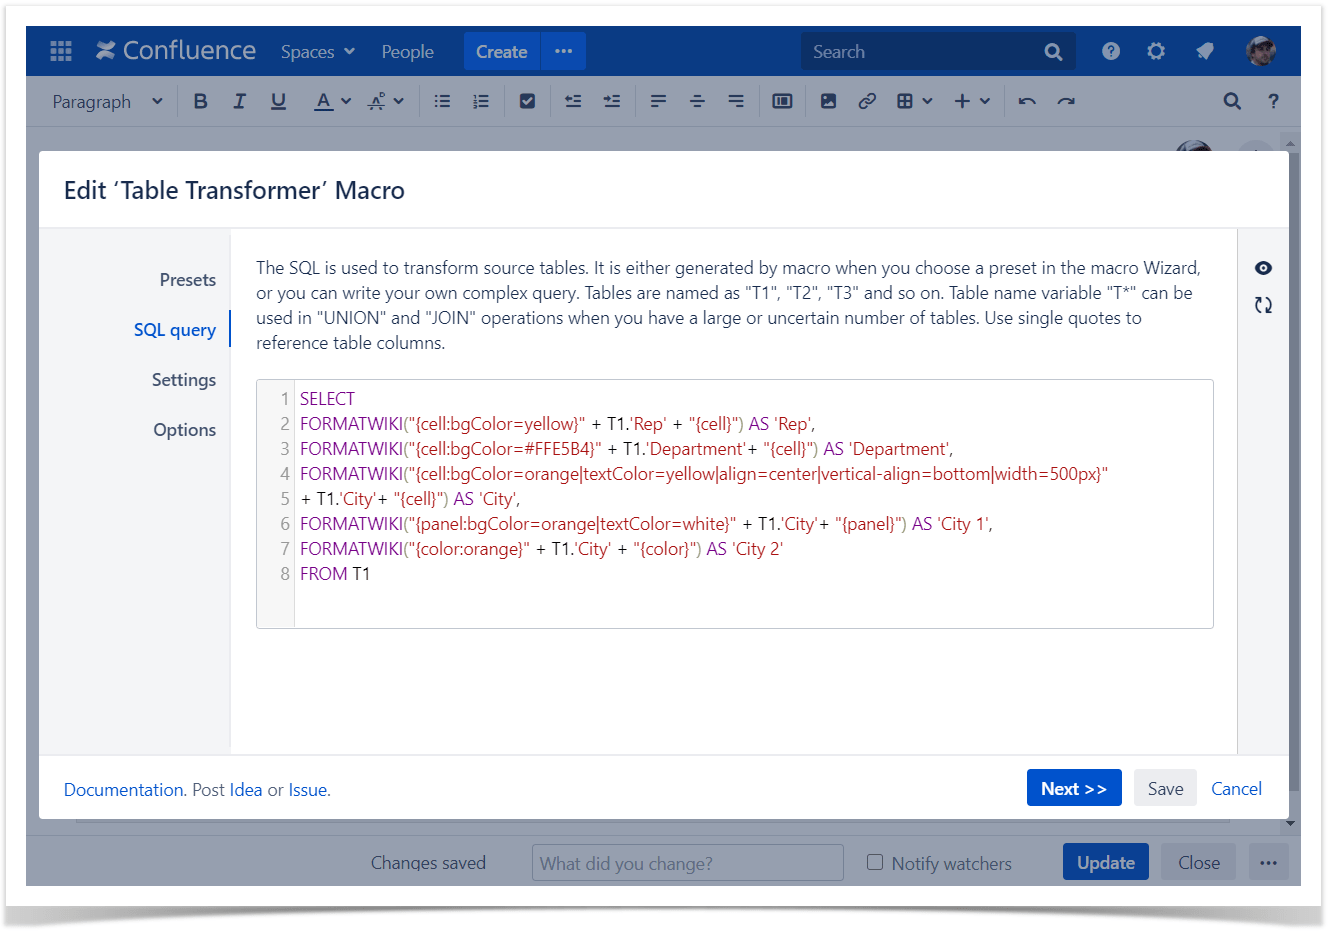
Enter the following SQL query:
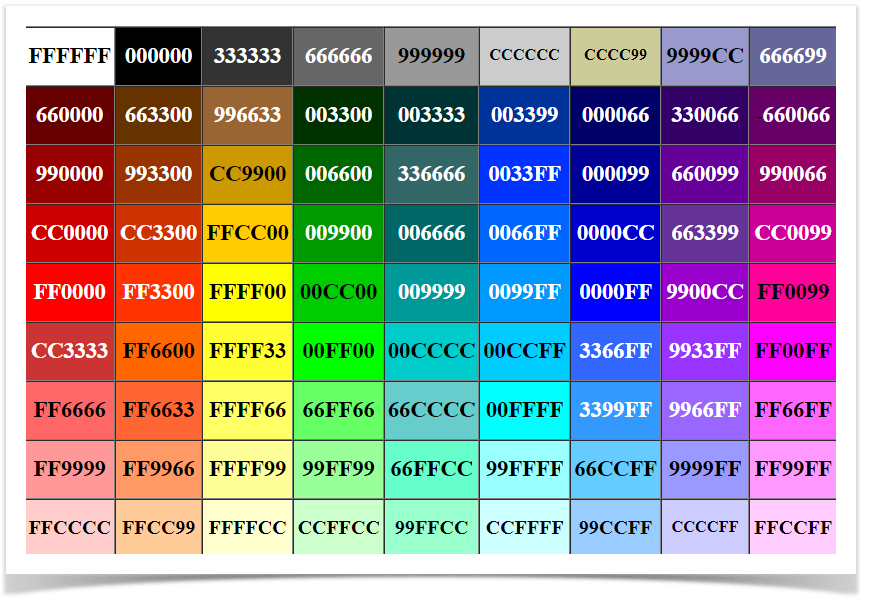
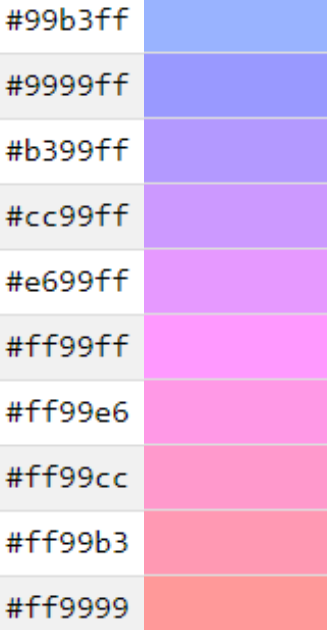
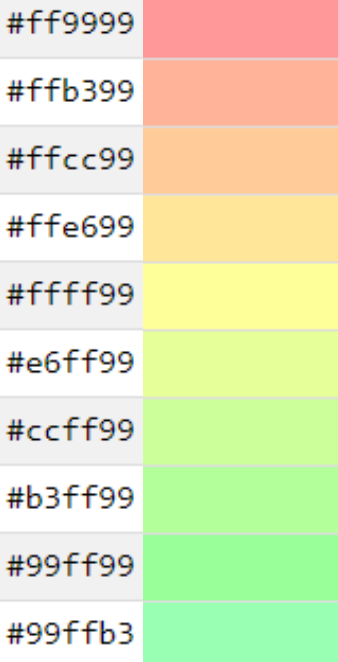
SELECTFORMATWIKI("{cell:bgColor=yellow}"+ T1.'Rep'+"{cell}")AS'Rep',FORMATWIKI("{cell:bgColor=#FFE5B4}"+ T1.'Department'+"{cell}")AS'Department',FORMATWIKI("{cell:bgColor=orange|textColor=yellow|align=center|vertical-align=bottom|width=500px}"+ T1.'City'+"{cell}")AS'City',FORMATWIKI("{panel:bgColor=orange|textColor=white}"+ T1.'City'+"{panel}")AS'City 1',FORMATWIKI("{color:orange}"+ T1.'City'+"{color}")AS'City 2'FROMT1You can write both a color name from this list and your own HEX code in the SQL query.
Keep the following order of attribues: bgColor, textColor, align, width.
- Click Next.
- Define the table settings and view options if needed.
-
Save the macro and the page.
Hex codes:
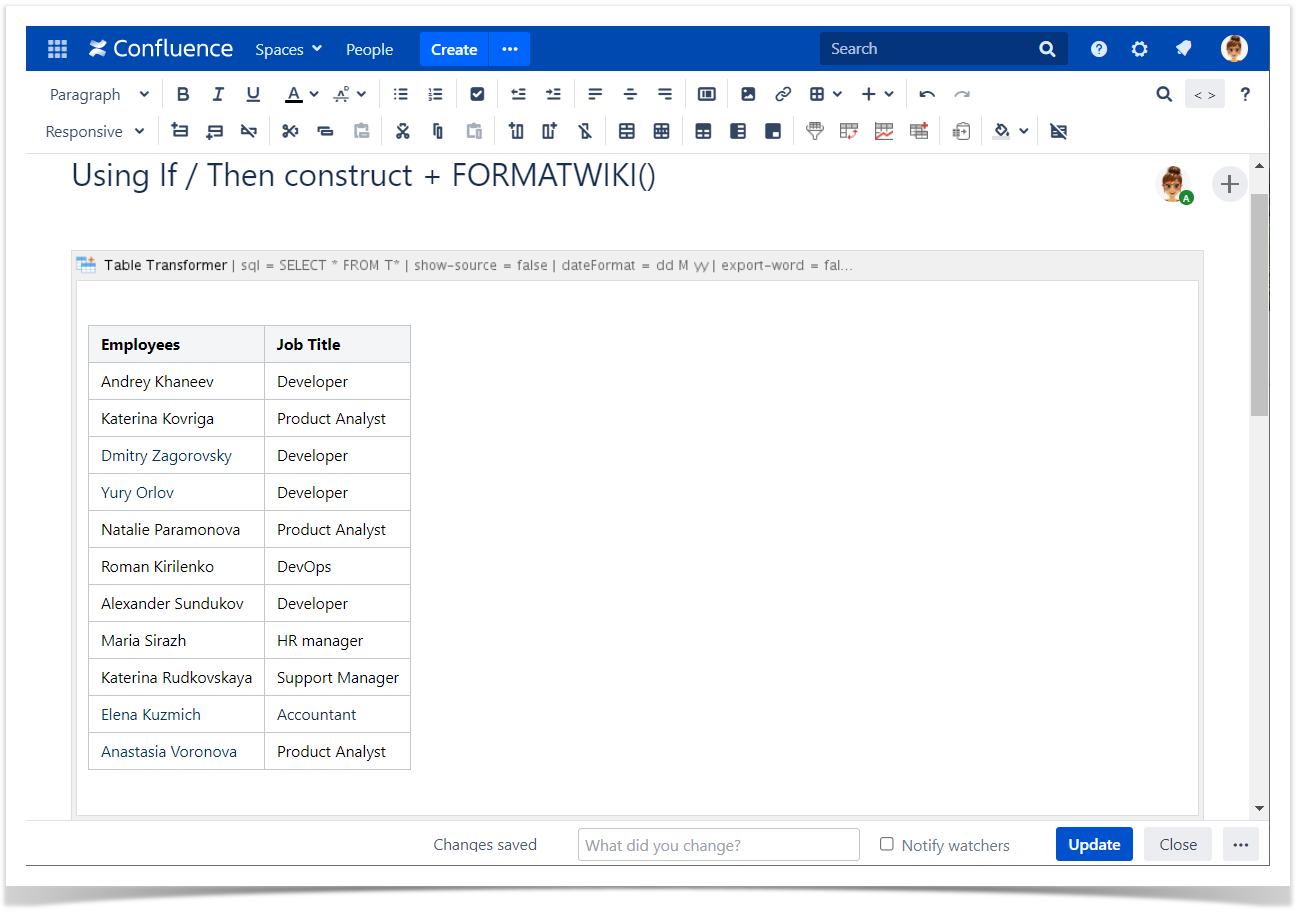
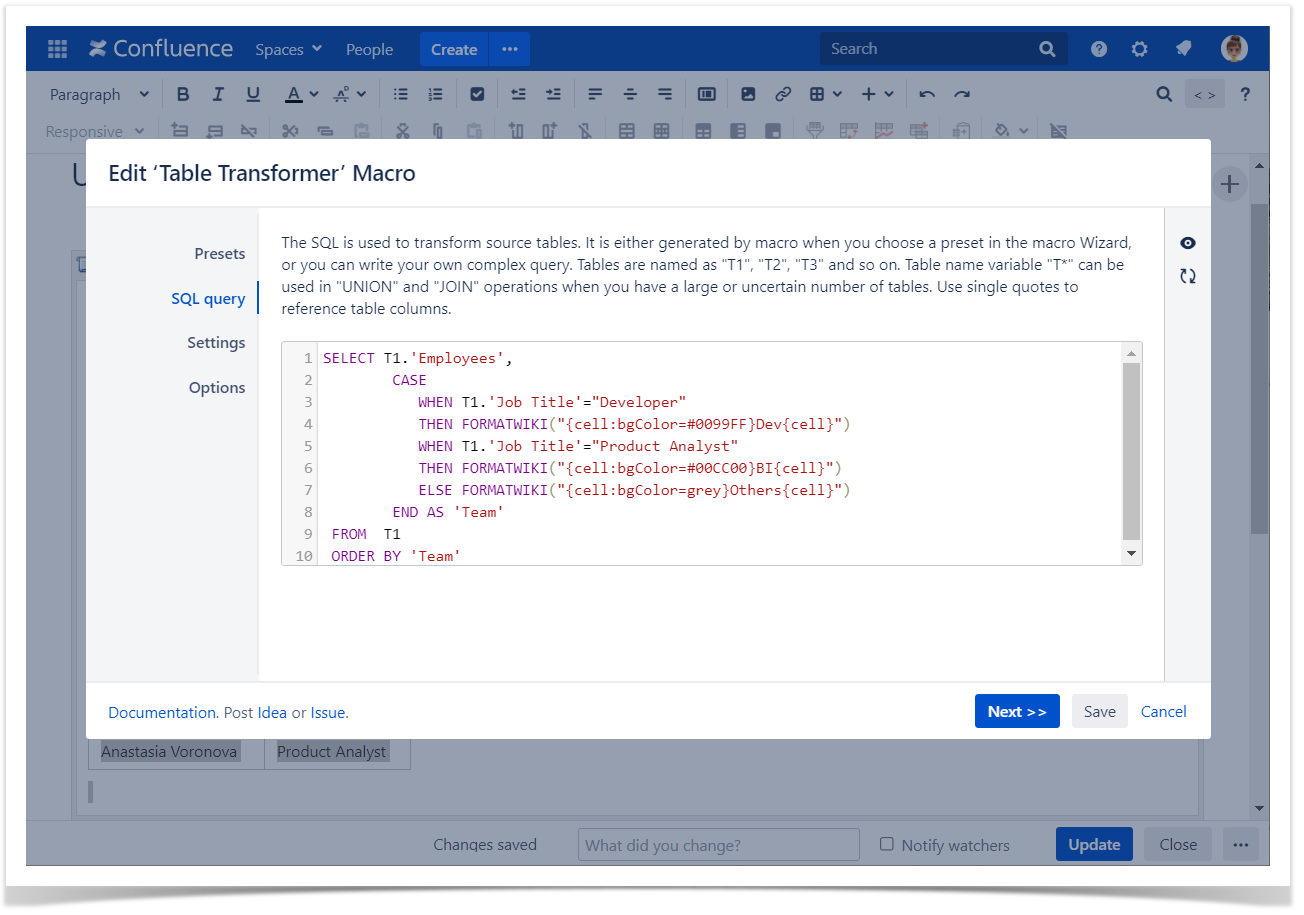
Conditional inserting of values and coloring cells background
Use case:
You need to add values in a newly created column and color its cells through conditions.
Solution:
- Switch the page to the edit mode.
- Insert the Table Transformer macro and paste the table or the macros outputting tables within the macro body.
- Select the macro and click Edit.
- In the Presets tab select Custom transformation and click Next.
-
Enter the following SQL query:
SELECTT1.'Employees',CASEWHENT1.'Job Title'="Developer"THENFORMATWIKI("{cell:bgColor=#0099FF}Dev{cell}")WHENT1.'Job Title'="Product Analyst"THENFORMATWIKI("{cell:bgColor=#00CC00}BI{cell}")ELSEFORMATWIKI("{cell:bgColor=grey}Others{cell}")ENDAS'Team'FROMT1ORDERBY'Team' - Click Next.
- Define the table settings and view options if needed.
-
Save the macro and the page.

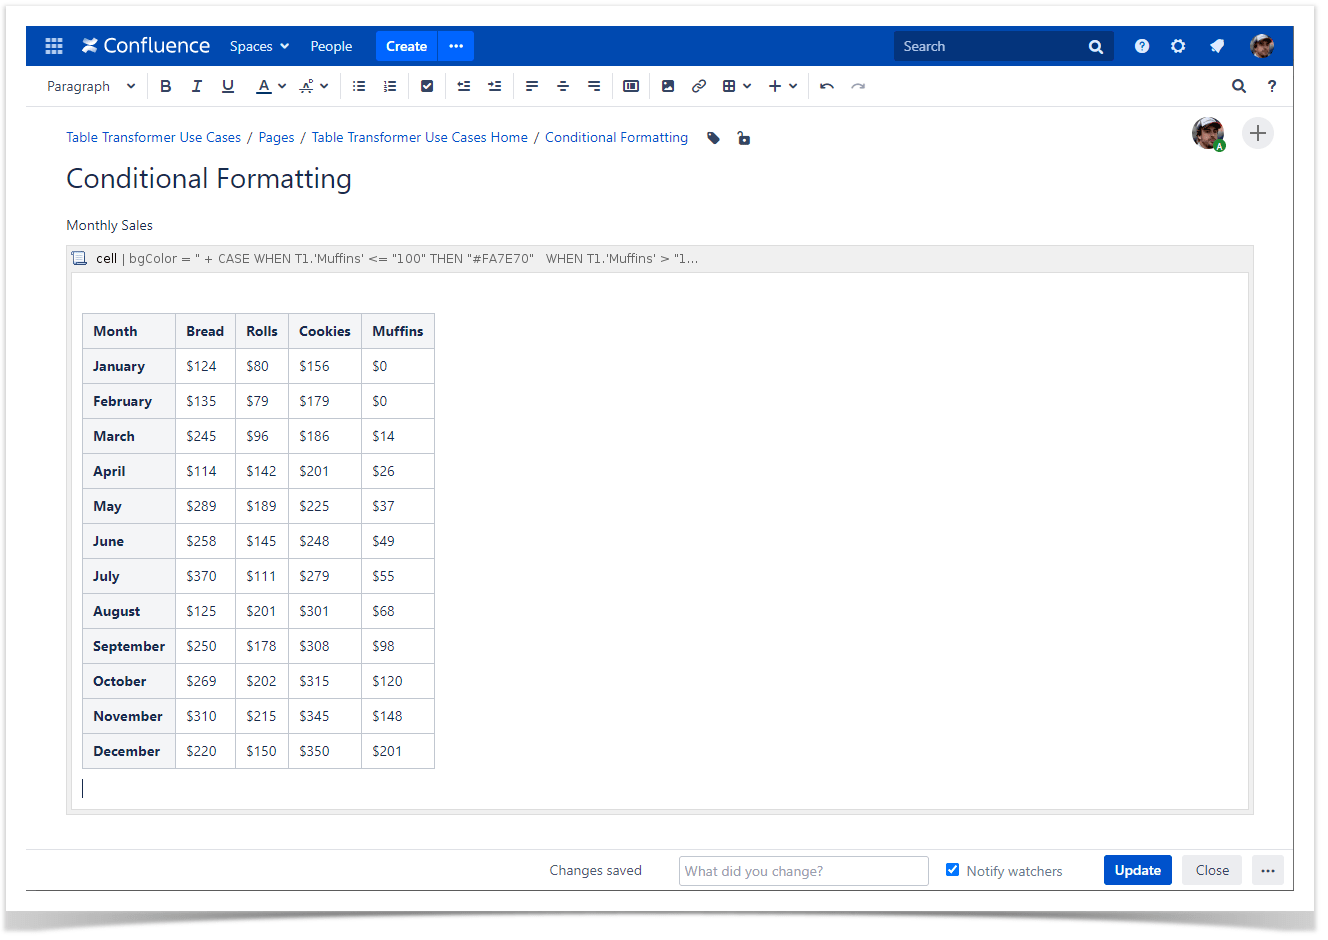
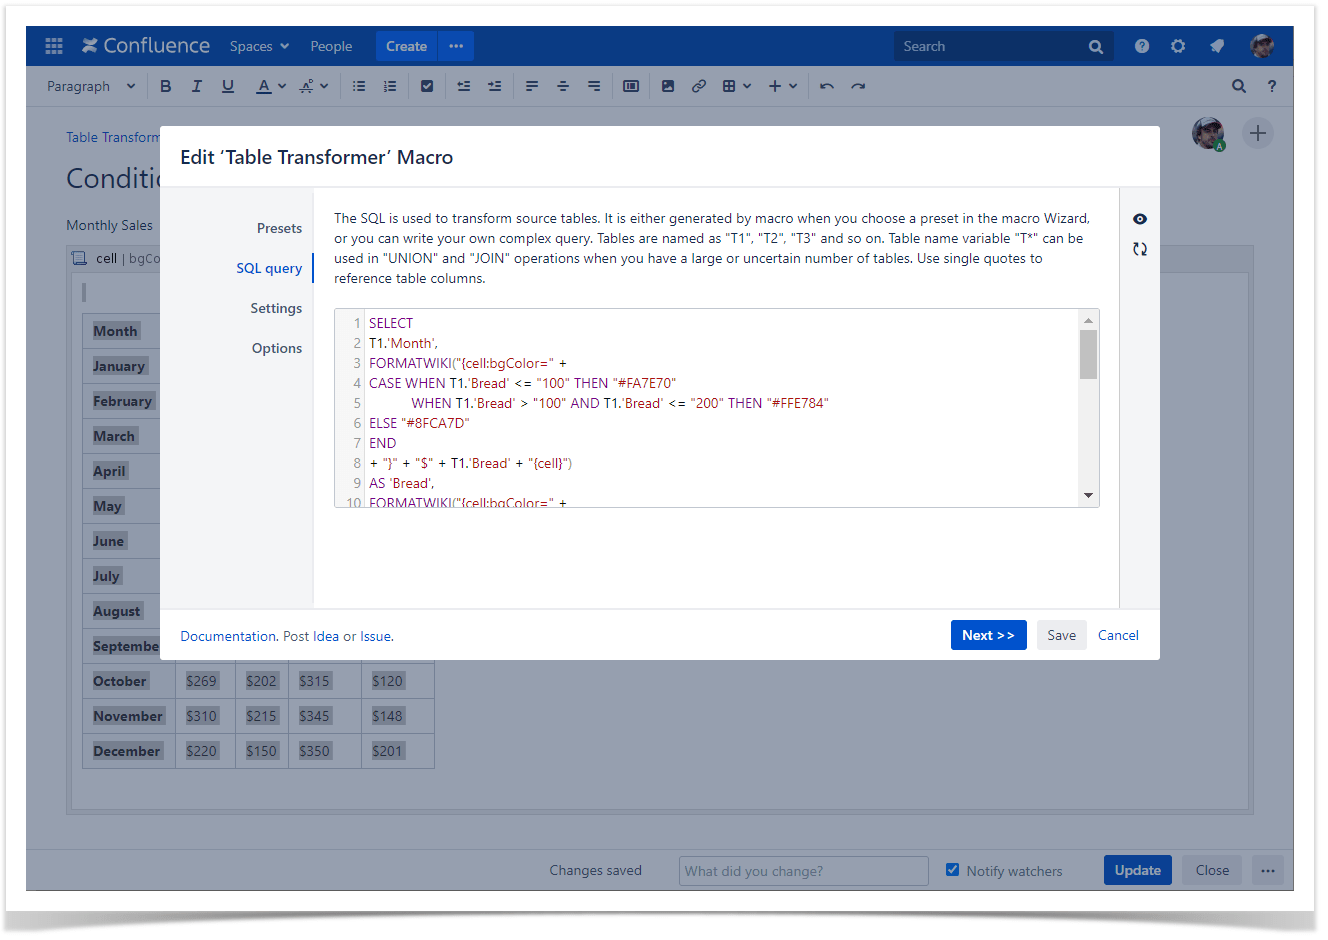
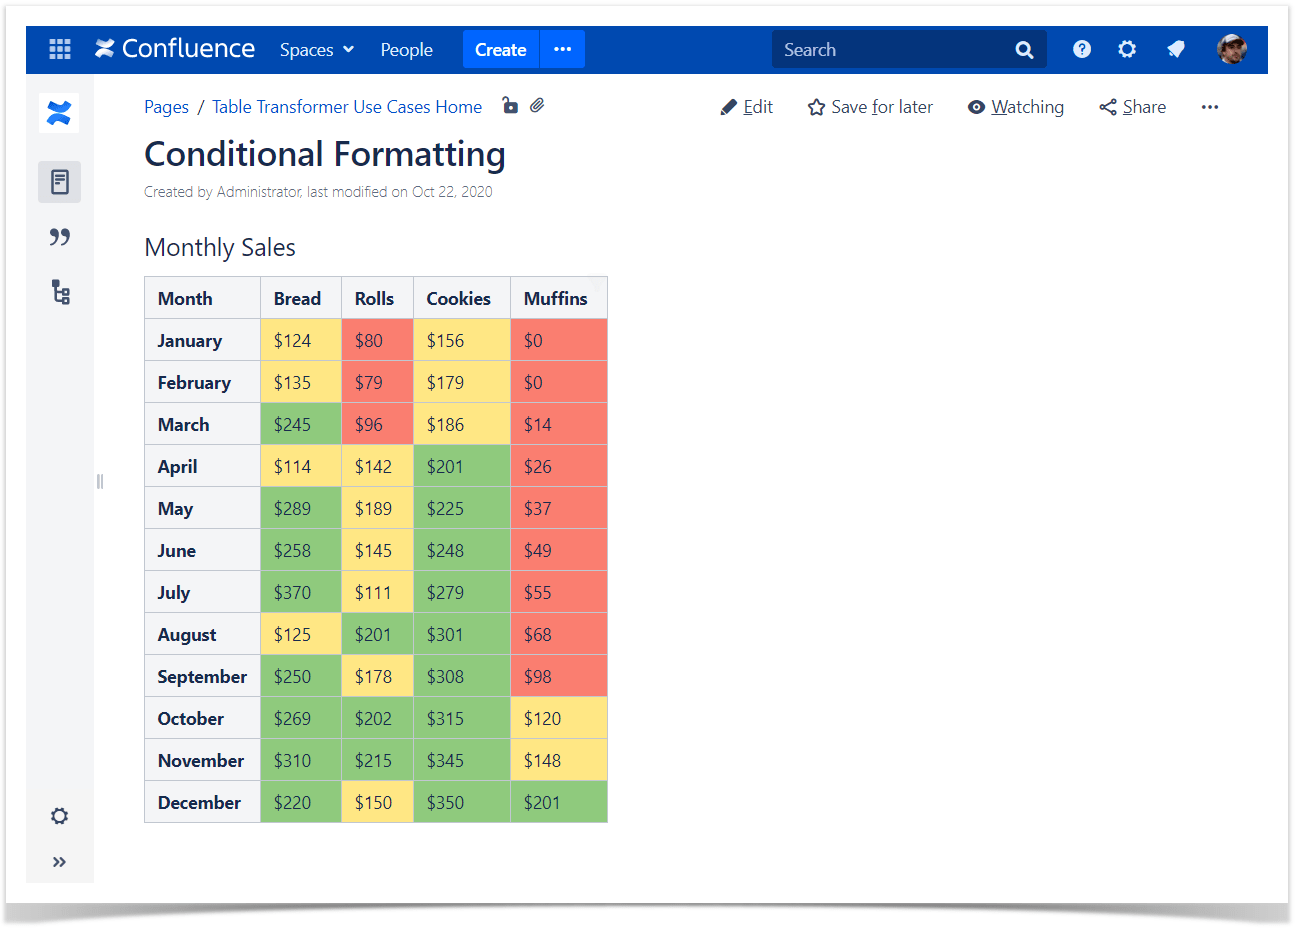
Conditional formatting
Use case:
You need to add conditional formatting of table data.
Solution:
- Switch the page to the edit mode.
- Insert the Table Transformer macro and paste the table or the macros outputting tables within the macro body.
- Select the macro and click Edit.
- In the Presets tab select Custom transformation and click Next.
-
Enter the following SQL query:
SELECTT1.'Month',FORMATWIKI("{cell:bgColor="+CASEWHENT1.'Bread'<="100"THEN"#FA7E70"WHENT1.'Bread'>"100"ANDT1.'Bread'<="200"THEN"#FFE784"ELSE"#8FCA7D"END+"}"+"$"+ T1.'Bread'+"{cell}")AS'Bread',FORMATWIKI("{cell:bgColor="+CASEWHENT1.'Rolls'<="100"THEN"#FA7E70"WHENT1.'Rolls'>"100"ANDT1.'Rolls'<="200"THEN"#FFE784"ELSE"#8FCA7D"END+"}"+"$"+ T1.'Rolls'+"{cell}")AS'Rolls',FORMATWIKI("{cell:bgColor="+CASEWHENT1.'Cookies'<="100"THEN"#FA7E70"WHENT1.'Cookies'>"100"ANDT1.'Cookies'<="200"THEN"#FFE784"ELSE"#8FCA7D"END+"}"+"$"+ T1.'Cookies'+"{cell}")AS'Cookies',FORMATWIKI("{cell:bgColor="+CASEWHENT1.'Muffins'<="100"THEN"#FA7E70"WHENT1.'Muffins'>"100"ANDT1.'Muffins'<="200"THEN"#FFE784"ELSE"#8FCA7D"END+"}"+"$"+ T1.'Muffins'+"{cell}")AS'Muffins'FROMT* - Click Next.
- Define the table settings and view options if needed.
-
Save the macro and the page.
Hex codes:
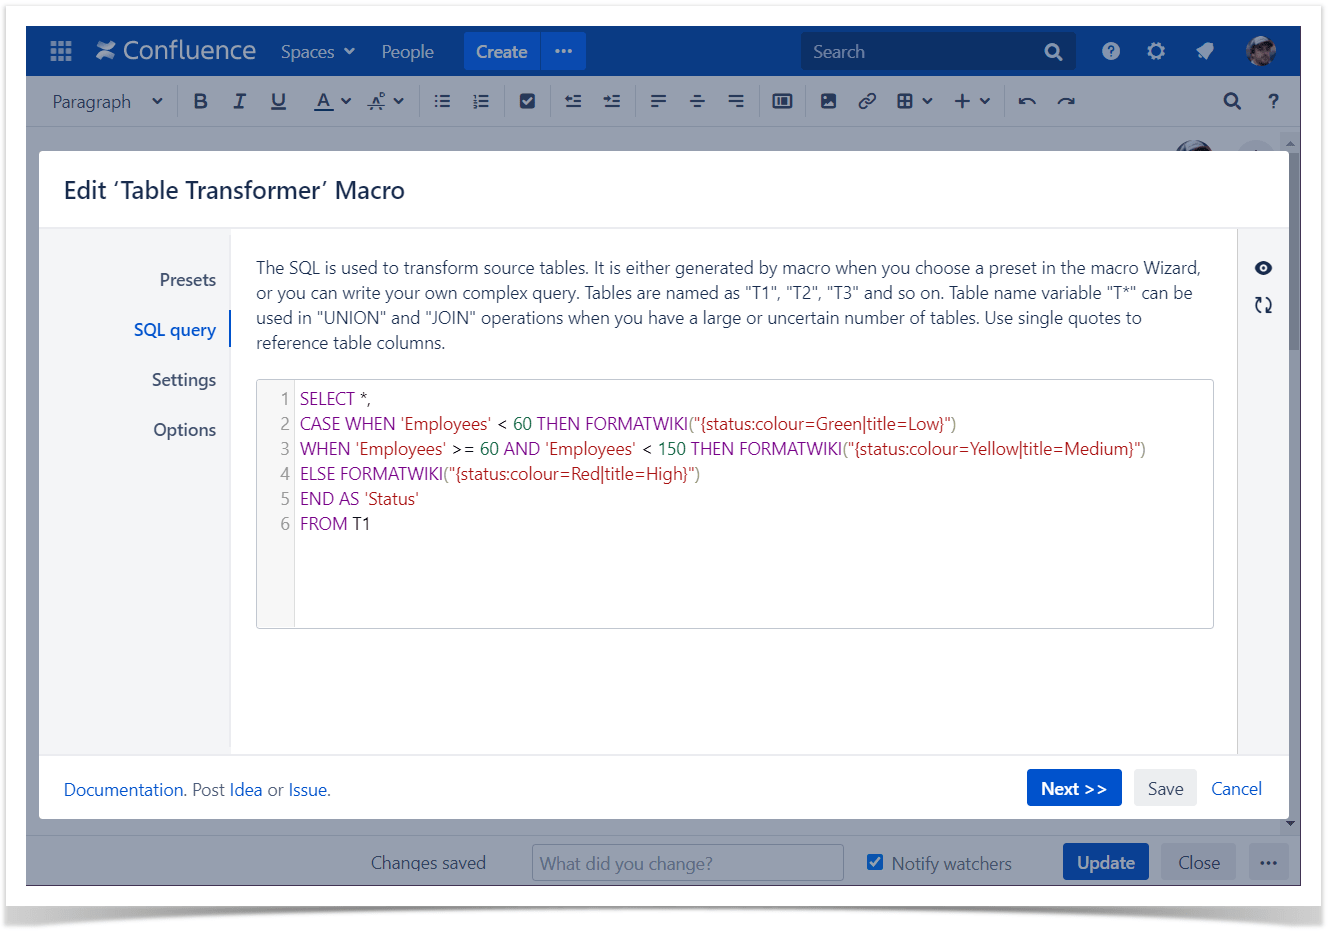
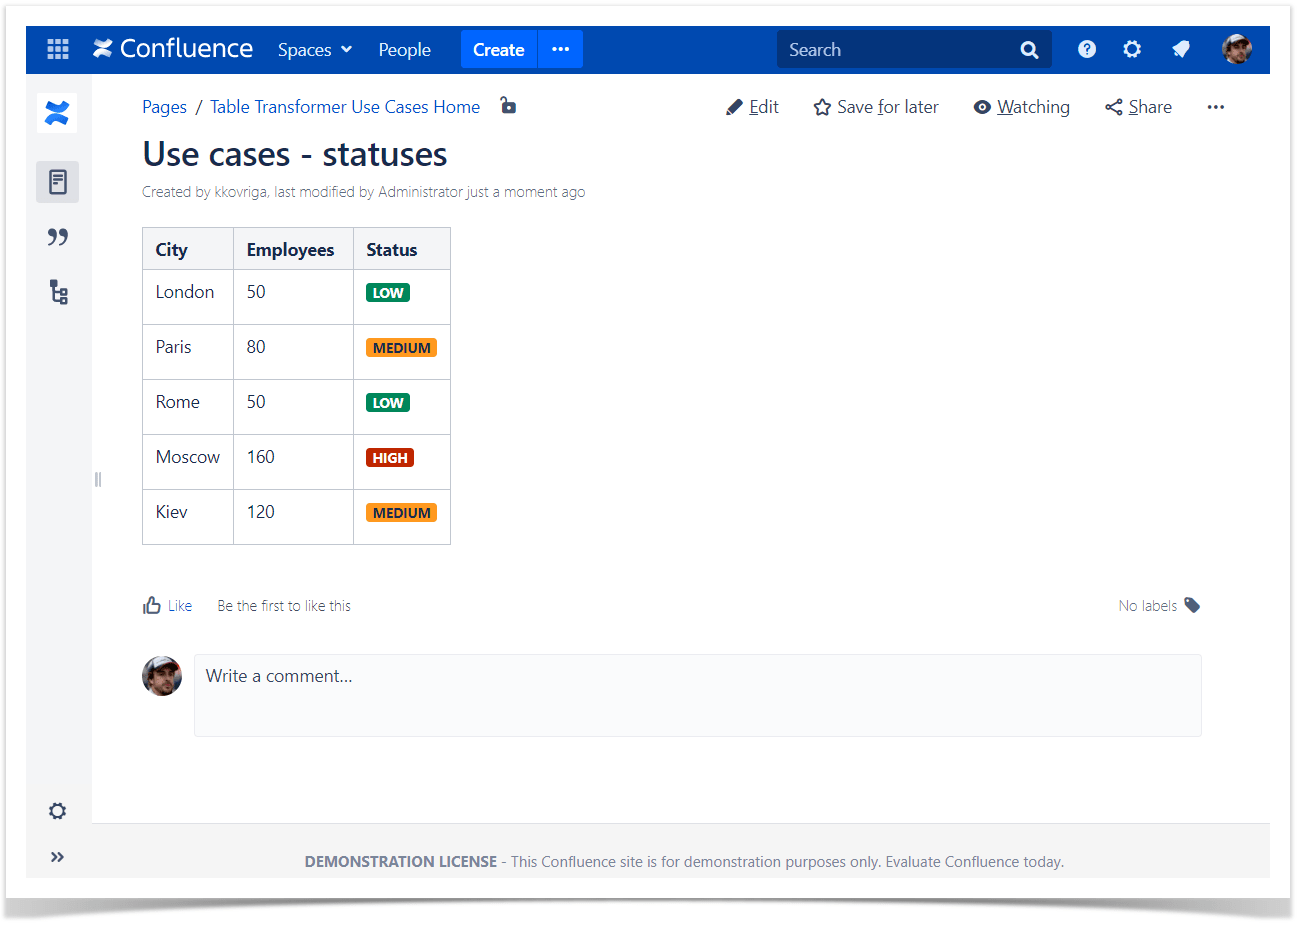
Conditional inserting of statuses
Use case:
You need to insert statuses depending on some condition.
Solution:
- Switch the page to the edit mode.
- Insert the Table Transformer macro and paste the table or the macros outputting tables within the macro body.
- Select the macro and click Edit.
- In the Presets tab select Custom transformation and click Next.
-
Enter the following SQL query:
SELECT*,CASEWHEN'Employees'< 60THENFORMATWIKI("{status:colour=Green|title=Low}")WHEN'Employees'>= 60AND'Employees'< 150THENFORMATWIKI("{status:colour=Yellow|title=Medium}")ELSEFORMATWIKI("{status:colour=Red|title=High}")ENDAS'Status'FROMT1 - Click Next.
- Define the table settings and view options if needed.
-
Save the macro and the page.
You can also use an alternative way of inserting statuses in a table.

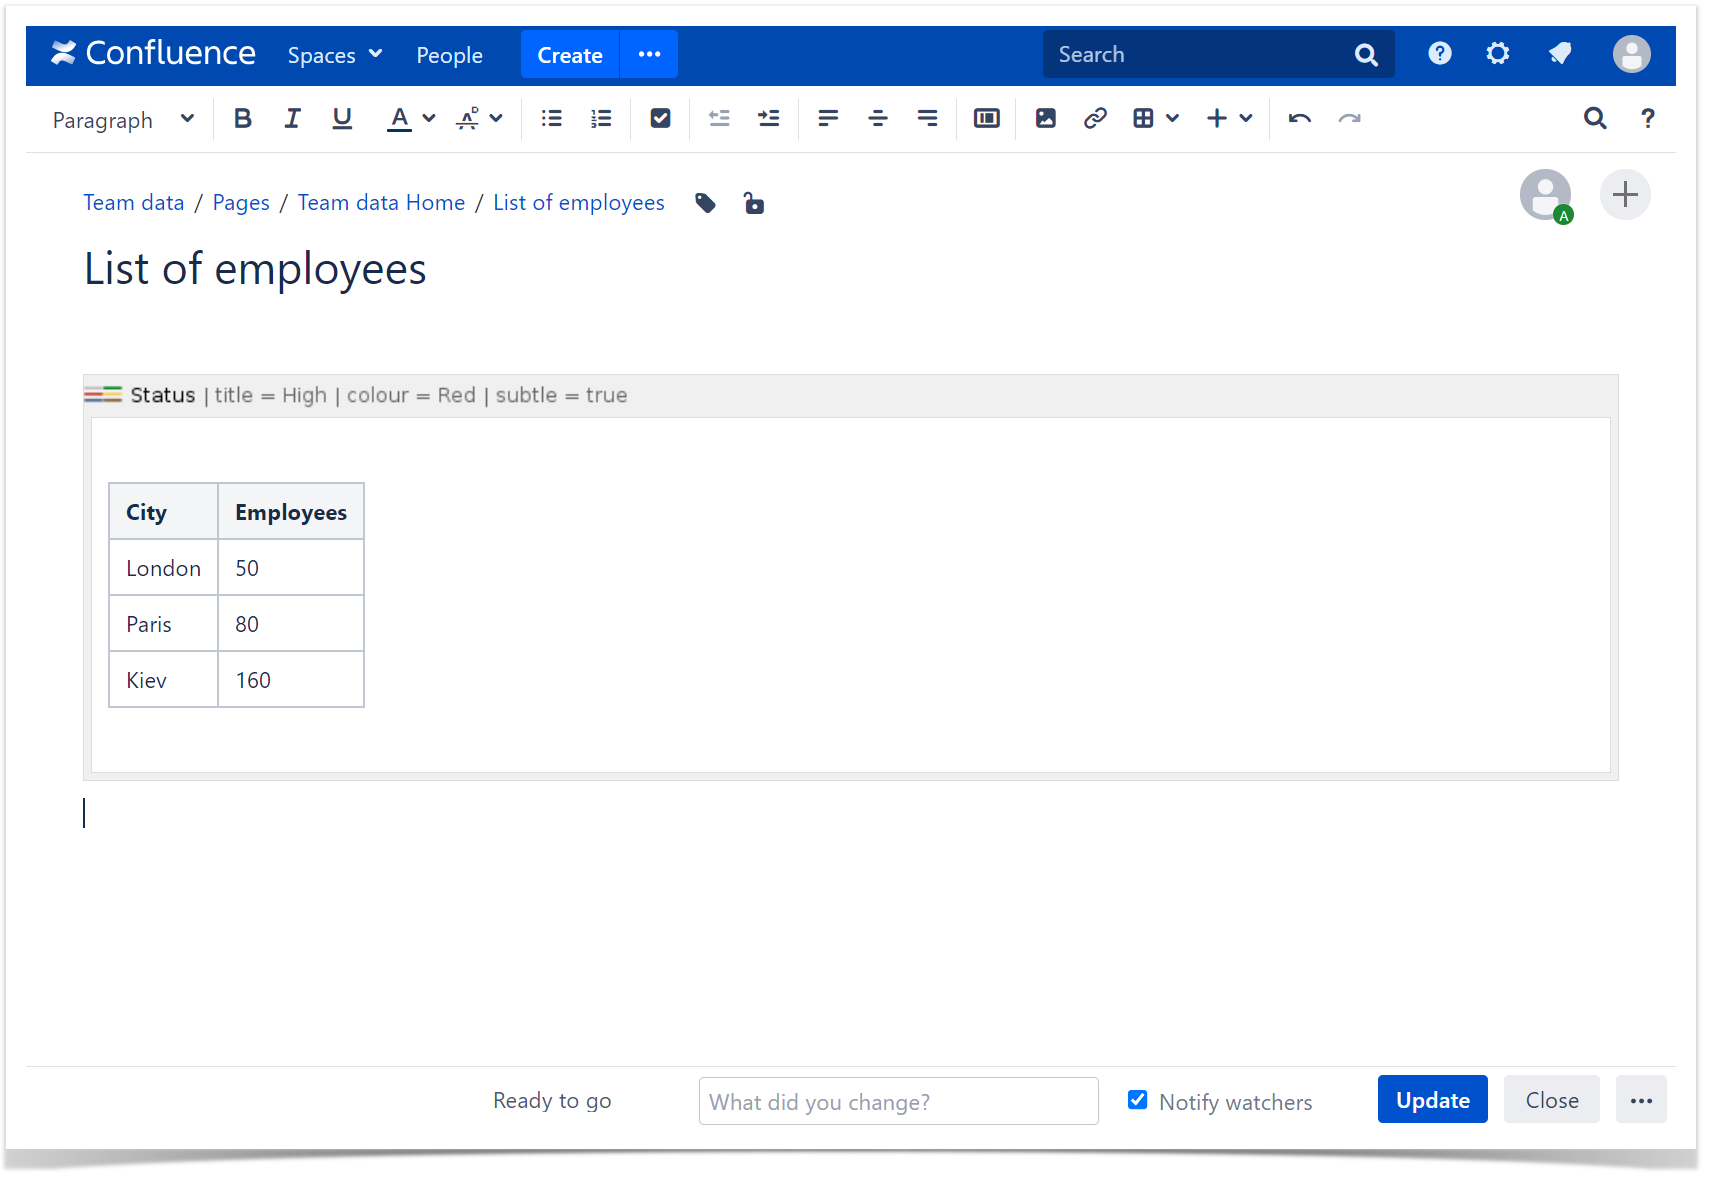
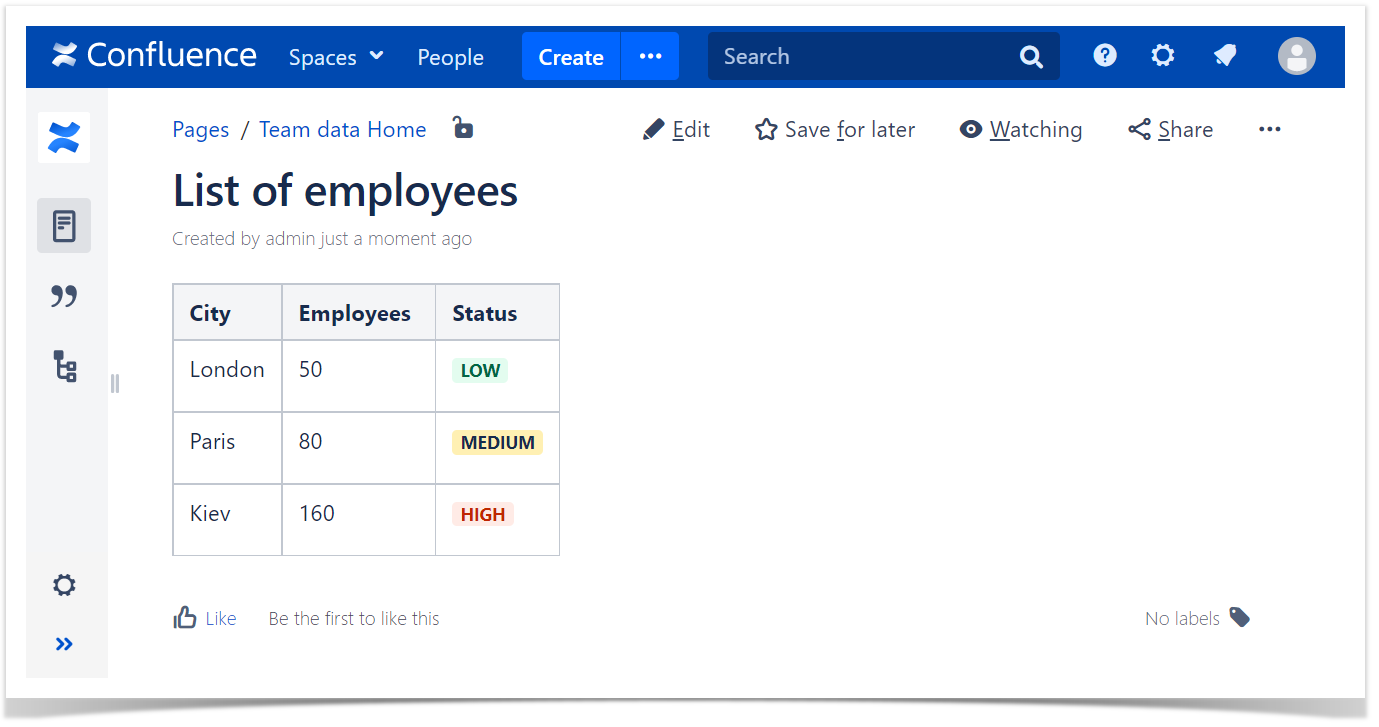
Adding lighter status color
Use case:
You need to choose a lighter status color.
Solution:
- Switch the page to the edit mode.
- Insert the Status macro and paste the table or the macros outputting tables within the macro body.
- Select the macro and click Edit.
- In the Presets tab select Custom transformation and click Next.
-
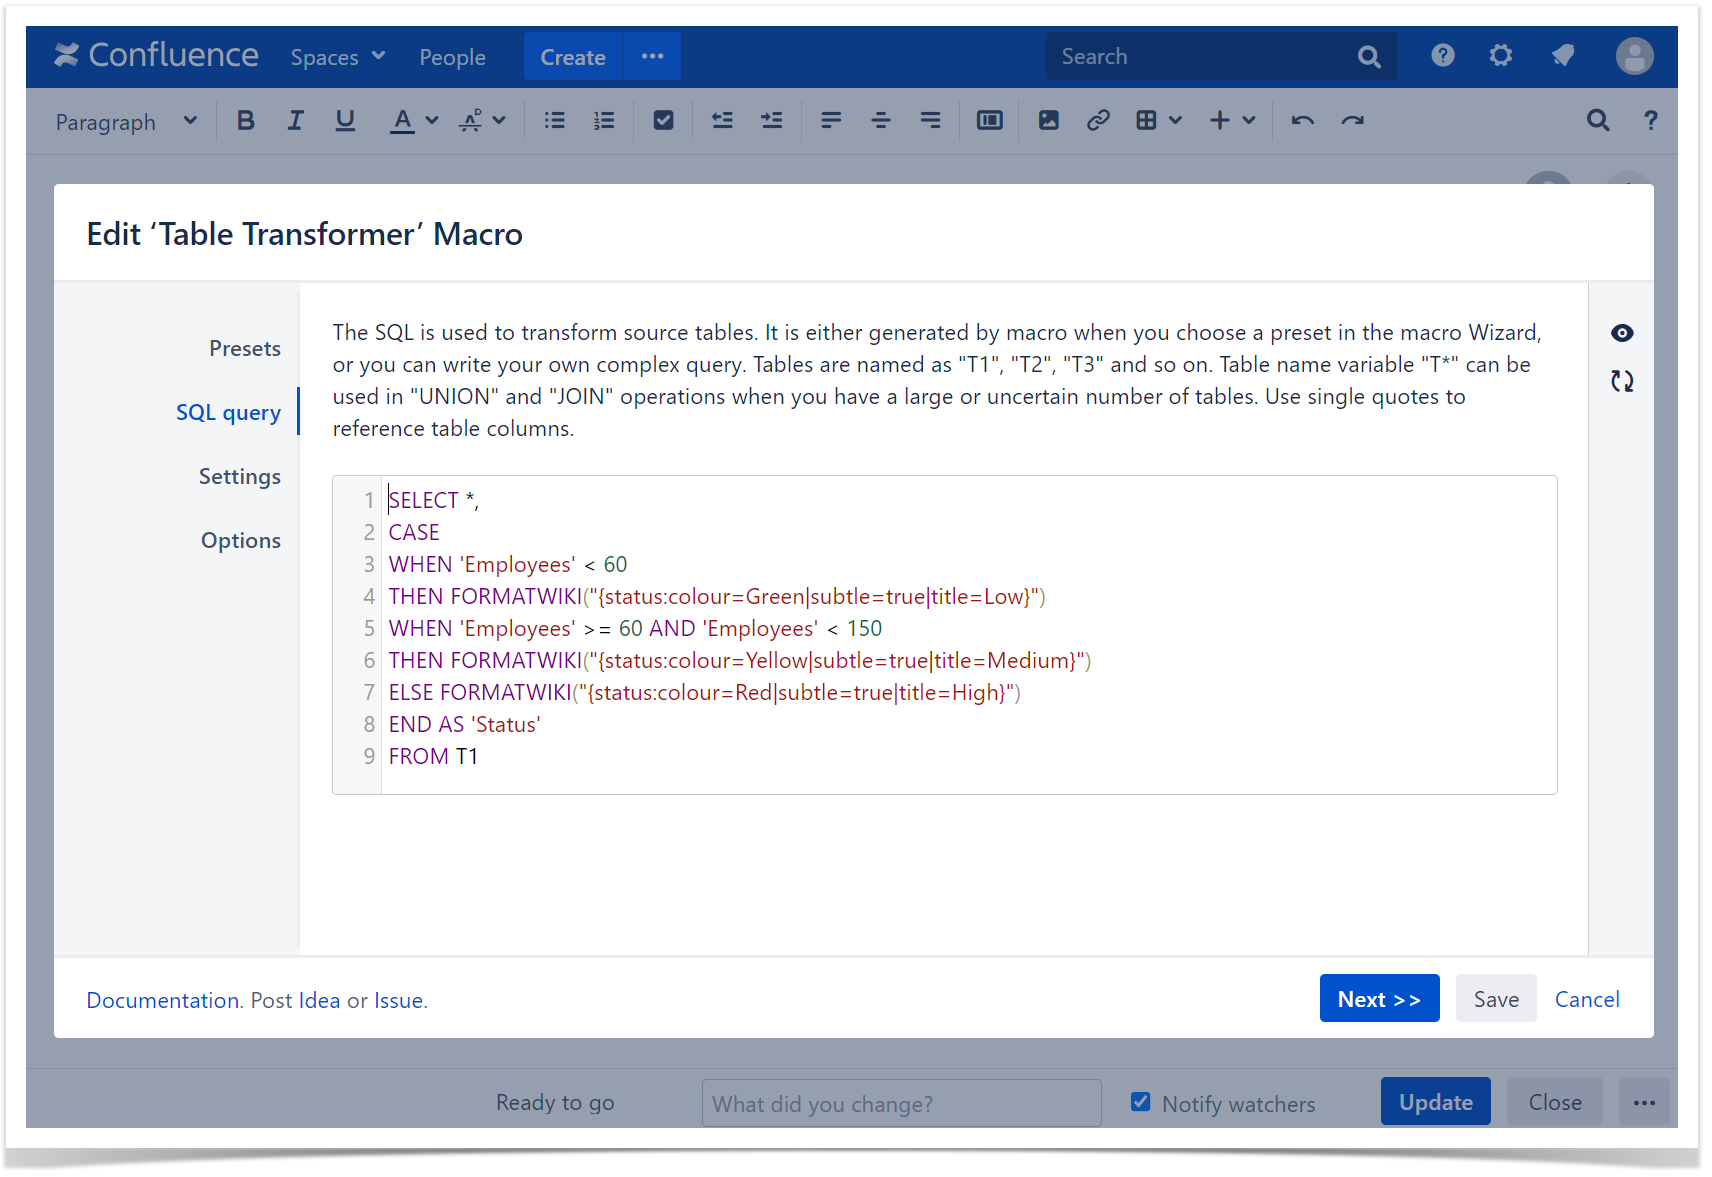
Enter the following SQL query:
SELECT*,CASEWHEN'Employees'< 60THENFORMATWIKI("{status:colour=Green|subtle=true|title=Low}")WHEN'Employees'>= 60AND'Employees'< 150THENFORMATWIKI("{status:colour=Yellow|subtle=true|title=Medium}")ELSEFORMATWIKI("{status:colour=Red|subtle=true|title=High}")ENDAS'Status'FROMT1 - Click Next.
- Define the table settings and view options if needed.
-
Save the macro and the page.
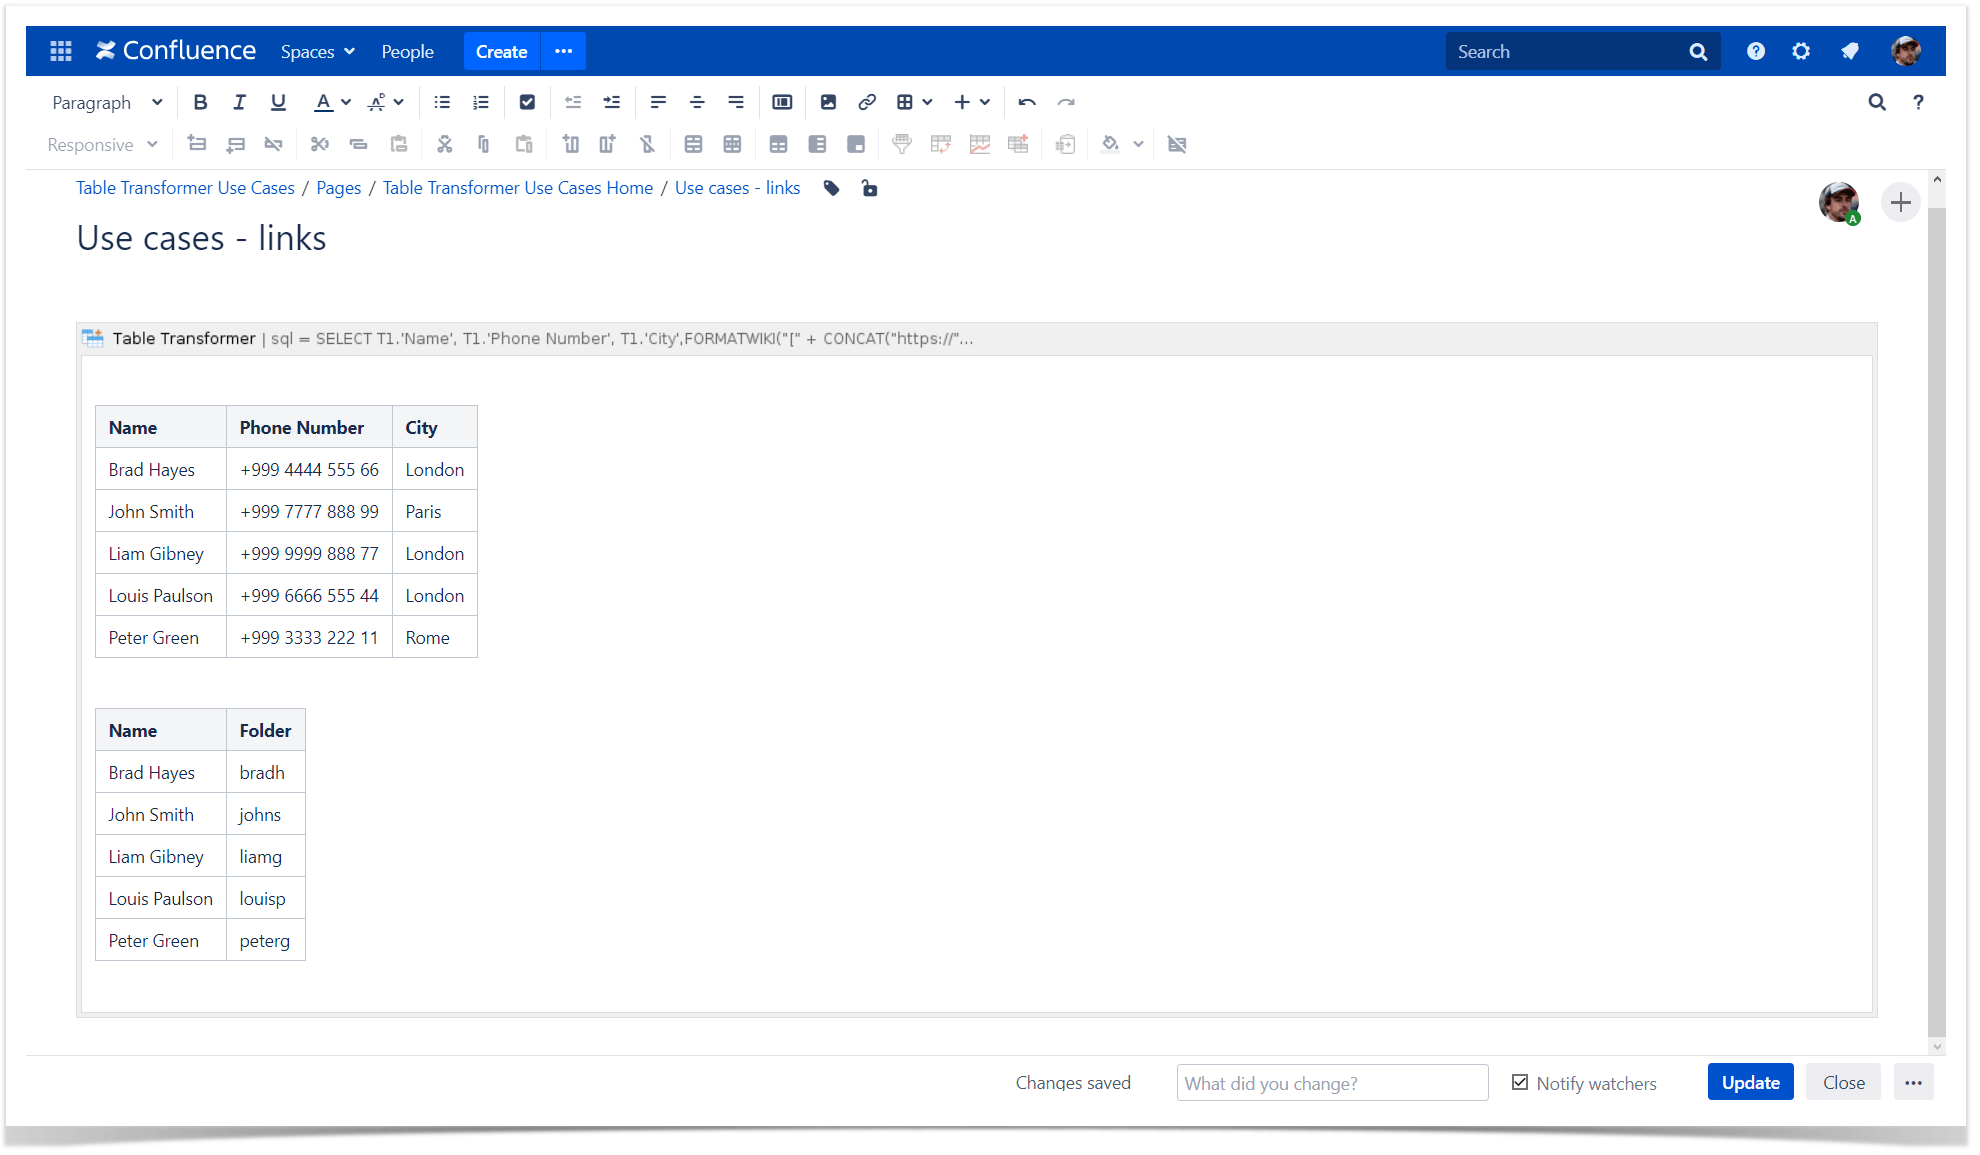
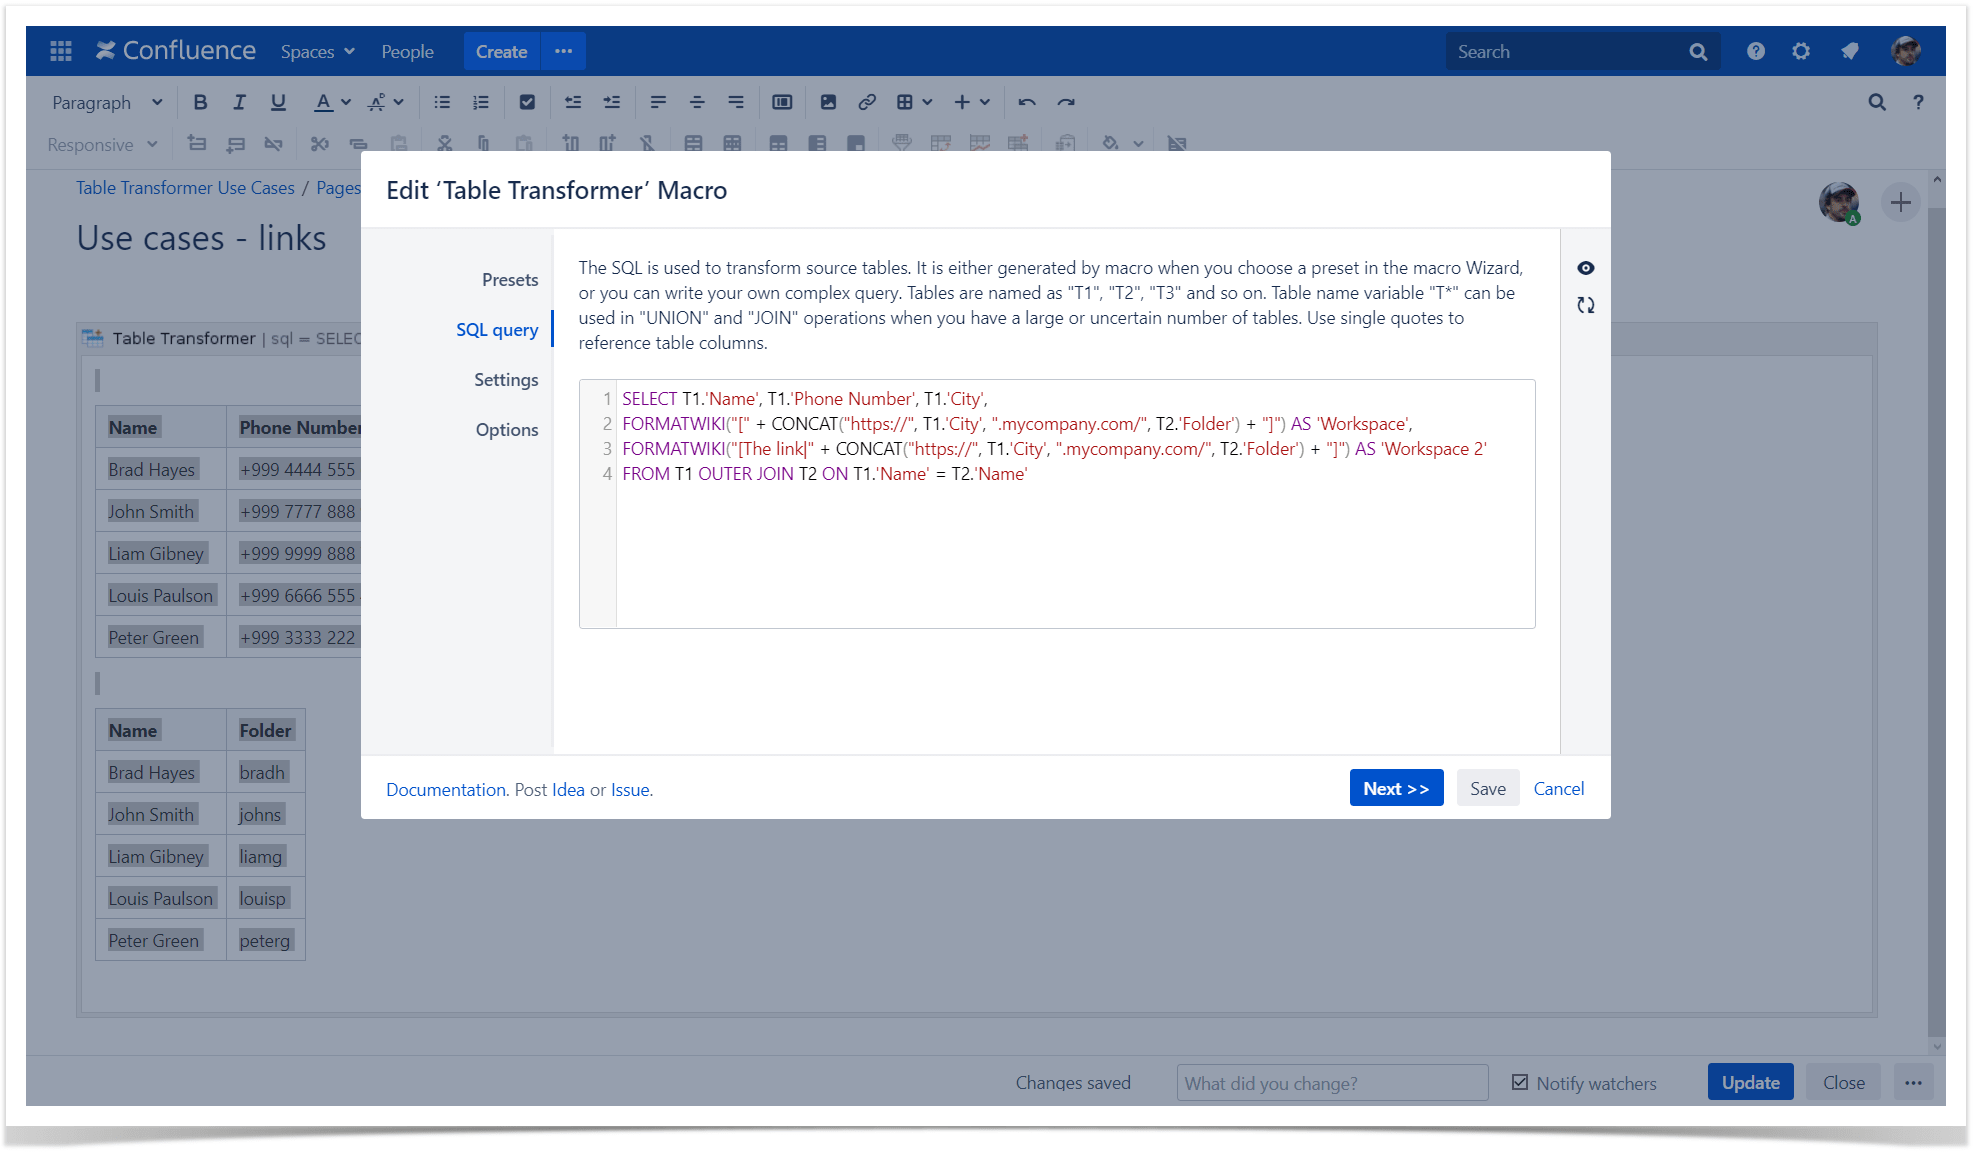
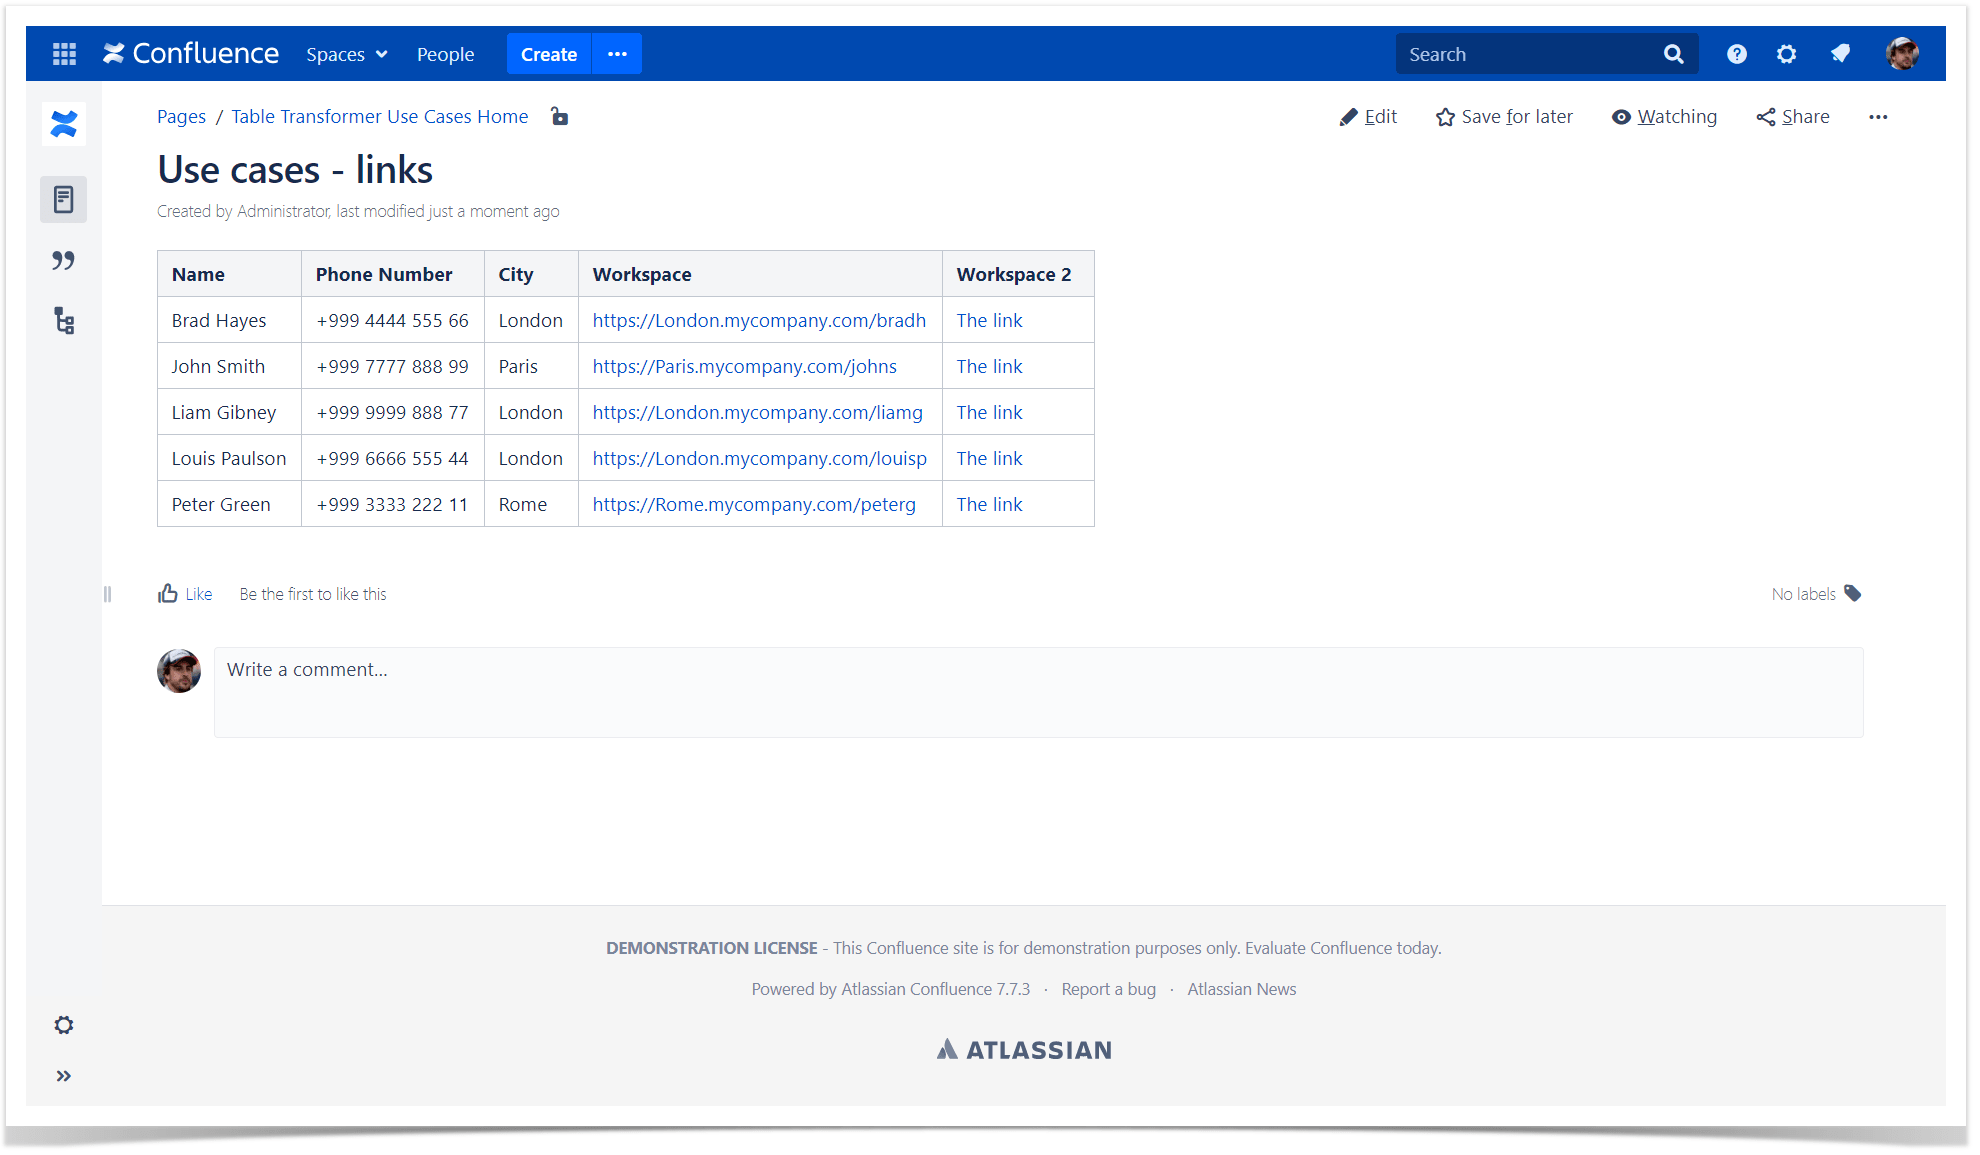
Creating clickable links
Use case:
You need to create clickable links from multiple text pieces put together.
Solution:
- Switch the page to the edit mode.
- Insert the Table Transformer macro and paste the table or the macros outputting tables within the macro body.
- Select the macro and click Edit.
- In the Presets tab select Custom transformation and click Next.
-
Enter the following SQL query:
SELECTT1.'Name', T1.'Phone Number', T1.'City',FORMATWIKI("["+ CONCAT("https://", T1.'City',".mycompany.com/", T2.'Folder') +"]")AS'Workspace',FORMATWIKI("[The link|"+ CONCAT("https://", T1.'City',".mycompany.com/", T2.'Folder') +"]")AS'Workspace 2'FROMT1OUTERJOINT2ONT1.'Name'= T2.'Name' - Click Next.
- Define the table settings and view options if needed.
-
Save the macro and the page.
Here's the example on how to create them to the JIRA issues.
Preserving initial cell formatting
Use case:
You need to preserve the initial formatting and apply a new one.
Solution:
- Switch the page to the edit mode.
- Insert the Table Transformer macro and paste the table or the macros outputting tables within the macro body.
- Select the macro and click Edit.
- In the Presets tab select Custom transformation and click Next.
-
Enter the following SQL query:
SELECT'Week',FORMATWIKI("{cell:textColor=green|align=left|width=200px}",'Plan for Weekly Progress',"{cell}")AS'Weekly plan'FROMT* - Click Next.
- Define the table settings and view options if needed.
-
Save the macro and the page.
Preserving initial cell formatting doesn't work in case of rows concatenation.
标签:Color,text,cells,T1,cell,macro,table,Next,FORMATWIKI 来源: https://www.cnblogs.com/freeliver54/p/15934309.html
本站声明: 1. iCode9 技术分享网(下文简称本站)提供的所有内容,仅供技术学习、探讨和分享; 2. 关于本站的所有留言、评论、转载及引用,纯属内容发起人的个人观点,与本站观点和立场无关; 3. 关于本站的所有言论和文字,纯属内容发起人的个人观点,与本站观点和立场无关; 4. 本站文章均是网友提供,不完全保证技术分享内容的完整性、准确性、时效性、风险性和版权归属;如您发现该文章侵犯了您的权益,可联系我们第一时间进行删除; 5. 本站为非盈利性的个人网站,所有内容不会用来进行牟利,也不会利用任何形式的广告来间接获益,纯粹是为了广大技术爱好者提供技术内容和技术思想的分享性交流网站。