标签:__ 调用 st 理解 64 printf 深入 rsp
深入理解系统调用
前言
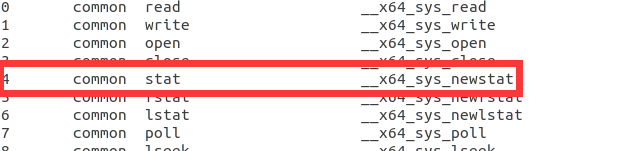
本文将基于Linux内核通过调试跟踪,深入理解Linux的系统调用过程。本人学号04结尾,在arch/x86/entry/syscalls/syscall_64.tbl 可以找到04号为stat系统调⽤,因此以系统调用stat为例进行展开。
一、实验目的
1.找一个系统调用,系统调用号为学号最后2位相同的系统调用,本人学号最后两位为04,即要测试的系统调用号为04
2.通过汇编指令触发该系统调用
3.通过gdb跟踪该系统调用的内核处理过程
4.重点阅读分析系统调用入口的保存现场、恢复现场和系统调用返回,以及重点关注系统调用过程中内核堆栈状态的变化
二、环境准备
安装开发工具:
sudo apt install build-essential
sudo apt install qemu # install QEMU
sudo apt install libncurses5-dev bison flex libssl-dev libelf-dev
下载内核源码:
sudo apt install axel
axel -n 20 https://mirrors.edge.kernel.org/pub/linux/kernel/v5.x/ linux-5.4.34.tar.xz
xz -d linux-5.4.34.tar.xz
tar -xvf linux-5.4.34.tar
cd linux-5.4.34
配置内核选项:
make defconfig #Default configuration is based on 'x86_64_defconfig'
make menuconfig
- Kernel hacking > Compile-time check and compiler options > Provide GDB scripts for kernel debugging 打开
- 返回上一页勾选Kernel debugging
- 返回首页,选中Processor type and features ---->Randomize the address of the kernel image (KASLR) 关闭
编译和运行内核:
make -j$(nproc)
qemu-system-x86_64 -kernel arch/x86/boot/bzImage
制作根文件系统:
axel -n 20 https://busybox.net/downloads/busybox-1.31.1.tar.bz2
tar -jxvf busybox-1.31.1.tar.bz2
cd busybox-1.31.1

make menuconfig
#记得要编译成静态链接,不⽤动态链接库。
Settings  --->
    [*] Build static binary (no shared libs)
#然后编译安装,默认会安装到源码⽬录下的 _install ⽬录中。
make -j$(nproc) && make install
制作内存根文件系统镜像:
#返回到~/目录下,创建根文件目录
mkdir rootfs
cd rootfs
cp ../busybox-1.31.1/_install/* ./ -rf
mkdir dev proc sys home
sudo cp -a /dev/{null,console,tty,tty1,tty2,tty3,tty4} dev/
在rootfs目录下制作init脚本:
touch init
vim init
 #!/bin/sh
 mount -t proc none /proc
 mount -t sysfs none /sys
 echo "Wellcome MyOS!"
 echo "--------------------"
 cd home
 /bin/sh
给init脚本添加可执行权限:
chmod +x init
打包成内存根文件系统镜像:
find . -print0 | cpio --null -ov --format=newc | gzip -9 > ../rootfs.cpio.gz
测试挂载根文件系统,看内核启动完成后是否执行init脚本:
qemu-system-x86_64 -kernel linux-5.4.34/arch/x86/boot/bzImage -initrd rootfs.cpio.gz
运行结果如下所示:

三、查看系统调用并编写调用汇编代码
- 打开/linux-5.4.34/arch/x86/entry/syscalls/syscall_64.tbl
函数声明:int stat(const char *file_name, struct stat *buf)
函数功能说明: 通过文件名filename获取文件信息,并保存在buf所指的结构体stat中
返回值: 执行成功则返回0,失败返回-1,错误代码存于errno
- 编写测试程序
/* file stat example */

#include <stdio.h>
#include <unistd.h>
#include <sys/stat.h>
#include <sys/types.h>

#include <stdlib.h>
#include <time.h>

int main(int argc, char **argv){

  struct stat st;

  if(argc != 2){
    fprintf(stderr, "Usage: %s <file_pathname> \n", argv[0]);
        exit(EXIT_FAILURE);
    }

    if(stat(argv[1], &st) == -1){
        perror("stat");
        exit(EXIT_SUCCESS);
    }

    printf("File type:                ");
    switch(st.st_mode & S_IFMT){
      case S_IFBLK:  printf("block device\n");            break;
      case S_IFCHR:  printf("character device\n");        break;
      case S_IFDIR:  printf("directory\n");               break;
      case S_IFIFO:  printf("FIFO/pipe\n");               break;
      case S_IFLNK:  printf("symlink\n");                 break;
      case S_IFREG:  printf("regular file\n");            break;
      case S_IFSOCK: printf("socket\n");                  break;
      default:       printf("unknown?\n");                break;
  }

  printf("I-node number:            %ld\n", (long) st.st_ino);
  printf("Mode:                     %lo (octal)\n", (unsigned long) st.st_mode);
  printf("Link count:               %ld\n", (long) st.st_nlink);
  printf("Ownership:                UID=%ld   GID=%ld\n", (long) st.st_uid, (long) st.st_gid);
  printf("device containing file id:%ld \n", (long) st.st_dev);
  printf("device id:                %ld \n", (long) st.st_rdev);
  printf("File size:                %lld bytes\n", (long long) st.st_size);
  printf("Preferred I/O block size: %ld bytes\n", (long) st.st_blksize);
  printf("Blocks allocated:         %lld\n", (long long) st.st_blocks);
  printf("Last status change:       %s", ctime(&st.st_ctime));
  printf("Last file access:         %s", ctime(&st.st_atime));
  printf("Last file modification:   %s", ctime(&st.st_mtime));

  exit(EXIT_SUCCESS);
}
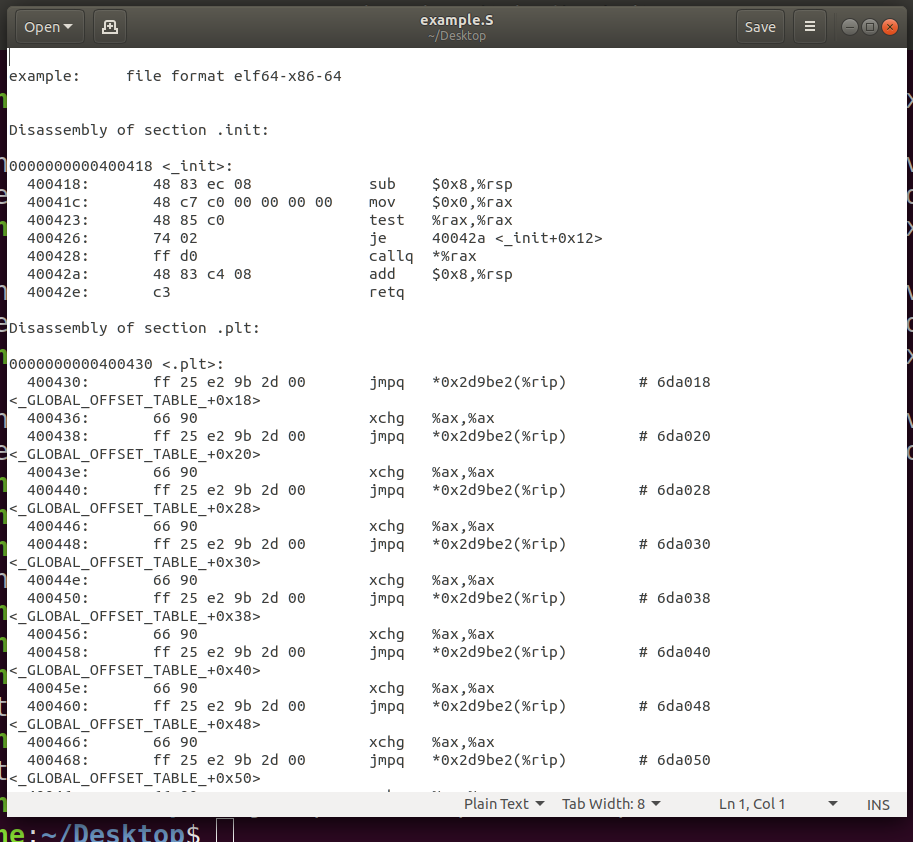
然后静态编译,并且反汇编存入文件example.S中。
gcc -o example example.c -static
objdump -S example > example.S
打开openfile.S文件,找到main函数,顺着函数调用可以找到syscall指令。
通过调试程序发现调用stat()函数后,会跳转到 ../sysdeps/unix/sysv/linux/wordsize-64/fxstat.c 文件里的__fxstat()函数,最终调用 INLINE_SYSCALL() 函数,其中会调用syscall指令触发系统调用中断。
#include <errno.h>
#include <stddef.h>
#include <sys/stat.h>

#include <sysdep.h>
#include <sys/syscall.h>

/* Get information about the file FD in BUF.  */
int
__fxstat (int vers, int fd, struct stat *buf)
{
  if (vers == _STAT_VER_KERNEL || vers == _STAT_VER_LINUX)
    return INLINE_SYSCALL (fstat, 2, fd, buf);

  __set_errno (EINVAL);
  return -1;
}

hidden_def (__fxstat)
weak_alias (__fxstat, _fxstat);
#undef __fxstat64
strong_alias (__fxstat, __fxstat64);
hidden_ver (__fxstat, __fxstat64)
四、系统调用初始化
系统启动时会调用arch/x86/kernel/cpu/common.c 的 syscall_init()函数进行初始化。可以看到 MSR_STAR 的第 32-47 位设置为 kernel mode 的 cs,48-63位设置为 user mode 的 cs。而 IA32_LSTAR 被设置为函数 entry_SYSCALL_64 的起始地址(需要注意intel64位增加了MSR寄存器,用于快速找到系统调用的处理函数,这与32位机不同)。于是 syscall 时,跳转到 entry_SYSCALL_64 开始执行,其定义在 arch/x86/entry/entry_64.S中。
void syscall_init(void)
{
    wrmsr(MSR_STAR, 0, (__USER32_CS << 16) | __KERNEL_CS);
    wrmsrl(MSR_LSTAR, (unsigned long)entry_SYSCALL_64);

#ifdef CONFIG_IA32_EMULATION
    wrmsrl(MSR_CSTAR, (unsigned long)entry_SYSCALL_compat);
    /*
     * This only works on Intel CPUs.
     * On AMD CPUs these MSRs are 32-bit, CPU truncates MSR_IA32_SYSENTER_EIP.
     * This does not cause SYSENTER to jump to the wrong location, because
     * AMD doesn't allow SYSENTER in long mode (either 32- or 64-bit).
     */
    wrmsrl_safe(MSR_IA32_SYSENTER_CS, (u64)__KERNEL_CS);
    wrmsrl_safe(MSR_IA32_SYSENTER_ESP, 0ULL);
    wrmsrl_safe(MSR_IA32_SYSENTER_EIP, (u64)entry_SYSENTER_compat);
#else
    wrmsrl(MSR_CSTAR, (unsigned long)ignore_sysret);
    wrmsrl_safe(MSR_IA32_SYSENTER_CS, (u64)GDT_ENTRY_INVALID_SEG);
    wrmsrl_safe(MSR_IA32_SYSENTER_ESP, 0ULL);
    wrmsrl_safe(MSR_IA32_SYSENTER_EIP, 0ULL);
#endif

    /* Flags to clear on syscall */
    wrmsrl(MSR_SYSCALL_MASK,
           X86_EFLAGS_TF|X86_EFLAGS_DF|X86_EFLAGS_IF|
           X86_EFLAGS_IOPL|X86_EFLAGS_AC|X86_EFLAGS_NT);
}
五、entry_SYSCALL_64
entry_SYSCALL_64作为系统调用(属于软中断)的处理函数,它的源代码如下:
ENTRY(entry_SYSCALL_64)
    /*
     * Interrupts are off on entry.
     * We do not frame this tiny irq-off block with TRACE_IRQS_OFF/ON,
     * it is too small to ever cause noticeable irq latency.
     */
    SWAPGS_UNSAFE_STACK
    // KAISER 进内核态需要切到内核页表
    SWITCH_KERNEL_CR3_NO_STACK
    /*
     * A hypervisor implementation might want to use a label
     * after the swapgs, so that it can do the swapgs
     * for the guest and jump here on syscall.
     */
GLOBAL(entry_SYSCALL_64_after_swapgs)
    // 将用户栈偏移保存到 per-cpu 变量 rsp_scratch 中
    movq    %rsp, PER_CPU_VAR(rsp_scratch)
    // 加载内核栈偏移
    movq    PER_CPU_VAR(cpu_current_top_of_stack), %rsp

    TRACE_IRQS_OFF

    /* Construct struct pt_regs on stack */
    pushq   $__USER_DS          /* pt_regs->ss */
    pushq   PER_CPU_VAR(rsp_scratch)    /* pt_regs->sp */
    pushq   %r11                /* pt_regs->flags */
    pushq   $__USER_CS          /* pt_regs->cs */
    pushq   %rcx                /* pt_regs->ip */
    pushq   %rax                /* pt_regs->orig_ax */
    pushq   %rdi                /* pt_regs->di */
    pushq   %rsi                /* pt_regs->si */
    pushq   %rdx                /* pt_regs->dx */
    pushq   %rcx                /* pt_regs->cx */
    pushq   $-ENOSYS            /* pt_regs->ax */
    pushq   %r8             /* pt_regs->r8 */
    pushq   %r9             /* pt_regs->r9 */
    pushq   %r10                /* pt_regs->r10 */
    pushq   %r11                /* pt_regs->r11 */
    // 为r12-r15, rbp, rbx保留位置
    sub $(6*8), %rsp            /* pt_regs->bp, bx, r12-15 not saved */

    /*
     * If we need to do entry work or if we guess we'll need to do
     * exit work, go straight to the slow path.
     */
    movq    PER_CPU_VAR(current_task), %r11
    testl   $_TIF_WORK_SYSCALL_ENTRY|_TIF_ALLWORK_MASK, TASK_TI_flags(%r11)
    jnz entry_SYSCALL64_slow_path

entry_SYSCALL_64_fastpath:
    /*
     * Easy case: enable interrupts and issue the syscall.  If the syscall
     * needs pt_regs, we'll call a stub that disables interrupts again
     * and jumps to the slow path.
     */
    TRACE_IRQS_ON
    ENABLE_INTERRUPTS(CLBR_NONE)
#if __SYSCALL_MASK == ~0
    // 确保系统调用号没超过最大值,超过了则跳转到后面的符号 1 处进行返回
    cmpq    $__NR_syscall_max, %rax
#else
    andl    $__SYSCALL_MASK, %eax
    cmpl    $__NR_syscall_max, %eax
#endif
    ja  1f              /* return -ENOSYS (already in pt_regs->ax) */
    // 除系统调用外的其他调用都通过 rcx 来传第四个参数,因此将 r10 的内容设置到 rcx
    movq    %r10, %rcx

    /*
     * This call instruction is handled specially in stub_ptregs_64.
     * It might end up jumping to the slow path.  If it jumps, RAX
     * and all argument registers are clobbered.
     */
    // 调用系统调用表中对应的函数
    call    *sys_call_table(, %rax, 8)
.Lentry_SYSCALL_64_after_fastpath_call:
    // 将函数返回值压到栈中,返回时弹出
    movq    %rax, RAX(%rsp)
1:

    /*
     * If we get here, then we know that pt_regs is clean for SYSRET64.
     * If we see that no exit work is required (which we are required
     * to check with IRQs off), then we can go straight to SYSRET64.
     */
    DISABLE_INTERRUPTS(CLBR_NONE)
    TRACE_IRQS_OFF
    movq    PER_CPU_VAR(current_task), %r11
    testl   $_TIF_ALLWORK_MASK, TASK_TI_flags(%r11)
    jnz 1f

    LOCKDEP_SYS_EXIT
    TRACE_IRQS_ON       /* user mode is traced as IRQs on */
    movq    RIP(%rsp), %rcx
    movq    EFLAGS(%rsp), %r11
    RESTORE_C_REGS_EXCEPT_RCX_R11
    /*
     * This opens a window where we have a user CR3, but are
     * running in the kernel.  This makes using the CS
     * register useless for telling whether or not we need to
     * switch CR3 in NMIs.  Normal interrupts are OK because
     * they are off here.
     */
    SWITCH_USER_CR3
    movq    RSP(%rsp), %rsp
    USERGS_SYSRET64

1:
    /*
     * The fast path looked good when we started, but something changed
     * along the way and we need to switch to the slow path.  Calling
     * raise(3) will trigger this, for example.  IRQs are off.
     */
    TRACE_IRQS_ON
    ENABLE_INTERRUPTS(CLBR_NONE)
    SAVE_EXTRA_REGS
    movq    %rsp, %rdi
    call    syscall_return_slowpath /* returns with IRQs disabled */
    jmp return_from_SYSCALL_64

entry_SYSCALL64_slow_path:
    /* IRQs are off. */
    SAVE_EXTRA_REGS
    movq    %rsp, %rdi
    call    do_syscall_64       /* returns with IRQs disabled */

return_from_SYSCALL_64:
    RESTORE_EXTRA_REGS
    TRACE_IRQS_IRETQ        /* we're about to change IF */

    /*
     * Try to use SYSRET instead of IRET if we're returning to
     * a completely clean 64-bit userspace context.
     */
    movq    RCX(%rsp), %rcx
    movq    RIP(%rsp), %r11
    cmpq    %rcx, %r11          /* RCX == RIP */
    jne opportunistic_sysret_failed

    /*
     * On Intel CPUs, SYSRET with non-canonical RCX/RIP will #GP
     * in kernel space.  This essentially lets the user take over
     * the kernel, since userspace controls RSP.
     *
     * If width of "canonical tail" ever becomes variable, this will need
     * to be updated to remain correct on both old and new CPUs.
     */
    .ifne __VIRTUAL_MASK_SHIFT - 47
    .error "virtual address width changed -- SYSRET checks need update"
    .endif

    /* Change top 16 bits to be the sign-extension of 47th bit */
    shl $(64 - (__VIRTUAL_MASK_SHIFT+1)), %rcx
    sar $(64 - (__VIRTUAL_MASK_SHIFT+1)), %rcx

    /* If this changed %rcx, it was not canonical */
    cmpq    %rcx, %r11
    jne opportunistic_sysret_failed

    cmpq    $__USER_CS, CS(%rsp)        /* CS must match SYSRET */
    jne opportunistic_sysret_failed

    movq    R11(%rsp), %r11
    cmpq    %r11, EFLAGS(%rsp)      /* R11 == RFLAGS */
    jne opportunistic_sysret_failed

    /*
     * SYSCALL clears RF when it saves RFLAGS in R11 and SYSRET cannot
     * restore RF properly. If the slowpath sets it for whatever reason, we
     * need to restore it correctly.
     *
     * SYSRET can restore TF, but unlike IRET, restoring TF results in a
     * trap from userspace immediately after SYSRET.  This would cause an
     * infinite loop whenever #DB happens with register state that satisfies
     * the opportunistic SYSRET conditions.  For example, single-stepping
     * this user code:
     *
     *           movq   $stuck_here, %rcx
     *           pushfq
     *           popq %r11
     *   stuck_here:
     *
     * would never get past 'stuck_here'.
     */
    testq   $(X86_EFLAGS_RF|X86_EFLAGS_TF), %r11
    jnz opportunistic_sysret_failed

    /* nothing to check for RSP */

    cmpq    $__USER_DS, SS(%rsp)        /* SS must match SYSRET */
    jne opportunistic_sysret_failed

    /*
     * We win! This label is here just for ease of understanding
     * perf profiles. Nothing jumps here.
     */
syscall_return_via_sysret:
    /* rcx and r11 are already restored (see code above) */
    RESTORE_C_REGS_EXCEPT_RCX_R11
    /*
     * This opens a window where we have a user CR3, but are
     * running in the kernel.  This makes using the CS
     * register useless for telling whether or not we need to
     * switch CR3 in NMIs.  Normal interrupts are OK because
     * they are off here.
     */
    // KAISER 返回用户态需要切回用户页表
    SWITCH_USER_CR3
    /* 根据压栈的内容,恢复 rsp 为用户态的栈顶 */
    movq    RSP(%rsp), %rsp
    USERGS_SYSRET64

    // 无法快速返回,只能退化到 iret
opportunistic_sysret_failed:
    /*
     * This opens a window where we have a user CR3, but are
     * running in the kernel.  This makes using the CS
     * register useless for telling whether or not we need to
     * switch CR3 in NMIs.  Normal interrupts are OK because
     * they are off here.
     */
    SWITCH_USER_CR3
    SWAPGS
    jmp restore_c_regs_and_iret
END(entry_SYSCALL_64)
首先将当前用户态栈偏移 rsp 存到 per-cpu 变量 rsp_scratch 中,然后将 per-cpu 变量 cpu_current_top_of_stack ,即内核态的栈偏移加载到 rsp。随后将各寄存器中的值压入内核态的栈中,包括rax、rcx、r11、rdi、rsi、rdx、r10、r8、r9。接着根据系统调用号从系统调用表(sys_call_table) 中找到相应的处理函数并执行,最终通过 USERGS_SYSRET64 ,即 sysretq 返回。
标签:__,调用,st,理解,64,printf,深入,rsp 来源: https://www.cnblogs.com/libertyunionkjy/p/12977259.html
本站声明: 1. iCode9 技术分享网(下文简称本站)提供的所有内容,仅供技术学习、探讨和分享; 2. 关于本站的所有留言、评论、转载及引用,纯属内容发起人的个人观点,与本站观点和立场无关; 3. 关于本站的所有言论和文字,纯属内容发起人的个人观点,与本站观点和立场无关; 4. 本站文章均是网友提供,不完全保证技术分享内容的完整性、准确性、时效性、风险性和版权归属;如您发现该文章侵犯了您的权益,可联系我们第一时间进行删除; 5. 本站为非盈利性的个人网站,所有内容不会用来进行牟利,也不会利用任何形式的广告来间接获益,纯粹是为了广大技术爱好者提供技术内容和技术思想的分享性交流网站。