标签:node wda Appium bootstrap appium 编译 sh 自动化 WebDriverAgent
tips:WebDriverAgent是Appium1.6.3以后版本新添加的模块,为了让appium与iPhone(基于xcuitest)设备进行通信而添加的。但是,这个模块在是一个独立的项目,在使用前必须编译、安装。下面介绍Appium中的WebDriverAgent的编译和打包。
appium-xcuitest-driver依赖(两种编译,安装方式)
方法一:基于Apple ID,编译,安装项目
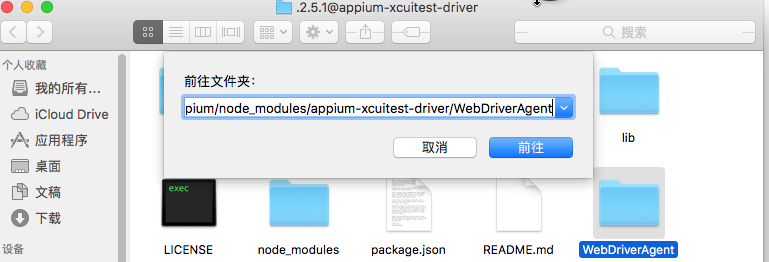
1. 进入WebDriverAgent安装目录。运行bootstrap
cd  /usr/local/lib/node_modules/appium/node_modules/appium-xcuitest-driver/WebDriverAgent (如果WebDriverAgent 所在路径和此不同,请自行查找)
mkdir -p Resources/WebDriverAgent.bundle
sh ./Scripts/bootstrap.sh
在运行sh ./Scripts/bootstrap.sh很可能会有因为咱们大中华局域网而网络连接失败。方法就是去App store下载了一个VPN代理软件,我下了一个评分最多且免费的,的确很好用。我就不说软件名称了。
再次运行sh ./Scripts/bootstrap.sh 无报错就OK了
2. 用Xcode打开WebDriverAgent,并且编译
进入WebDriverAgent 文件夹,可用如下方法
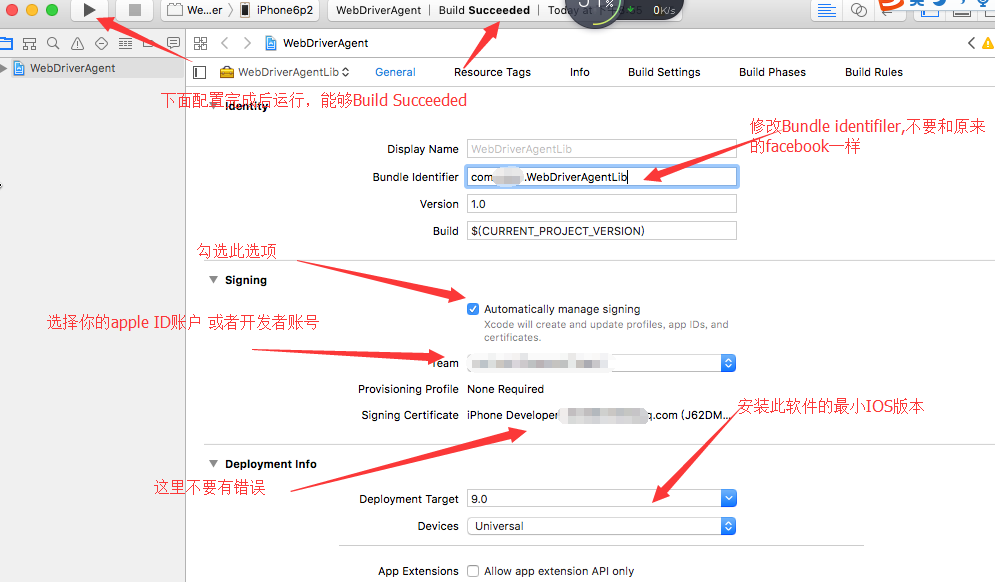
双击WebDriverAgent.xcodeproj打开此项目,这个项目由facebook开源 有兴趣的话可以研究https://github.com/facebook/WebDriverAgent/apple。在这里我们的目的就是更改一些配置,让他能够编译成功,首先编译之前你得有 ID账号,并且登录你的Xcode账户。当然如果有开发者账号那么会更好。
编译WebDriverAgentLib
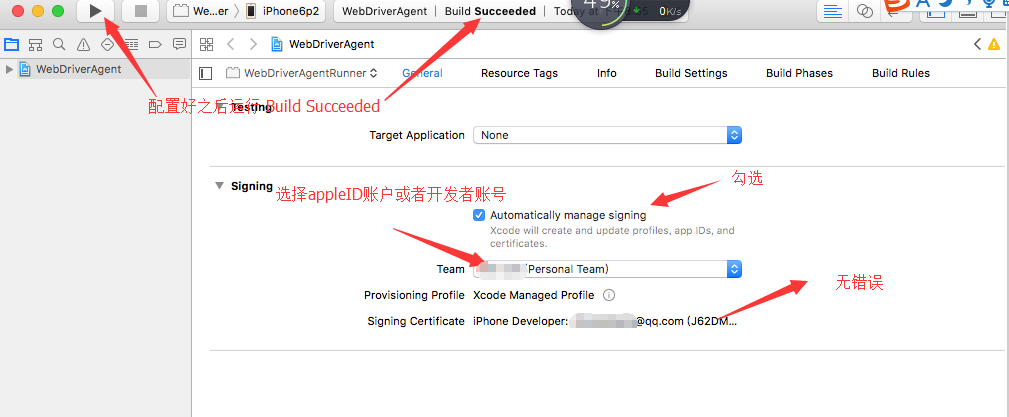
编译WebDriverAgentRunner

3. 建立服务WebDriverAgent ,关闭Xcode,进入WebDriverAgent 文件夹
cd  /usr/local/lib/node_modules/appium/node_modules/appium-xcuitest-driver/WebDriverAgent
xcodebuild -project WebDriverAgent.xcodeproj -scheme WebDriverAgentRunner -destination 'id=真机的udid' test

tips:这种方式安装好的iPhone端wda需要在iPhone设备的“管理”界面进行信任。并且,在使用的时候需要连接外网,不支持内网运行。
方法二:基于开发者证书编译、安装。
1. 进入WebDriverAgent安装目录。运行bootstrap
cd  /usr/local/lib/node_modules/appium/node_modules/appium-xcuitest-driver/WebDriverAgent (如果WebDriverAgent 所在路径和此不同,请自行查找)
mkdir -p Resources/WebDriverAgent.bundle
sh ./Scripts/bootstrap.sh
在运行sh ./Scripts/bootstrap.sh很可能会有因为咱们大中华局域网而网络连接失败。方法就是去App store下载了一个VPN代理软件,我下了一个评分最多且免费的,的确很好用。我就不说软件名称了。
再次运行sh ./Scripts/bootstrap.sh 无报错就OK了
2. 用Xcode打开WebDriverAgent
双击WebDriverAgent.xcodeproj打开此项目。
编译WebDriverAgentLib
不选中Automatially,在Team里面添加开发者账号

编译WebDriverAgentRunner
不选中Automatically,导入证书。其他的几个模块也是如此。

3. 建立服务WebDriverAgent ,关闭Xcode,进入WebDriverAgent 文件夹
cd  /usr/local/lib/node_modules/appium/node_modules/appium-xcuitest-driver/WebDriverAgent
xcodebuild -project WebDriverAgent.xcodeproj -scheme WebDriverAgentRunner -destination 'id=真机的udid' test

tips:这种方式在安装完成后,运行wda是不需要外网的,在内网环境下同样可以运行。
来自:https://www.cnblogs.com/baconLiu/p/6861431.html
标签:node,wda,Appium,bootstrap,appium,编译,sh,自动化,WebDriverAgent 来源: https://www.cnblogs.com/brianlai/p/11770560.html
本站声明: 1. iCode9 技术分享网(下文简称本站)提供的所有内容,仅供技术学习、探讨和分享; 2. 关于本站的所有留言、评论、转载及引用,纯属内容发起人的个人观点,与本站观点和立场无关; 3. 关于本站的所有言论和文字,纯属内容发起人的个人观点,与本站观点和立场无关; 4. 本站文章均是网友提供,不完全保证技术分享内容的完整性、准确性、时效性、风险性和版权归属;如您发现该文章侵犯了您的权益,可联系我们第一时间进行删除; 5. 本站为非盈利性的个人网站,所有内容不会用来进行牟利,也不会利用任何形式的广告来间接获益,纯粹是为了广大技术爱好者提供技术内容和技术思想的分享性交流网站。