标签:02 peerConnectionFactory -- void 入门教程 PeerConnection PeerConnectionFactory new l
上一篇: Android WebRTC完整入门教程01: 使用相机
在上一篇中完成了WebRTC最基本的使用--相机的使用. 这一篇将介绍WebRTC中最核心的概念PeerConnection , 给同一手机中的前后摄像头建立虚拟的连接, 相互传输画面.
PeerConnection
PeerConnection也就是Peer-to-Peer connection(P2P), 就是两个"人"的连接. 双方分别创建PeerConnection对象, 然后向对方发送自己的网络状况ICE和多媒体编码格式SDP(因为这时候连接还没建立, 所以发送内容是通过服务器完成的). 当双方网络和编码格式协商好后, 连接就建立好了, 这时从PeerConnection中能获取到对方的MediaStream数据流, 也就能播放对方的音视频了.
ICE
Interactive Connectivity Establishment, 交互式连接建立. 其实是一个整合STUN和TURN的框架, 给它提供STUN和TURN服务器地址, 它会自动选择优先级高的进行NAT穿透.
SDP
Session Description Protocol: 会话描述协议. 发送方的叫Offer, 接受方的叫Answer, 除了名字外没有区别. 就是一些文本描述本地的音视频编码和网络地址等.
主要流程
A(local)和B(remote)代表两个人, 初始化PeerConnectionFactory并分别创建PeerConnection , 并向PeerConnection 添加本地媒体流.
- A创建Offer
- A保存Offer(set local description)
- A发送Offer给B
- B保存Offer(set remote description)
- B创建Answer
- B保存Answer(set local description)
- B发送Answer给A
- A保存Answer(set remote description)
- A发送Ice Candidates给B
- B发送Ice Candidates给A
- A,B收到对方的媒体流并播放
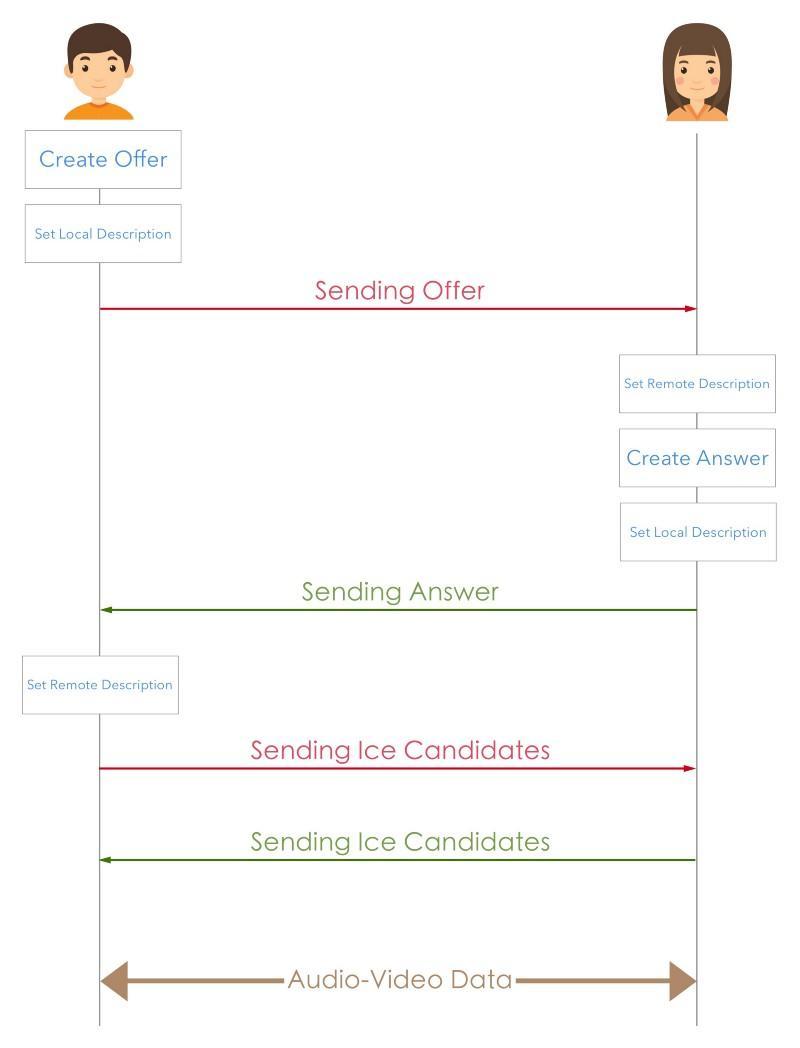
如上图所示, 总共11步, 虽然步骤不少, 但其实并不复杂, 双方基本是对称的. 主要代码如下.
准备步骤
主要是初始化PeerConnectionFactory和使用相机, 在上一篇已介绍过.
public class MainActivity extends AppCompatActivity {

    PeerConnectionFactory peerConnectionFactory;
    PeerConnection peerConnectionLocal;
    PeerConnection peerConnectionRemote;
    SurfaceViewRenderer localView;
    SurfaceViewRenderer remoteView;
    MediaStream mediaStreamLocal;
    MediaStream mediaStreamRemote;

    @Override
    protected void onCreate(Bundle savedInstanceState) {
        super.onCreate(savedInstanceState);
        setContentView(R.layout.activity_main);
        EglBase.Context eglBaseContext = EglBase.create().getEglBaseContext();

        // create PeerConnectionFactory
        PeerConnectionFactory.initialize(PeerConnectionFactory.InitializationOptions
                .builder(this)
                .createInitializationOptions());
        PeerConnectionFactory.Options options = new PeerConnectionFactory.Options();
        DefaultVideoEncoderFactory defaultVideoEncoderFactory =
                new DefaultVideoEncoderFactory(eglBaseContext, true, true);
        DefaultVideoDecoderFactory defaultVideoDecoderFactory =
                new DefaultVideoDecoderFactory(eglBaseContext);
        peerConnectionFactory = PeerConnectionFactory.builder()
                .setOptions(options)
                .setVideoEncoderFactory(defaultVideoEncoderFactory)
                .setVideoDecoderFactory(defaultVideoDecoderFactory)
                .createPeerConnectionFactory();

        SurfaceTextureHelper surfaceTextureHelper = SurfaceTextureHelper.create("CaptureThread", eglBaseContext);
        // create VideoCapturer
        VideoCapturer videoCapturer = createCameraCapturer(true);
        VideoSource videoSource = peerConnectionFactory.createVideoSource(videoCapturer.isScreencast());
        videoCapturer.initialize(surfaceTextureHelper, getApplicationContext(), videoSource.getCapturerObserver());
        videoCapturer.startCapture(480, 640, 30);

        localView = findViewById(R.id.localView);
        localView.setMirror(true);
        localView.init(eglBaseContext, null);

        // create VideoTrack
        VideoTrack videoTrack = peerConnectionFactory.createVideoTrack("100", videoSource);
//        // display in localView
//        videoTrack.addSink(localView);


        SurfaceTextureHelper remoteSurfaceTextureHelper = SurfaceTextureHelper.create("RemoteCaptureThread", eglBaseContext);
        // create VideoCapturer
        VideoCapturer remoteVideoCapturer = createCameraCapturer(false);
        VideoSource remoteVideoSource = peerConnectionFactory.createVideoSource(remoteVideoCapturer.isScreencast());
        remoteVideoCapturer.initialize(remoteSurfaceTextureHelper, getApplicationContext(), remoteVideoSource.getCapturerObserver());
        remoteVideoCapturer.startCapture(480, 640, 30);

        remoteView = findViewById(R.id.remoteView);
        remoteView.setMirror(false);
        remoteView.init(eglBaseContext, null);

        // create VideoTrack
        VideoTrack remoteVideoTrack = peerConnectionFactory.createVideoTrack("102", remoteVideoSource);
//        // display in remoteView
//        remoteVideoTrack.addSink(remoteView);


        mediaStreamLocal = peerConnectionFactory.createLocalMediaStream("mediaStreamLocal");
        mediaStreamLocal.addTrack(videoTrack);

        mediaStreamRemote = peerConnectionFactory.createLocalMediaStream("mediaStreamRemote");
        mediaStreamRemote.addTrack(remoteVideoTrack);

        call(mediaStreamLocal, mediaStreamRemote);
    }
}
使用相机
对createCameraCapturer()方法略作修改, 传入boolean参数就能分别获取前后摄像头.
 private VideoCapturer createCameraCapturer(boolean isFront) {
        Camera1Enumerator enumerator = new Camera1Enumerator(false);
        final String[] deviceNames = enumerator.getDeviceNames();

        // First, try to find front facing camera
        for (String deviceName : deviceNames) {
            if (isFront ? enumerator.isFrontFacing(deviceName) : enumerator.isBackFacing(deviceName)) {
                VideoCapturer videoCapturer = enumerator.createCapturer(deviceName, null);

                if (videoCapturer != null) {
                    return videoCapturer;
                }
            }
        }

        return null;
    }
拨打
建立连接的两人肯定有一个是拨打方, 另一个是接受方. 拨打方创建Offer发给接受方, 接收方收到后回复Answer.
    private void call(MediaStream localMediaStream, MediaStream remoteMediaStream) {
        List<PeerConnection.IceServer> iceServers = new ArrayList<>();
        peerConnectionLocal = peerConnectionFactory.createPeerConnection(iceServers, new PeerConnectionAdapter("localconnection") {
            @Override
            public void onIceCandidate(IceCandidate iceCandidate) {
                super.onIceCandidate(iceCandidate);
                peerConnectionRemote.addIceCandidate(iceCandidate);
            }

            @Override
            public void onAddStream(MediaStream mediaStream) {
                super.onAddStream(mediaStream);
                VideoTrack remoteVideoTrack = mediaStream.videoTracks.get(0);
                runOnUiThread(() -> {
                    remoteVideoTrack.addSink(localView);
                });
            }
        });

        peerConnectionRemote = peerConnectionFactory.createPeerConnection(iceServers, new PeerConnectionAdapter("remoteconnection") {
            @Override
            public void onIceCandidate(IceCandidate iceCandidate) {
                super.onIceCandidate(iceCandidate);
                peerConnectionLocal.addIceCandidate(iceCandidate);
            }

            @Override
            public void onAddStream(MediaStream mediaStream) {
                super.onAddStream(mediaStream);
                VideoTrack localVideoTrack = mediaStream.videoTracks.get(0);
                runOnUiThread(() -> {
                    localVideoTrack.addSink(remoteView);
                });
            }
        });

        peerConnectionLocal.addStream(localMediaStream);
        peerConnectionLocal.createOffer(new SdpAdapter("local offer sdp") {
            @Override
            public void onCreateSuccess(SessionDescription sessionDescription) {
                super.onCreateSuccess(sessionDescription);
                // todo crashed here
                peerConnectionLocal.setLocalDescription(new SdpAdapter("local set local"), sessionDescription);
                peerConnectionRemote.addStream(remoteMediaStream);
                peerConnectionRemote.setRemoteDescription(new SdpAdapter("remote set remote"), sessionDescription);
                peerConnectionRemote.createAnswer(new SdpAdapter("remote answer sdp") {
                    @Override
                    public void onCreateSuccess(SessionDescription sdp) {
                        super.onCreateSuccess(sdp);
                        peerConnectionRemote.setLocalDescription(new SdpAdapter("remote set local"), sdp);
                        peerConnectionLocal.setRemoteDescription(new SdpAdapter("local set remote"), sdp);
                    }
                }, new MediaConstraints());
            }
        }, new MediaConstraints());
    }
}
注意: 虽然这里没有真正使用到网络, 但是要添加网络权限
网上大部分本地回环(Loopback)的Demo都只用到一个摄像头, 这里使用到同一个手机的前后摄像头, 把它们当做两个客户端, 建立模拟连接, 发送媒体数据. 这跟实际WebRTC工作流程非常接近了, 只有一点差别--这里的数据传输是内存共享, 而实际是通过网络发送.
附录
下一篇: Android WebRTC完整入门教程03: 信令
标签:02,peerConnectionFactory,--,void,入门教程,PeerConnection,PeerConnectionFactory,new,l 来源: https://www.cnblogs.com/rome753/p/16491455.html
本站声明: 1. iCode9 技术分享网(下文简称本站)提供的所有内容,仅供技术学习、探讨和分享; 2. 关于本站的所有留言、评论、转载及引用,纯属内容发起人的个人观点,与本站观点和立场无关; 3. 关于本站的所有言论和文字,纯属内容发起人的个人观点,与本站观点和立场无关; 4. 本站文章均是网友提供,不完全保证技术分享内容的完整性、准确性、时效性、风险性和版权归属;如您发现该文章侵犯了您的权益,可联系我们第一时间进行删除; 5. 本站为非盈利性的个人网站,所有内容不会用来进行牟利,也不会利用任何形式的广告来间接获益,纯粹是为了广大技术爱好者提供技术内容和技术思想的分享性交流网站。