标签:username SpringSecurity 流程 request authentication 认证 Authentication null
1. 前言
SpringSecurity的认证,其实就是我们的登录验证。
Web系统中登录验证的核心就是凭证,比较多使用的是Session和JWT,其原理都是在用户成功登录后返回给用户一个凭证,后续用户访问时需要携带凭证来辨别自己的身份。后端会根据这个凭证进行安全判断,如果凭证没问题则代表已登录,否则则直接拒绝请求。
以下内容会先分析源码理清楚认证的流程。
2. SpringSecurity的工作流程
要想分析SpringSecurity的认证流程,就一定要先了解整个SpringSecurity的工作流程,我们才能最终进行一些自定义操作。
Spring Security的web基础是Filters(过滤器),它是通过一层层的Filters来对web请求做处理的,每一个web请求会经过一条过滤器链,在这个过程中完成认证与授权。
其具体工作流程是这样的:
-
在Spring的过滤器链中,Spring Security向其添加了一个
FilterChainProxy过滤器,而这个过滤器只是一个代理过滤器,通过这个代理过滤器创建一套SpringSecurity自定义的过滤器链(认证与授权过滤器就在这过滤器链中),然后再执行这一系列自定义的过滤器。如图所示(网上找的)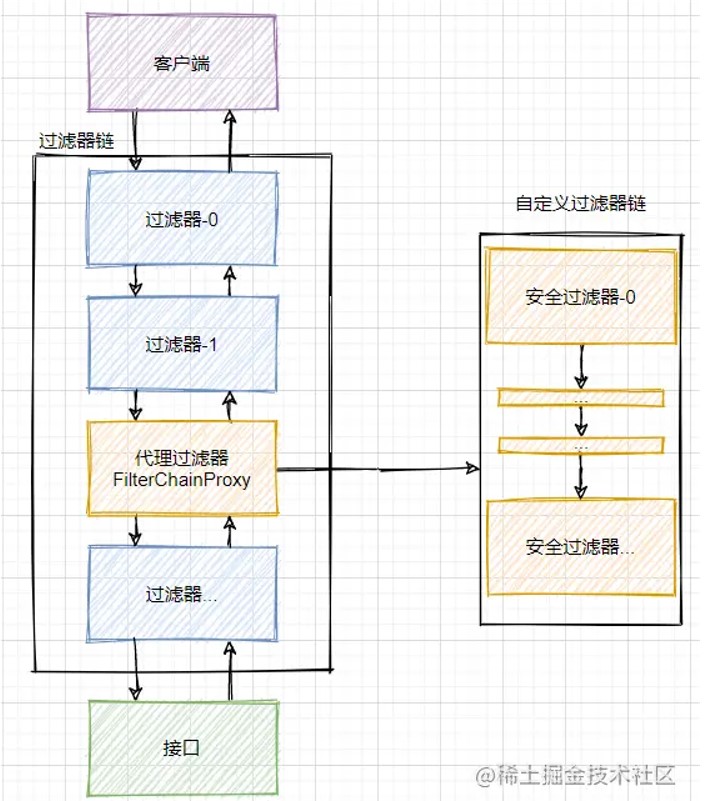
-
然后我们可以来看看这个代理过滤器
FilterChainProxy的部分源码: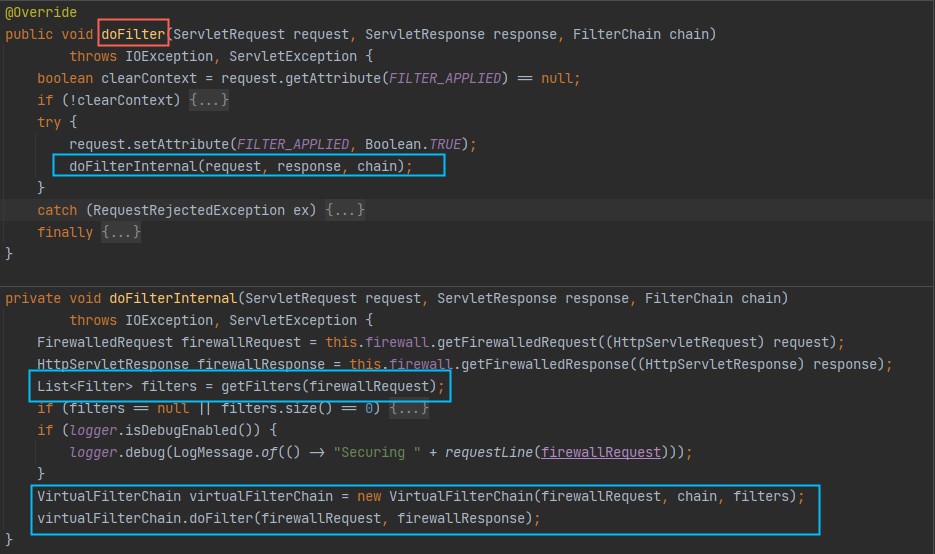
下面debug程序,设置断点,看看过滤器链中有哪些过滤器
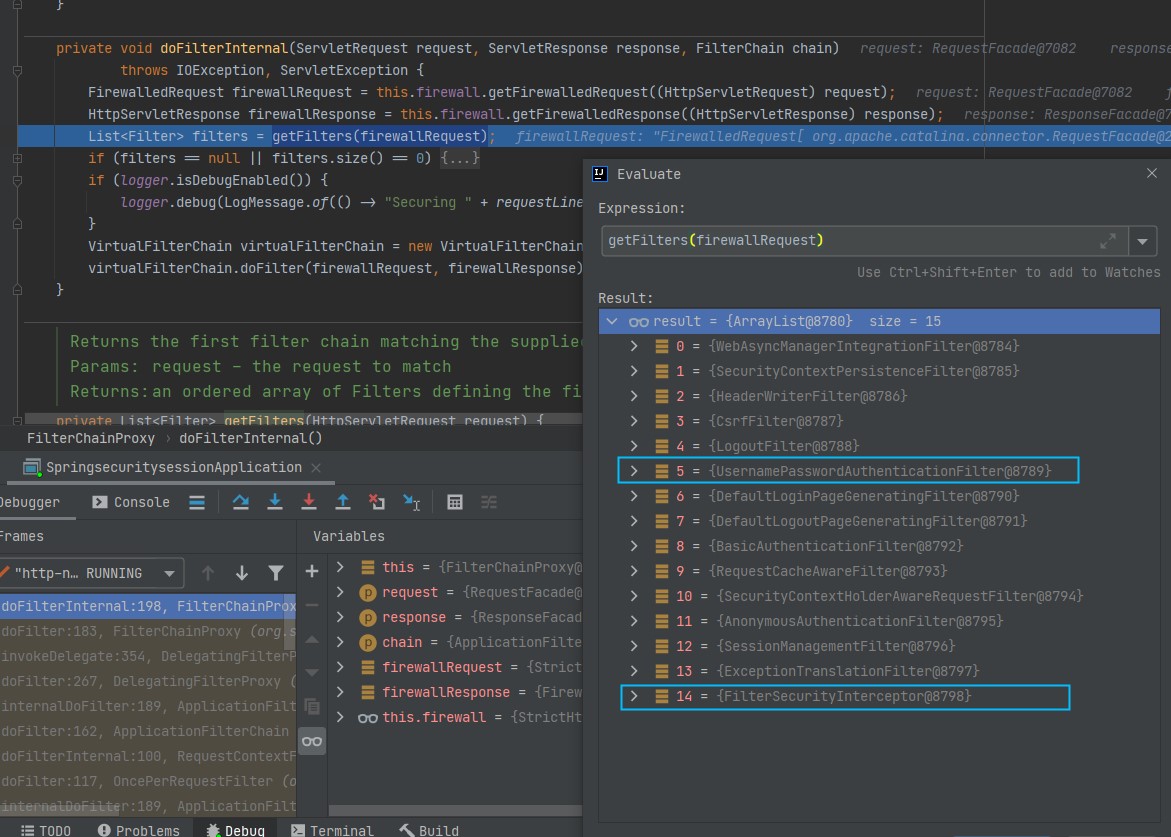
这些过滤器中,我们重点关注
UsernamePasswordAuthenticationFilter和FilterSecurityInterceptor,其中UsernamePasswordAuthenticationFilter负责登录认证,FilterSecurityInterceptor负责授权。 -
SpringSecurity的基本原理(网络上找的一张图)
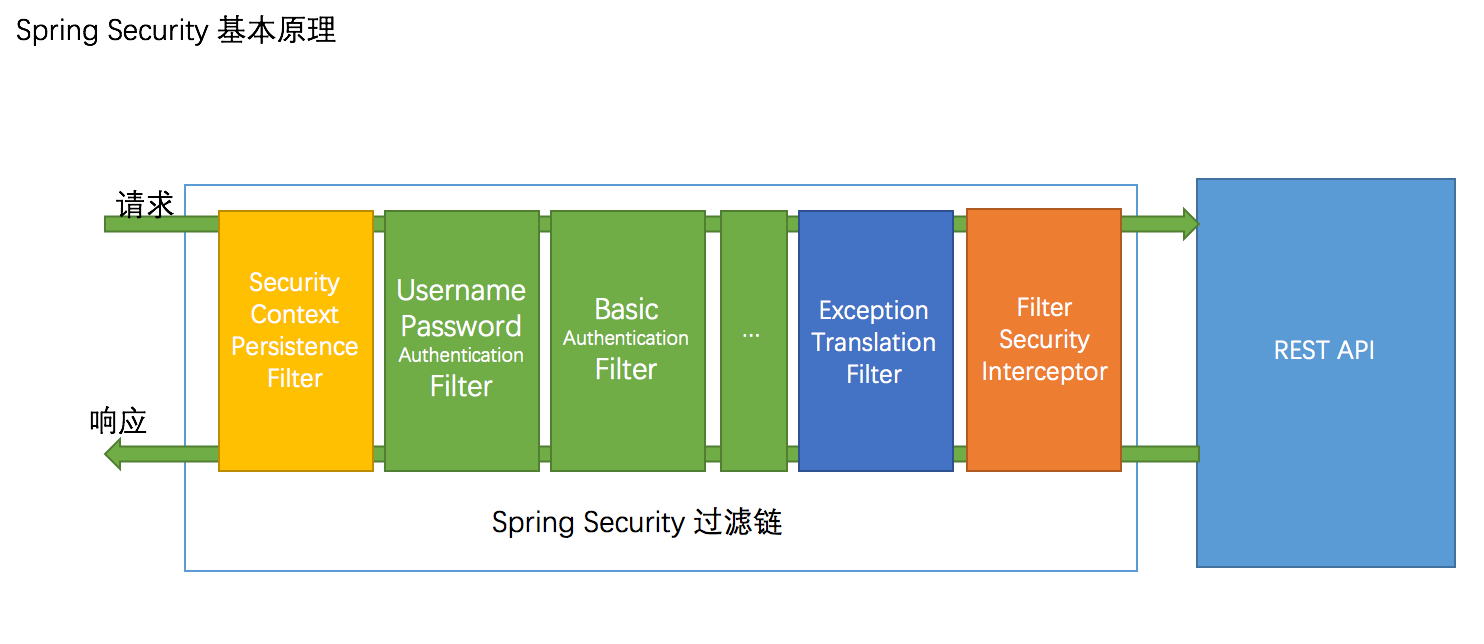
如图所示,一个请求想要访问到API就会从左到右经过蓝线框里的过滤器,其中绿色部分是负责认证的过滤器,蓝色部分是负责异常处理,橙色部分则是负责授权,对应了我们代码debug的过滤器链。
注意:只有在配置中打开了
formLogin配置项,过滤器链中才会加入它们,否则是不会被加到过滤器链的。SpringSecurity中有两个配置项叫
formLogin和httpBasic,分别对应着表单认证方式(过滤器是UsernamePasswordAuthenticationFilter)和Basic认证方式(过滤器是BasicAuthenticationFilter),分别对应上图
3. SpringSecurity中的重要组件
-
Authentication:认证接口,存储了认证信息,代表当前登录用户 -
SecurityContext:上下文对象,Authentication对象会放在里面 -
SecurityContextHolder:用于拿到上下文对象的静态工具类 -
AuthenticationManager:用于校验Authentication,返回一个认证完成后的Authentication对象
-
我们需要通过
SecurityContext上下文对象来获取认证对象Authentication,而SecurityContext又是交给SecurityContextHolder进行管理的。 -
查看源码
-
SecurityContext:
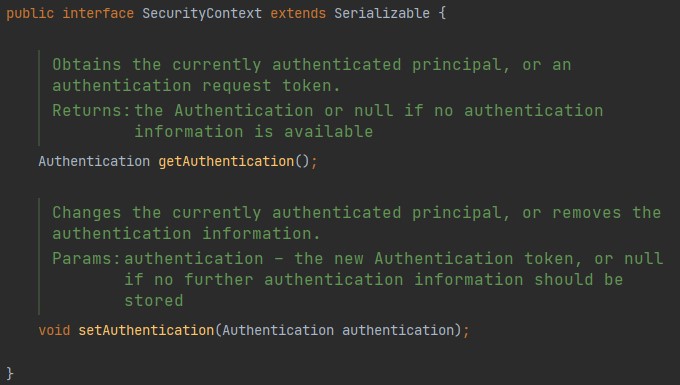
接口只有两个方法,作用就是get/set Authentication
-
SecurityContextHolder:
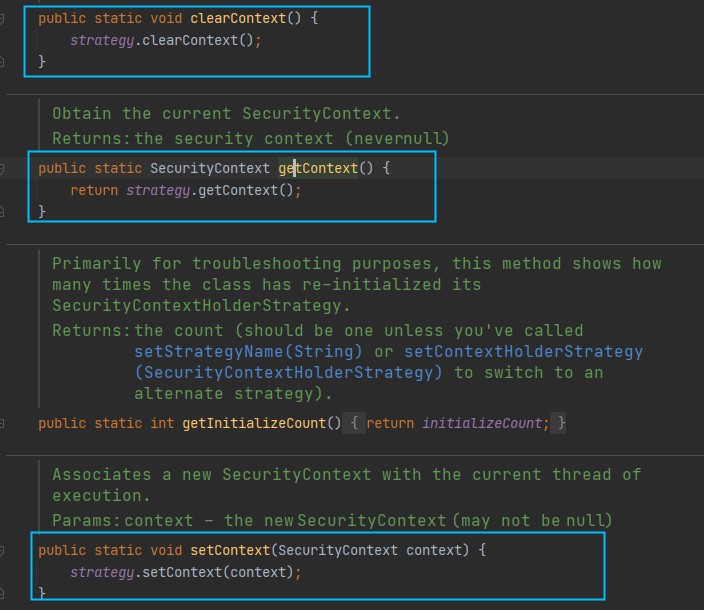
可以人为这是
SecurityContext的一个静态工具类,主要有get,set,clear处理SecurityContext,其原理是使用ThreadLocal来保证一个线程中传递同一个对象
-
-
我们可以通过以下代码在程序任何地方获取
AuthenticationAuthentication authentication = SecurityContextHolder.getContext().getAuthentication(); -
再看看
Authentication和AuthenticationManager源码Authentication: (注释太长不好截图)
public interface Authentication extends Principal, Serializable {
     Collection<? extends GrantedAuthority> getAuthorities();

     Object getCredentials();

     Object getDetails();

     Object getPrincipal();

     boolean isAuthenticated();

     void setAuthenticated(boolean isAuthenticated) throws IllegalArgumentException;
}
这几个方法的作用如下:
getAuthorities:获取用户权限(角色信息)getCredentials:获取证明用户认证的信息,一般是指密码等信息getDetails:获取用户额外的信息getPrincipal:获取用户身份信息,在未认证的时候获取的是用户名,在已认证后获取的是UserDetails对象isAuthenticated:获取当前Authentication是否已认证setAuthenticated:设置当前Authentication是否已认证(true/false)
AuthenticationManager:
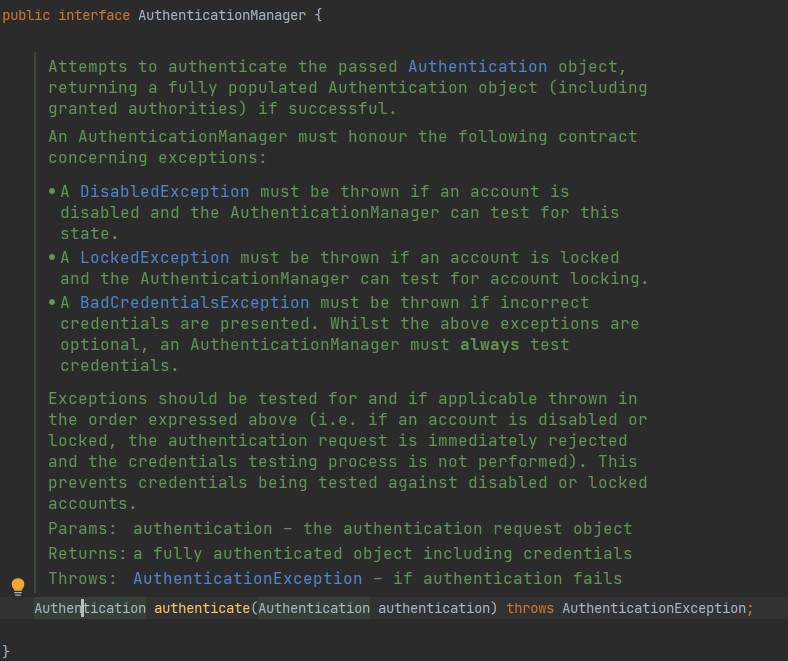
该接口定义了一个认证方法,将一个未被认证的
Authentication传入,返回一个已认证的Authentication -
总结下SpringSecurity的认证流程
将上面四个组件串联起来,可以大致了解到认证的流程:
- 一个请求带着身份信息进来
- 经过
AuthenticationManager进行认证 - 然后通过
SecurityContextHolder获取到SecurityContext - 最后将认证后的
Authentication放入SecurityContext,这样下一个请求进来就能知道是否已认证过
4. 完整源码流程
有了以上的一些基础了解后,我们来顺着源码流程走一边,理清整个认证的流程。
基于formLogin的流程分析,SpringSecurity默认也是formLogin。
以下源码我都将注释去掉,否则太长了!
-
第一步:请求进来,到达
UsernamePasswordAuthenticationFilter过滤器public class UsernamePasswordAuthenticationFilter extends AbstractAuthenticationProcessingFilter { public static final String SPRING_SECURITY_FORM_USERNAME_KEY = "username"; public static final String SPRING_SECURITY_FORM_PASSWORD_KEY = "password"; private static final AntPathRequestMatcher DEFAULT_ANT_PATH_REQUEST_MATCHER = new AntPathRequestMatcher("/login", "POST"); private String usernameParameter = SPRING_SECURITY_FORM_USERNAME_KEY; private String passwordParameter = SPRING_SECURITY_FORM_PASSWORD_KEY; private boolean postOnly = true; public UsernamePasswordAuthenticationFilter() { super(DEFAULT_ANT_PATH_REQUEST_MATCHER); } public UsernamePasswordAuthenticationFilter(AuthenticationManager authenticationManager) { super(DEFAULT_ANT_PATH_REQUEST_MATCHER, authenticationManager); } @Override public Authentication attemptAuthentication(HttpServletRequest request, HttpServletResponse response) throws AuthenticationException { if (this.postOnly && !request.getMethod().equals("POST")) { throw new AuthenticationServiceException("Authentication method not supported: " + request.getMethod()); } String username = obtainUsername(request); username = (username != null) ? username : ""; username = username.trim(); String password = obtainPassword(request); password = (password != null) ? password : ""; UsernamePasswordAuthenticationToken authRequest = new UsernamePasswordAuthenticationToken(username, password); // Allow subclasses to set the "details" property setDetails(request, authRequest); return this.getAuthenticationManager().authenticate(authRequest); } @Nullable protected String obtainPassword(HttpServletRequest request) { return request.getParameter(this.passwordParameter); } @Nullable protected String obtainUsername(HttpServletRequest request) { return request.getParameter(this.usernameParameter); } protected void setDetails(HttpServletRequest request, UsernamePasswordAuthenticationToken authRequest) { authRequest.setDetails(this.authenticationDetailsSource.buildDetails(request)); } public void setUsernameParameter(String usernameParameter) { Assert.hasText(usernameParameter, "Username parameter must not be empty or null"); this.usernameParameter = usernameParameter; } public void setPasswordParameter(String passwordParameter) { Assert.hasText(passwordParameter, "Password parameter must not be empty or null"); this.passwordParameter = passwordParameter; } public void setPostOnly(boolean postOnly) { this.postOnly = postOnly; } public final String getUsernameParameter() { return this.usernameParameter; } public final String getPasswordParameter() { return this.passwordParameter; } }分析:
-
过滤器中定义了一些默认的信息,比如默认用户名参数为username,密码参数为password,默认请求为
/login,但同时也提供了set、get方法让我们自定义,自定义的方式就是在配置类WebSecurityConfigurerAdapter的子类中重写configure(HttpSecurity http)设置 -
过滤器的处理核心就是
doFilter,但我们在UsernamePasswordAuthenticationFilter中并没有看到,这是因为在他父类AbstractAuthenticationProcessingFilter实现了。 -
进入
AbstractAuthenticationProcessingFilter查看@Override public void doFilter(ServletRequest request, ServletResponse response, FilterChain chain) throws IOException, ServletException { doFilter((HttpServletRequest) request, (HttpServletResponse) response, chain); } private void doFilter(HttpServletRequest request, HttpServletResponse response, FilterChain chain) throws IOException, ServletException { // 先通过请求的uri判断是否需要认证,比如默认的/login就不需要认证了 if (!requiresAuthentication(request, response)) { chain.doFilter(request, response); return; } try { Authentication authenticationResult = attemptAuthentication(request, response); if (authenticationResult == null) { // return immediately as subclass has indicated that it hasn't completed return; } this.sessionStrategy.onAuthentication(authenticationResult, request, response); // Authentication success if (this.continueChainBeforeSuccessfulAuthentication) { chain.doFilter(request, response); } successfulAuthentication(request, response, chain, authenticationResult); } catch (InternalAuthenticationServiceException failed) { this.logger.error("An internal error occurred while trying to authenticate the user.", failed); unsuccessfulAuthentication(request, response, failed); } catch (AuthenticationException ex) { // Authentication failed unsuccessfulAuthentication(request, response, ex); } } protected void successfulAuthentication(HttpServletRequest request, HttpServletResponse response, FilterChain chain,Authentication authResult) throws IOException, ServletException { SecurityContext context = SecurityContextHolder.createEmptyContext(); context.setAuthentication(authResult); SecurityContextHolder.setContext(context); if (this.logger.isDebugEnabled()) { this.logger.debug(LogMessage.format("Set SecurityContextHolder to %s", authResult)); } this.rememberMeServices.loginSuccess(request, response, authResult); if (this.eventPublisher != null) { this.eventPublisher.publishEvent(new InteractiveAuthenticationSuccessEvent(authResult, this.getClass())); } this.successHandler.onAuthenticationSuccess(request, response, authResult); }分析:
- doFilter首先判断uri是否需要认证
- 接着执行方法
Authentication authenticationResult = attemptAuthentication(request, response);进行认证,从函数名也能看出是尝试认证,认证成功获取认证对象Authentication,这是这个过滤器的核心 - 认证成功,则执行
successfulAuthentication(),将已认证的Authentication存放到SecurityContext,认证失败则通过认证失败处理器AuthenticationFailureHandler处理 - 接下来研究下
attemptAuthentication方法,这个方法在当前父类中是一个抽象方法,由子类实现,而AbstractAuthenticationProcessingFilter的一个子类就是UsernamepasswordAuthenticationFilter,回到这个类看看这个attemptAuthentication方法
-
分析
UsernamepasswordAuthenticationFilter的attemptAuthentication方法@Override public Authentication attemptAuthentication(HttpServletRequest request, HttpServletResponse response) throws AuthenticationException { if (this.postOnly && !request.getMethod().equals("POST")) { throw new AuthenticationServiceException("Authentication method not supported: " + request.getMethod()); } String username = obtainUsername(request); username = (username != null) ? username : ""; username = username.trim(); String password = obtainPassword(request); password = (password != null) ? password : ""; UsernamePasswordAuthenticationToken authRequest = new UsernamePasswordAuthenticationToken(username, password); // Allow subclasses to set the "details" property setDetails(request, authRequest); return this.getAuthenticationManager().authenticate(authRequest); }分析:
-
从源码可以看出,首先如果不是POST请求,直接抛出异常
-
然后从当前请求中获取用户名username和密码password
-
通过当前用户名和密码,构造一个令牌
UsernamePasswordAuthenticationToken这个
UsernamePasswordAuthenticationToken继承了AbstractAuthenticationToken,而AbstractAuthenticationToken又实现了Authentication接口,所以实质上这个token就是一个Authentication对象 -
最后调用
this.getAuthenticationManager().authenticate(authRequest)返回,这里就用到了AuthenticationManager去认证了,这个稍后在看
-
-
接着看这个方法
this.getAuthenticationManager().authenticate(authRequest)这里使用的是
AuthenticationManager接口的方法去进行认证,这个方法authenticate很奇特,传入的参数和返回值类型都是Authentication.public interface AuthenticationManager { Authentication authenticate(Authentication authentication) throws AuthenticationException; }该接口方法的作用是:**对用户未认证的凭据进行认证,认证通过后返回已认证的凭据,否则抛出认证异常
AuthenticationException分析:
从源码可以看到,这个
AuthenticationManager是一个接口,所以他并不是真正做事情的那个,只是提供了一个标准,真正实现功能的是它的子类。通过(ctrl + h)查看
AuthenticationManager接口的实现类,可以看到如下: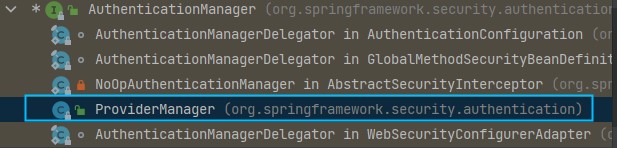
其他几个都是内部类,所以我们找到了
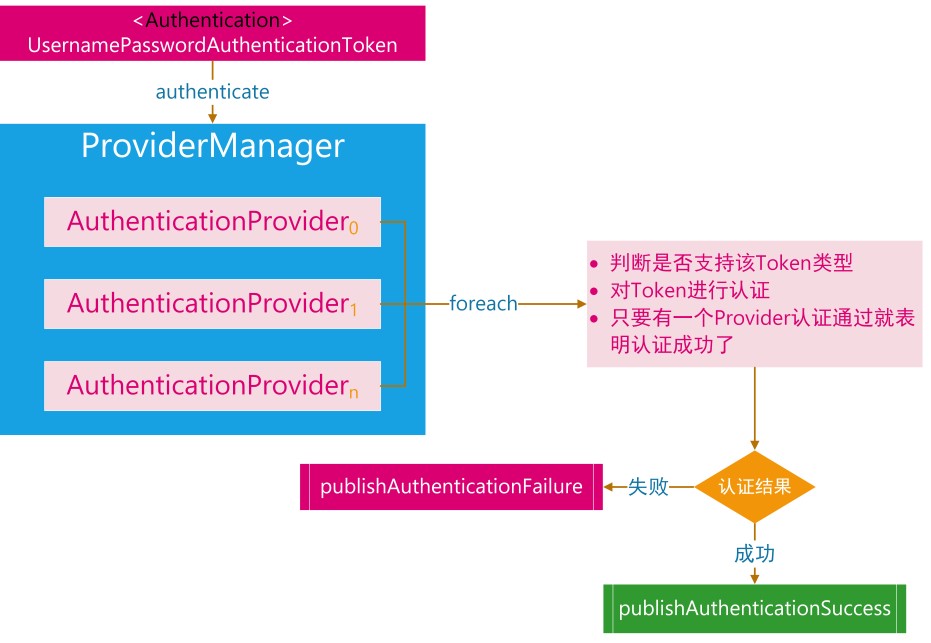
ProviderManager实现了AuthenticationManager我们看看他实现的
authenticate方法:@Override public Authentication authenticate(Authentication authentication) throws AuthenticationException { Class<? extends Authentication> toTest = authentication.getClass(); AuthenticationException lastException = null; AuthenticationException parentException = null; Authentication result = null; Authentication parentResult = null; int currentPosition = 0; int size = this.providers.size(); // 遍历AuthenticationProvider,列表中的每个Provider依次进行认证 for (AuthenticationProvider provider : getProviders()) { if (!provider.supports(toTest)) { continue; } if (logger.isTraceEnabled()) { logger.trace(LogMessage.format("Authenticating request with %s (%d/%d)", provider.getClass().getSimpleName(), ++currentPosition, size)); } try { // 真正的验证 result = provider.authenticate(authentication); if (result != null) { copyDetails(authentication, result); break; } } catch (AccountStatusException | InternalAuthenticationServiceException ex) { prepareException(ex, authentication); // SEC-546: Avoid polling additional providers if auth failure is due to // invalid account status throw ex; } catch (AuthenticationException ex) { lastException = ex; } } // 如果 AuthenticationProvider 列表中的Provider都认证失败,且之前有构造一个 AuthenticationManager 实现类,那么利用AuthenticationManager 实现类 继续认证 if (result == null && this.parent != null) { // Allow the parent to try. try { parentResult = this.parent.authenticate(authentication); result = parentResult; } catch (ProviderNotFoundException ex) { } catch (AuthenticationException ex) { parentException = ex; lastException = ex; } } // 认证成功 if (result != null) { if (this.eraseCredentialsAfterAuthentication && (result instanceof CredentialsContainer)) { // Authentication is complete. Remove credentials and other secret data // from authentication // 认证成功后删除验证信息 ((CredentialsContainer) result).eraseCredentials(); } // If the parent AuthenticationManager was attempted and successful then it // will publish an AuthenticationSuccessEvent // This check prevents a duplicate AuthenticationSuccessEvent if the parent // AuthenticationManager already published it // 发布登录成功事件 if (parentResult == null) { this.eventPublisher.publishAuthenticationSuccess(result); } return result; } // Parent was null, or didn't authenticate (or throw an exception). if (lastException == null) { lastException = new ProviderNotFoundException(this.messages.getMessage("ProviderManager.providerNotFound", new Object[] { toTest.getName() }, "No AuthenticationProvider found for {0}")); } // If the parent AuthenticationManager was attempted and failed then it will // publish an AbstractAuthenticationFailureEvent // This check prevents a duplicate AbstractAuthenticationFailureEvent if the // parent AuthenticationManager already published it if (parentException == null) { prepareException(lastException, authentication); } throw lastException; }分析:
从源码中看出,
ProviderManager并不是自己直接对请求进行验证,而是循环一个AuthenticationProvider列表,列表中每一个provider依次进行判断是否使用它进行验证。 -
接下来看看
AuthenticationProvider这个
AuthenticationProvider也是一个接口public interface AuthenticationProvider { // 认证方法 Authentication authenticate(Authentication authentication) throws AuthenticationException; // 该Provider是否支持对应的Authentication类型 boolean supports(Class<?> authentication); }同样看看这个接口有哪些实现类:
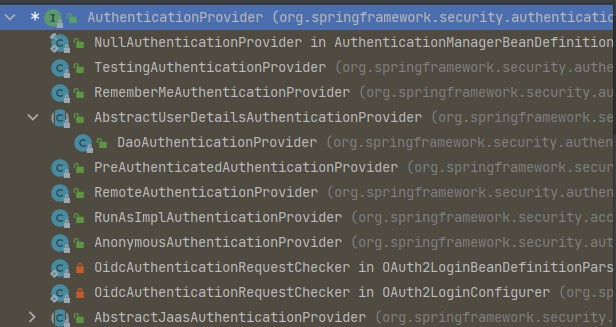
这个接口的实现类和继承类有很多,我们直接看与
User相关的,会看到有一个AbstractUserDetailsAuthenticationProvider抽象类,他的实现类是DaoAuthenticationProvider, 才是真正做验证的人authenticate
是由AbstractUserDetailsAuthenticationProvider`实现的,源码如下:@Override public Authentication authenticate(Authentication authentication) throws AuthenticationException { Assert.isInstanceOf(UsernamePasswordAuthenticationToken.class, authentication,() -> this.messages.getMessage("AbstractUserDetailsAuthenticationProvider.onlySupports","Only UsernamePasswordAuthenticationToken is supported")); // 判断用户名是否为空 String username = determineUsername(authentication); boolean cacheWasUsed = true; // 先查缓存 UserDetails user = this.userCache.getUserFromCache(username); if (user == null) { cacheWasUsed = false; try { // retrieveUser是一个抽象方法,子类中实现 user = retrieveUser(username, (UsernamePasswordAuthenticationToken) authentication); } catch (UsernameNotFoundException ex) { this.logger.debug("Failed to find user '" + username + "'"); if (!this.hideUserNotFoundExceptions) { throw ex; } throw new BadCredentialsException(this.messages .getMessage("AbstractUserDetailsAuthenticationProvider.badCredentials", "Bad credentials")); } Assert.notNull(user, "retrieveUser returned null - a violation of the interface contract"); } // 一些检查 try { this.preAuthenticationChecks.check(user); additionalAuthenticationChecks(user, (UsernamePasswordAuthenticationToken) authentication); } catch (AuthenticationException ex) { if (!cacheWasUsed) { throw ex; } // There was a problem, so try again after checking // we're using latest data (i.e. not from the cache) cacheWasUsed = false; // retrieveUser是一个抽象方法,子类中实现 user = retrieveUser(username, (UsernamePasswordAuthenticationToken) authentication); this.preAuthenticationChecks.check(user); additionalAuthenticationChecks(user, (UsernamePasswordAuthenticationToken) authentication); } this.postAuthenticationChecks.check(user); if (!cacheWasUsed) { this.userCache.putUserInCache(user); } Object principalToReturn = user; if (this.forcePrincipalAsString) { principalToReturn = user.getUsername(); } // 创建一个成功的Authentication对象返回 return createSuccessAuthentication(principalToReturn, authentication, user); }在这个
authenticate方法里,真正做验证的方法是:retrieveUser,该方法是在子类DaoAuthenticationProvider中实现的@Override protected final UserDetails retrieveUser(String username, UsernamePasswordAuthenticationToken authentication) throws AuthenticationException { prepareTimingAttackProtection(); try { // 通过loadUserByUsername获取用户信息,返回一个UserDetails UserDetails loadedUser = this.getUserDetailsService().loadUserByUsername(username); if (loadedUser == null) { throw new InternalAuthenticationServiceException( "UserDetailsService returned null, which is an interface contract violation"); } return loadedUser; } catch (UsernameNotFoundException ex) { mitigateAgainstTimingAttack(authentication); throw ex; } catch (InternalAuthenticationServiceException ex) { throw ex; } catch (Exception ex) { throw new InternalAuthenticationServiceException(ex.getMessage(), ex); } } // 重写了父类的方法,对密码进行一些加密操作 @Override protected Authentication createSuccessAuthentication(Object principal, Authentication authentication, UserDetails user) { boolean upgradeEncoding = this.userDetailsPasswordService != null && this.passwordEncoder.upgradeEncoding(user.getPassword()); if (upgradeEncoding) { String presentedPassword = authentication.getCredentials().toString(); String newPassword = this.passwordEncoder.encode(presentedPassword); user = this.userDetailsPasswordService.updatePassword(user, newPassword); } return super.createSuccessAuthentication(principal, authentication, user); }分析:
这个
retrieveUser方法,就是调用UserDetailsService的loadUserByUsername方法,这个UserDetailsService就是一个服务接口,加载UserDetails,一般是从数据库中去查找用户,封装为UserDetails对象返回,找不到就报异常。 SpringSecurity默认实现了一个UserDetails的实现类User,当我们使用将用户信息存储在内存的方式
auth.inMemoryAuthentication()时,会创建一个InMemoryUserDetailsManager,这个类创建了一个UserDetails的实现类User,同时这个类实现了
UserDetailsManager接口,而UserDEtailsManager又是继承自UserDetailsService,所以默认情况下的话就是调用InMemoryUserDetailsManager类的loadUserByUsername方法 因此,当我们需要自定义时,则需要自己实现
UserDetailsService接口和UserDetails接口 -
UserDetailsService和UserDetails接口UserDetailsService就是定义了一个加载UserDetails的接口,通常我们会实现这个接口,然后从数据库中查询相关用户信息,再返回。public interface UserDetailsService { UserDetails loadUserByUsername(String username) throws UsernameNotFoundException; }UserDetails也是一个接口,在实际开发中也会对他进行定制化,提供核心用户信息。SpringSecurity处于安全考虑,UserDetails只是存储用户信息,这些信息最后会封装到
Authentication对象中的。public interface UserDetails extends Serializable { // 返回用户的权限集合 Collection<? extends GrantedAuthority> getAuthorities(); /** * Returns the password used to authenticate the user. * @return the password */ String getPassword(); /** * Returns the username used to authenticate the user. Cannot return * <code>null</code>. * @return the username (never <code>null</code>) */ String getUsername(); // 用户账户是否过期 boolean isAccountNonExpired(); // 用户是否被锁定 boolean isAccountNonLocked(); // 用户的密码是否已过期 boolean isCredentialsNonExpired(); // 用户是否被禁用 boolean isEnabled(); } -
至此,整个认证流程差不多就走完了,这个过程中,梳理以下,我们是以默认的登录方式来分析流程的,默认的登录方式用到的是:
UsernamePasswordAuthenticationFilter和UsernamePasswordAuthenticationToken以及DaoAuthenticationProvider这些来进行身份的验证,那么以后我们要添加别的验证方式的话,就可以模仿这个流程:重新继承AbstractAuthenticationProcessingFilter,AbstractAuthenticationToken,AuthenticationProvider。流程图大致如下:
-
-
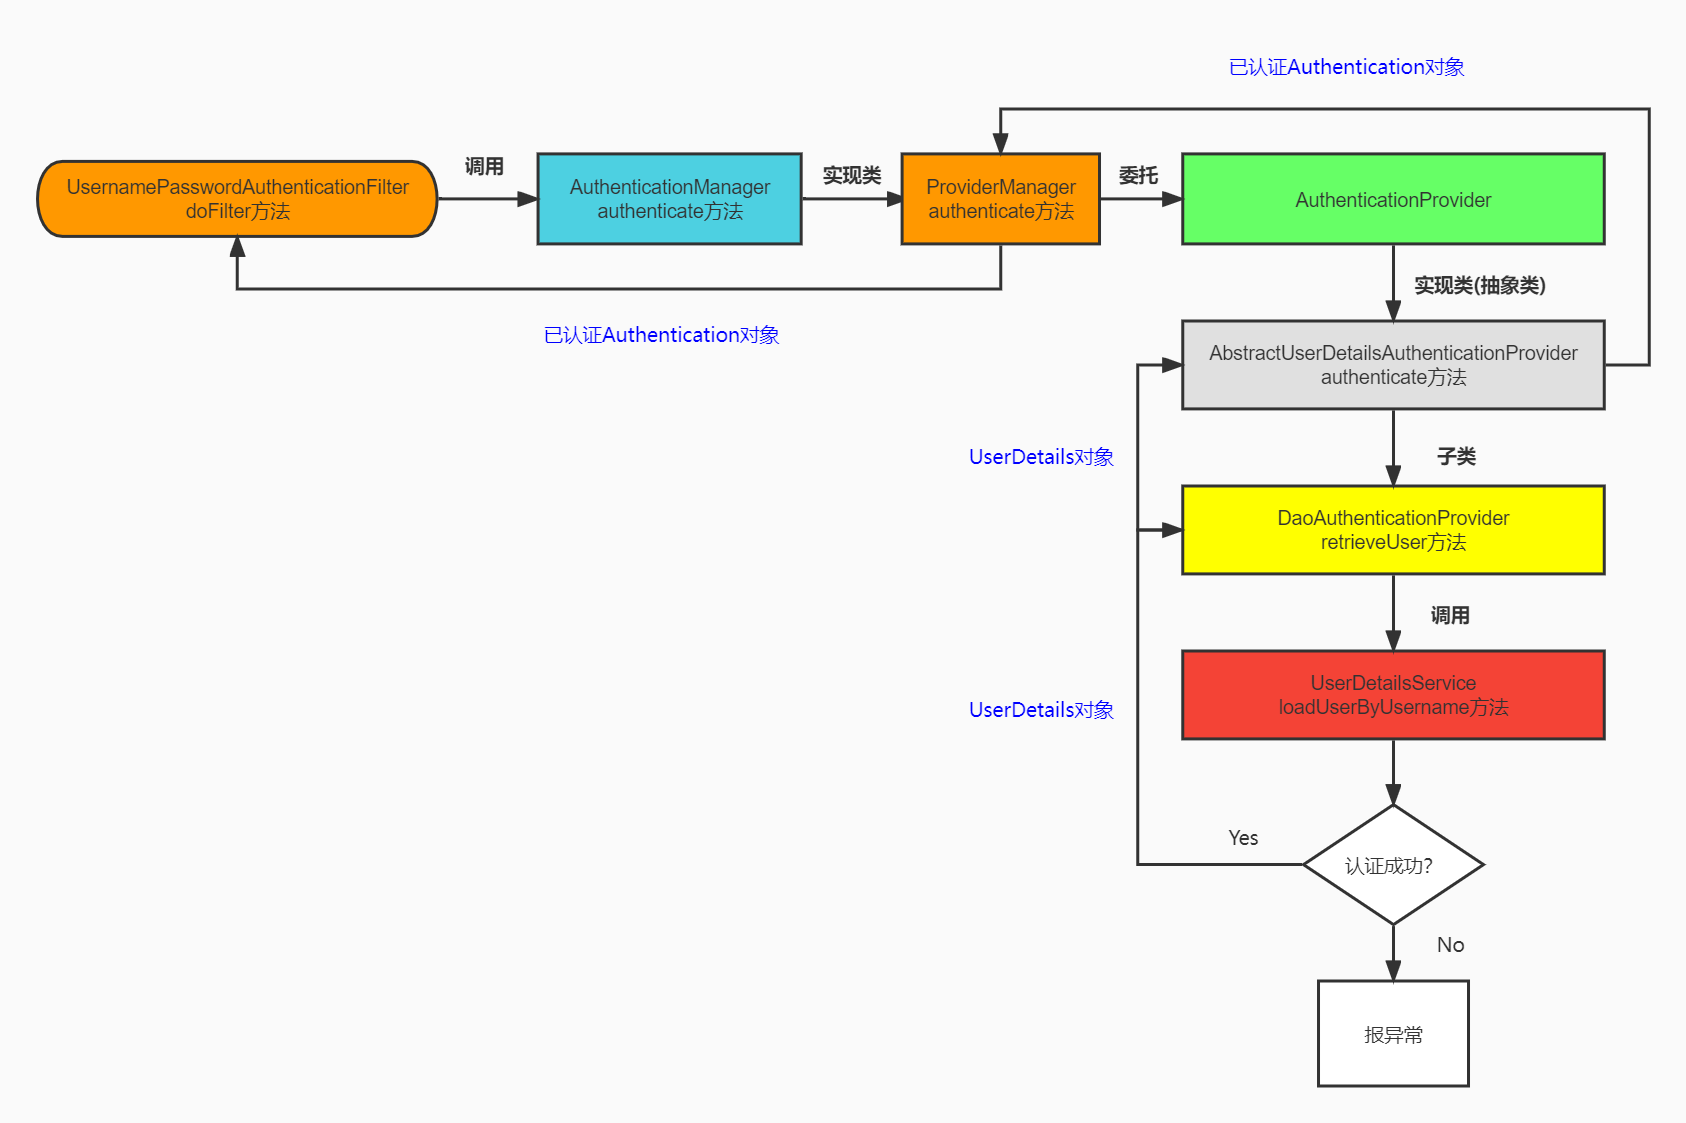
返回过程
DaoAuthenticationProvider类的retrieveUser方法通过loadUserByUsername获取到用户信息后返回一个UserDetails对象给到父类AbstractUserDetailsAuthenticationProvider的方法authenticate中AbstractUserDetailsAuthenticationProvider拿到返回的UserDetails后,调用了return createSuccessAuthentication(principalToReturn, authentication, user);创建了一个可信的UsernamepasswordAuthenticationToken,并返回给了ProviderManager的authenticate方法- 这时候的
UsernamepasswordAuthenticationToken是已验证过的可信的,再往上返回Authentication(UsernamepasswordAuthenticationToken是他的一个实现类,多态) - 再回到了
UsernamepasswordAuthenticationFilter类的attemptAuthentication方法中,return this.getAuthenticationManager().authenticate(authRequest)返回到了AbstractAuthenticationProcessingFilter类中doFilter,最后调用了successfulAuthentication,将可信的Authentication对象保存到SecurityContext中,然后放行。
5. 整体流程图
6. 学习博客
【项目实践】一文带你搞定前后端分离下的认证和授权|Spring Security + JWT
SpringSecurity+JWT认证流程解析 | 掘金新人第一弹
标签:username,SpringSecurity,流程,request,authentication,认证,Authentication,null 来源: https://www.cnblogs.com/LucasBlog/p/16026370.html
本站声明: 1. iCode9 技术分享网(下文简称本站)提供的所有内容,仅供技术学习、探讨和分享; 2. 关于本站的所有留言、评论、转载及引用,纯属内容发起人的个人观点,与本站观点和立场无关; 3. 关于本站的所有言论和文字,纯属内容发起人的个人观点,与本站观点和立场无关; 4. 本站文章均是网友提供,不完全保证技术分享内容的完整性、准确性、时效性、风险性和版权归属;如您发现该文章侵犯了您的权益,可联系我们第一时间进行删除; 5. 本站为非盈利性的个人网站,所有内容不会用来进行牟利,也不会利用任何形式的广告来间接获益,纯粹是为了广大技术爱好者提供技术内容和技术思想的分享性交流网站。