标签:PlatformIO VSCode VS Marlin environment Code env your
参考:https://marlinfw.org/docs/basics/install_platformio_vscode.html
前言
在阅读本文之前,您应该已经阅读了使用 PlatformIO 安装 Marlin。
VSCode中的PlatformIO插件:PlatformIO将 VSCode 变成了一个完整的 IDE,用于编译和开发 Marlin。

1.安装
1.1安装VSCode
访问设置 Visual Studio 代码页面,为您的特定平台下载并安装最新的 VSCode。
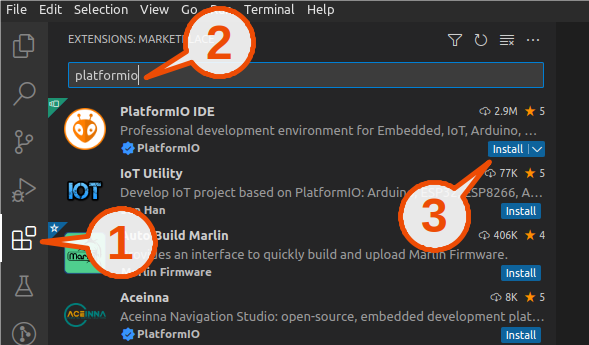
1.2安装 PlatformIO IDE
前往“获取 PlatformIO IDE ”页面了解如何在 VSCode 中安装 PlatformIO IDE。
(最快的上手方法是安装Auto Build Marlin,PlatformIO 也会随之安装。)

2.在 VSCode / PlatformIO 中打开 Marlin
您可以通过以下几种方式之一在Visual Studio Code中打开 Marlin :
- 将下载的 Marlin Firmware 文件夹拖到Visual Studio Code应用程序图标上,或
- 使用VSCode File菜单中的Open...命令,或
- 打开 PIO Home 选项卡,然后单击“ Open Project ”按钮。
3.设置你的环境
为您的开发板手动设置环境:
打开文件platformio.ini并更改default_envs为您的开发板使用的环境。查看此文件以了解您的芯片的环境名称。例如,LPC1768芯片的环境名称显示为[env:LPC1768]. 省略外包装:[env:____].

当您单击PlatformIO按钮时,您将看到PROJECT TASKS包括Build和Upload。这些按钮将构建和上传您的默认环境。

如果您不想设置,请从PlatformIO Project Tasks 列表default_envs中为您的开发板选择环境。
识别主板环境
主板所需的 PlatformIO 环境在pins.h文件中的主板注释中。在 Marlin 2.0 中,它位于子目录Marlin/src/pins/pins.h中。
例子:
Configuration.h 文件中有#define MOTHERBOARD BOARD_RAMPS_14_EFB
在pins.h文件中搜索RAMPS_14_EFB ,直到出现以下内容:
  #elif MB(RAMPS_14_EEB)
     #include "pins_RAMPS.h"     // ATmega1280, ATmega2560  env:megaatmega1280 env:megaatmega2560
注释的第一部分列出了板上使用的 CPU。
env:xxxx 部分是用于此板的 PlatformIO 环境。
4. 启动构建、清理或上传任务
启动任务是通过PlatformIO 的 Project Tasks、底部状态栏图标或Auto Build Options完成的。


使用构建窗口比使用 PlatformIO 安装 Marlin中显示的要好一些。
- 面板可以调整大小。
- 控制台可以通过鼠标滚轮或滚动条滚动。
- 文本可以突出显示并复制到剪贴板。
“firmware.bin”文件
一些较新的板需要将firmware.bin文件复制到板载 SD 卡上,然后您必须重新启动打印机才能完成安装。如果板子已连接并且您的 PC 可以看到 SD 卡,PlatformIO 将尝试自动复制文件,但这可能并不总是有效。在这些情况下,您需要找到firmware.bin文件并将其手动复制到 SD 卡。

Installing Marlin (VSCode)
Before reading this article, you should have already read Installing Marlin with PlatformIO.
PlatformIO with VSCode
PlatformIO turns VSCode into a complete IDE for compiling and developing Marlin.

Installation
1. Install VSCode
Visit the Setting up Visual Studio Code page to download and install the latest VSCode for your particular platform.
2. Install the PlatformIO IDE
Head over to the “Get PlatformIO IDE” page to learn how to install PlatformIO IDE in VSCode.
(The quickest way to get started is to install Auto Build Marlin and PlatformIO will be installed along with it.)
Open Marlin in VSCode / PlatformIO
You can open Marlin in Visual Studio Code in one of several ways:
- Drag your downloaded Marlin Firmware folder onto the Visual Studio Code application icon, or
- Use the Open… command in the VSCode File menu, or
- Open the PIO Home tab and click the “Open Project” button.
Set your environment
To manually set the environment for your board:
Open the file platformio.ini and change default_envs to the environment that your board uses. Look through this file for your chip’s environment name. For example, the environment name for the LPC1768 chip appears as [env:LPC1768]. Omit the outer wrapper: [env:____].

When you click the PlatformIO button, you will see the PROJECT TASKS including Build and Upload. These buttons will build and upload your default environment.

If you don’t want to set default_envs, select the environment for your board from the PlatformIO Project Tasks list.
Identifying your board’s environment
The PlatformIO environment needed for a motherboard is in the comments for the board in the pins.h file. In Marlin 2.0 it’s located in a subdirectory Marlin/src/pins/pins.h.
Example:
The Configuration.h file says #define MOTHERBOARD BOARD_RAMPS_14_EFB
Search the pins.h file for RAMPS_14_EFB until you come to the following:
  #elif MB(RAMPS_14_EEB)
     #include "pins_RAMPS.h"     // ATmega1280, ATmega2560  env:megaatmega1280 env:megaatmega2560
The first part of the comment lists the CPU(s) used in the board.
The env:xxxx section(s) are the PlatformIO environment(s) that are used for this board.
6. Initiate Build, Clean or Upload task
Initiating a task is done via PlatformIO’s Project Tasks, the bottom Status Bar icons or the Auto Build Options.
![]()
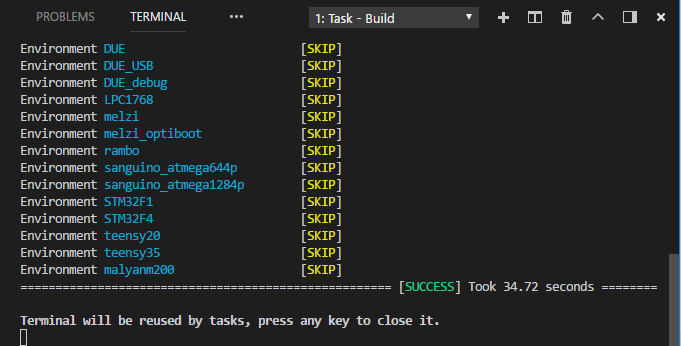
Working with the build window is a little bit better than shown in Installing Marlin with PlatformIO.
- The panel can be re-sized.
- The console can be scrolled via the mouse scroll wheel or with the scroll bar.
- Text can be highlighted and copied to the clipboard.
‘firmware.bin’ file
Some newer boards require the firmware.bin file to be copied onto the onboard SD card, and then you must reboot the printer to complete the install. PlatformIO will try to copy the file automatically if the board is connected and your PC can see the SD card, but this may not always work.
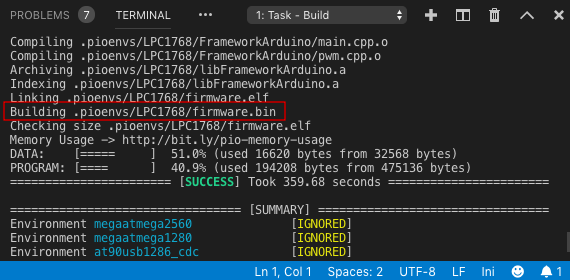
In these cases, you’ll need to locate the firmware.bin file and copy it over to the SD card manually.
标签:PlatformIO,VSCode,VS,Marlin,environment,Code,env,your 来源: https://www.cnblogs.com/cai-zi/p/15940746.html
本站声明: 1. iCode9 技术分享网(下文简称本站)提供的所有内容,仅供技术学习、探讨和分享; 2. 关于本站的所有留言、评论、转载及引用,纯属内容发起人的个人观点,与本站观点和立场无关; 3. 关于本站的所有言论和文字,纯属内容发起人的个人观点,与本站观点和立场无关; 4. 本站文章均是网友提供,不完全保证技术分享内容的完整性、准确性、时效性、风险性和版权归属;如您发现该文章侵犯了您的权益,可联系我们第一时间进行删除; 5. 本站为非盈利性的个人网站,所有内容不会用来进行牟利,也不会利用任何形式的广告来间接获益,纯粹是为了广大技术爱好者提供技术内容和技术思想的分享性交流网站。