标签:PowerApps app Register application Dataverse Azure Directory your Active
Tutorial: Register an app with Azure Active Directory
This tutorial describes how to register an application with Azure Active Directory, which enables a user with Power Apps user account to connect to their Microsoft Dataverse environment from external client applications using OAuth authentication.
Important
Power Apps also provides you with Server-to-Server (S2S) authentication option to connect to Dataverse environment from external applications and services using the special application user account. S2S authentication is the common way that apps registered on Microsoft AppSource use to access the data of their subscribers. More information: Build web applications using Server-to-Server (S2S) authentication.
App registration in Azure Active Directory is typically done by ISVs who want to develop external client applications to read and write data in Dataverse. Registering an app in Azure Active Directory provides you with Application IDand Redirect URI values that ISVs can use in their client application's authentication code. When end users use the ISV's application for the first time to connect to their Dataverse environment by providing their Dataverse credentials, a consent form is presented to the end user. After consenting to use their Dataverse account with the ISV's application, end users can connect to Dataverse environment from external application. The consent form is not displayed again to other users after the first user who has already consented to use the ISV's app. Apps registered in Azure Active Directory are multi-tenant, which implies that other Dataverse users from other tenant can connect to their environment using the ISV's app.
App registration can also be done by an application developer or individual user who is building a client application to connect to and read/write data in Dataverse. Use the Application ID and Redirect URI values from your registered app in your client application's authentication code to be able to connect to Dataverse environment from your client application, and perform the required operations. Note that if the app is registered in the same tenant as your Dataverse environment, you won't be presented with a consent form when connecting from your client application to your Dataverse environment.
Prerequisites
- An Azure subscription for application registration. A trial account will also work.
Create an application registration
-
Sign in to the Azure portal using an account with administrator permission. You must use an account in the same Microsoft 365 subscription (tenant) as you intend to register the app with. You can also access the Azure portal through the Microsoft 365 Admin center by expanding the Admin centers item in the left navigation pane, and selecting Azure Active Directory.
Note
If you don't have an Azure tenant (account) or you do have one but your Microsoft 365 subscription with Dataverse is not available in your Azure subscription, following the instructions in the topic Set up Azure Active Directory access for your Developer Site to associate the two accounts.
If you don't have an account, you can sign up for one by using a credit card. However, the account is free for application registration and your credit card won't be charged if you only follow the procedures called out in this topic to register one or more apps. More information: Active Directory Pricing Details -
In the Azure portal, select Azure Active Directory in the left pane and select App registrations and click on New registration.

-
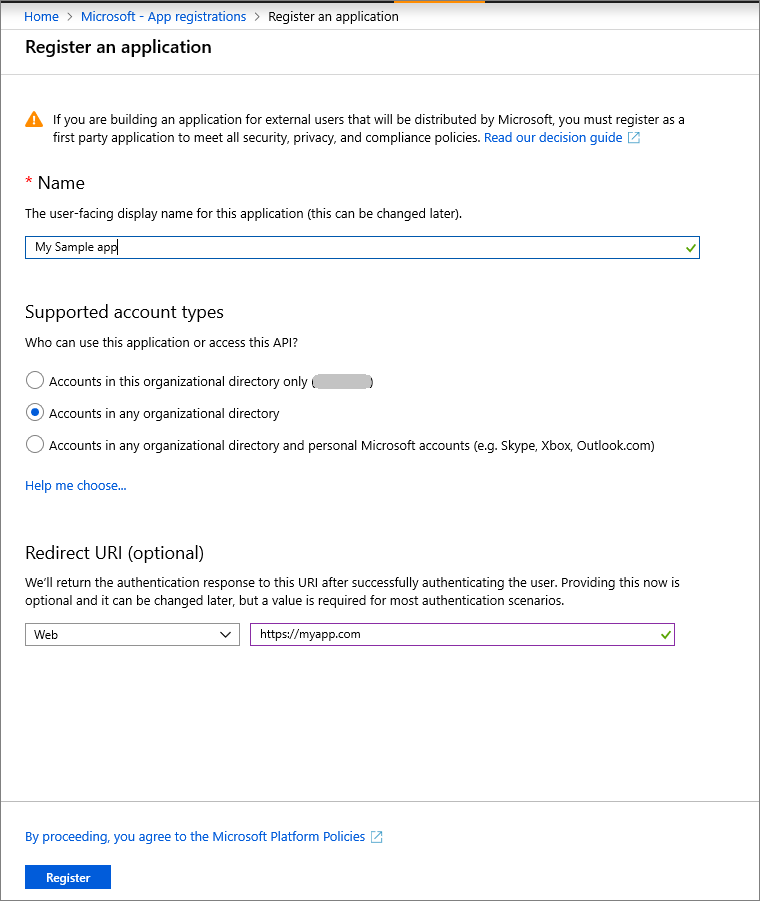
In the Register an application page, enter your application's registration information:
-
In the Name section, enter a meaningful application name that will be displayed to the users.
-
Select Accounts in any organizational directory option from Supported account types section.
-
Set the Redirect URI.
-
Click on Register to create the application.
-
-
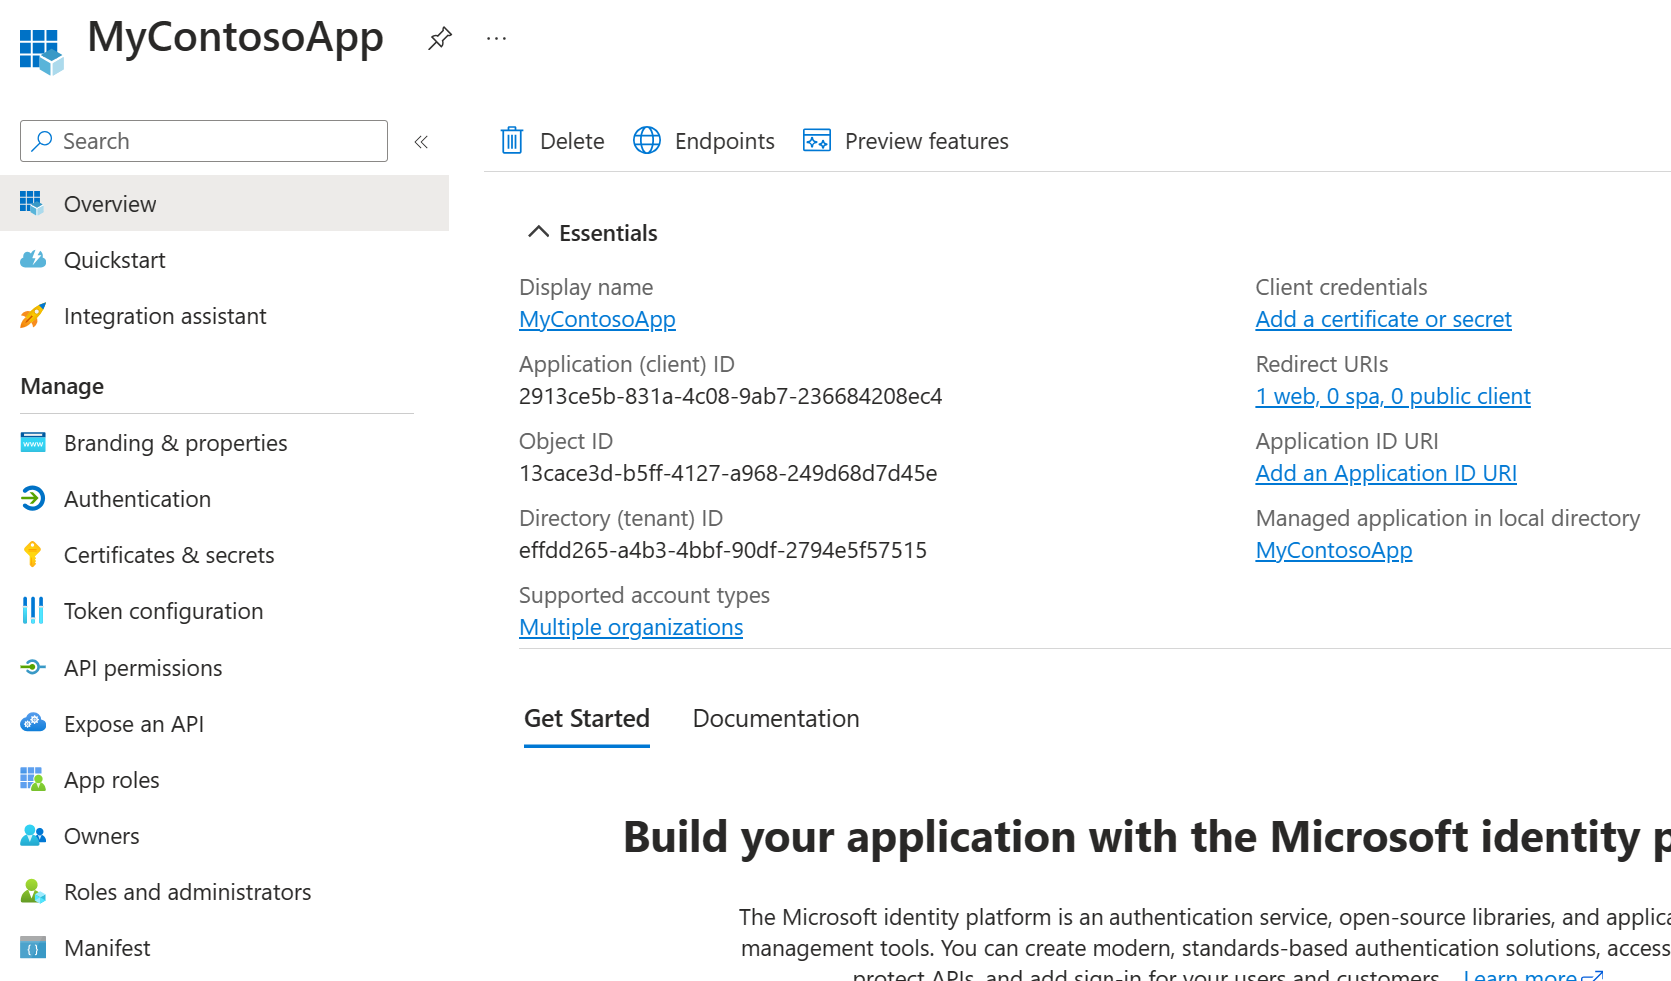
On the app Overview page, hover over Application (client) ID value, and select the Copy to clipboard icon to copy the value as you'll need to specify this in your application's authentication code or app.config file where appropriate.
-
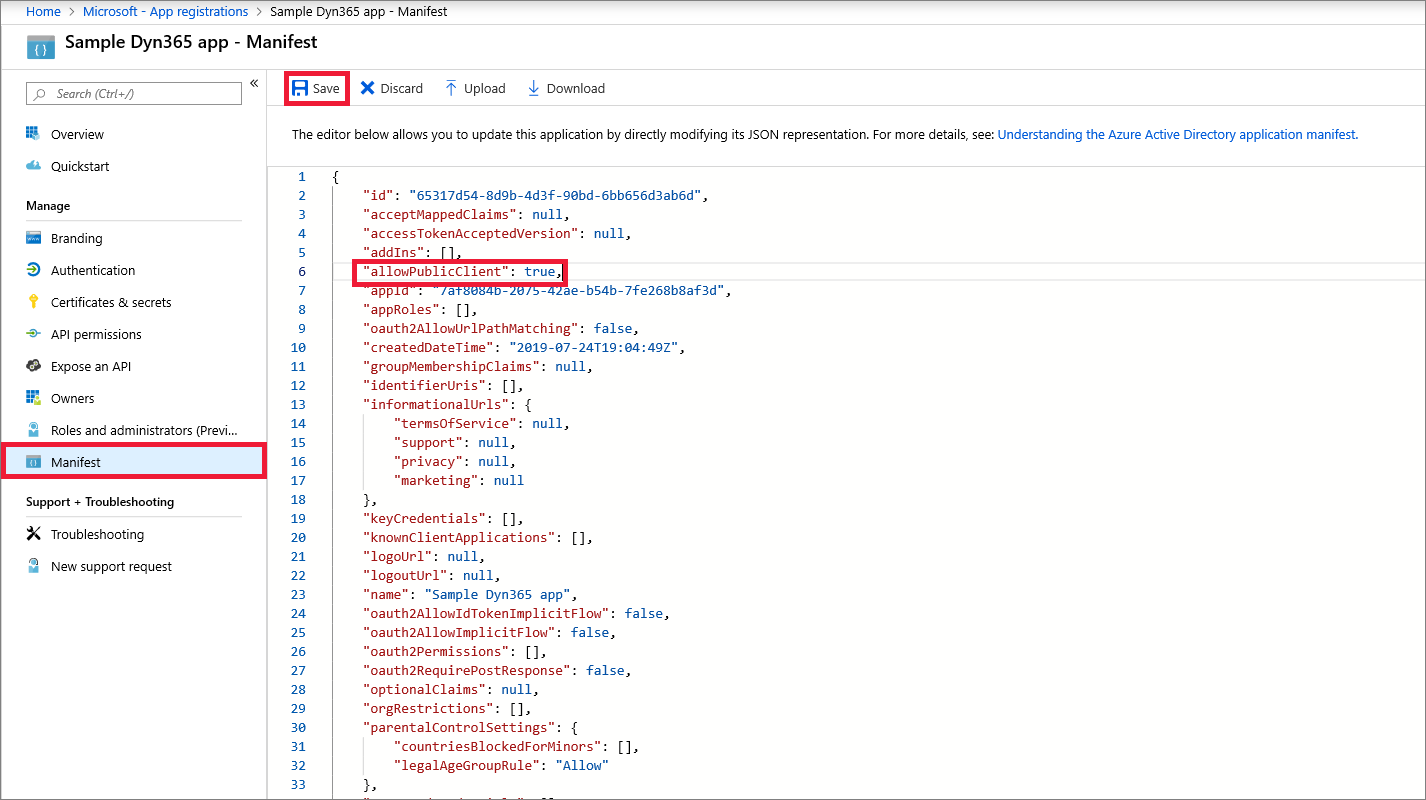
Select Manifest tab, in the manifest editor, set the allowPublicClient* property to true and click on Save.
-
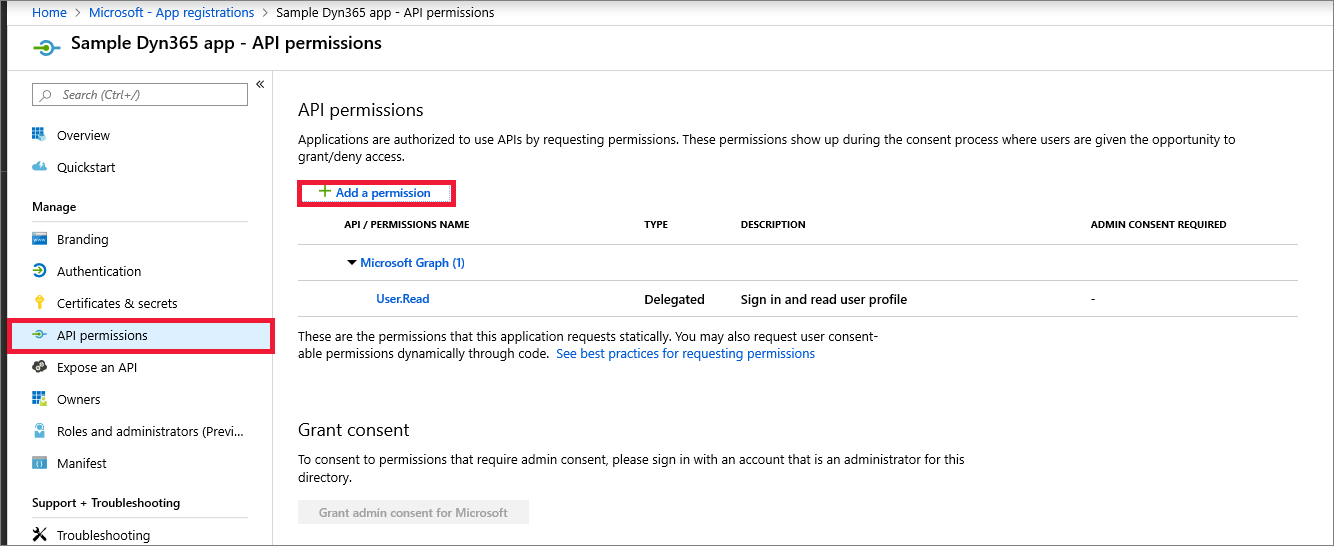
Select API permissions tab, click on Add a permission.
-
Search for and choose Dataverse under the APIs my organization uses tab. If "Dataverse" is not found, then search for "Common Data Service".

Tip
If you are presented with more than one Common Data Service item in the search list, choose any one of them. In the next step the service name and URL will be shown. At that point you can go back to the API search and choose a different Dataverse list item if needed.
-
Click on Delegated permissions and check the options and click on Add permissions.
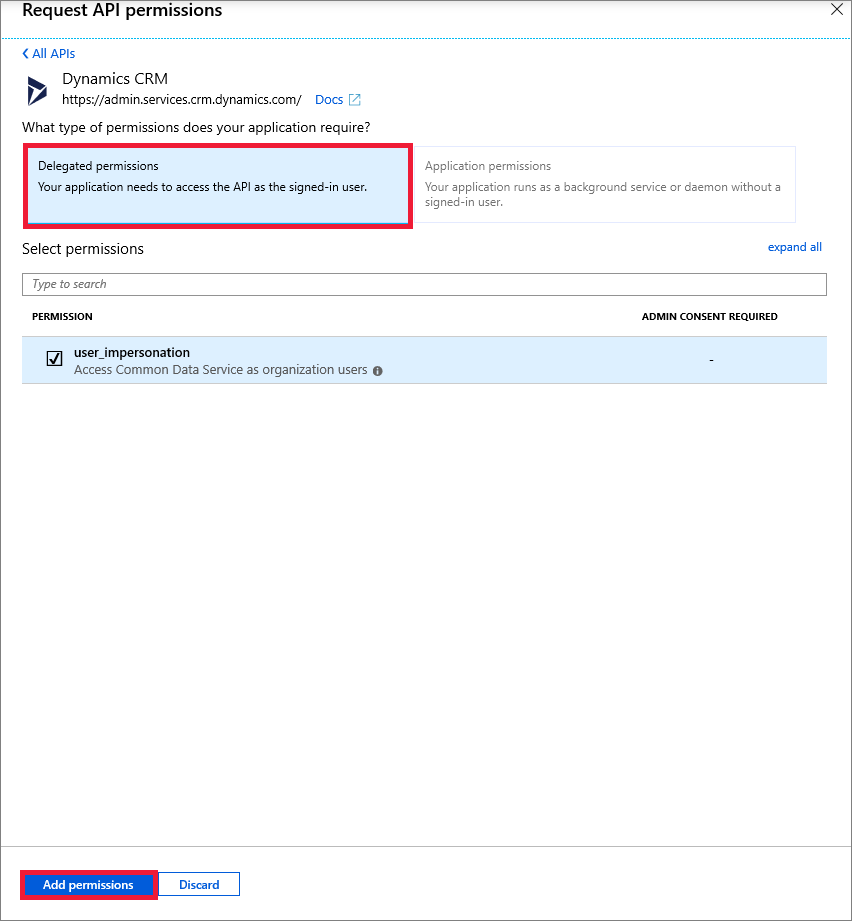
Note
A future revision of the form in step #8 will replace the Dynamics CRM logo and icon with Dataverse.
This completes the registration of your application in Azure Active Directory.
标签:PowerApps,app,Register,application,Dataverse,Azure,Directory,your,Active 来源: https://www.cnblogs.com/lingdanglfw/p/15323600.html
本站声明: 1. iCode9 技术分享网(下文简称本站)提供的所有内容,仅供技术学习、探讨和分享; 2. 关于本站的所有留言、评论、转载及引用,纯属内容发起人的个人观点,与本站观点和立场无关; 3. 关于本站的所有言论和文字,纯属内容发起人的个人观点,与本站观点和立场无关; 4. 本站文章均是网友提供,不完全保证技术分享内容的完整性、准确性、时效性、风险性和版权归属;如您发现该文章侵犯了您的权益,可联系我们第一时间进行删除; 5. 本站为非盈利性的个人网站,所有内容不会用来进行牟利,也不会利用任何形式的广告来间接获益,纯粹是为了广大技术爱好者提供技术内容和技术思想的分享性交流网站。
