标签:xml web 容器 SpringMVC spring SPI ServletContext servlet
一、回顾Servlet
@WebServlet("/hello")
public class HelloServlet extends HttpServlet {

	@Override
	protected void doGet(HttpServletRequest req, HttpServletResponse resp) throws ServletException, IOException {
		//super.doGet(req, resp);
		System.out.println(Thread.currentThread()+" start...");
		try {
			sayHello();
		} catch (Exception e) {
			e.printStackTrace();
		}
		resp.getWriter().write("hello...");
		System.out.println(Thread.currentThread()+" end...");
	}

	public void sayHello() throws Exception{
		System.out.println(Thread.currentThread()+" processing...");
		Thread.sleep(3000);
	}
}
web三大组件
Servlet、Filter、Listener
二、SPI机制
SPI机制我们或多或少都了解过,Java中有SPI,SprngBoot中有SPI,SpringMVC中也有对应的SPI机制。
SpringMVC根据Servlet3.0的新规范:
你的项目里面如果有某些类或者方法,需要在启动的时候被tomcat(容器)调用的话
首先在下面的目录META-INF/services/javax.servlet.ServletContainerInitializer 建立一个文件,他里面写了ServletContainerInitializer实现类,那么,当web容器启动时就会运行这个初始化器做一些组件内的初始化工作,该初始化工作包括:
- 调用onStartup()方法
- 注入感兴趣的了
tomcat是servlet容器
SPI机制官方也叫作Shared libraries(共享库) / runtimes pluggability(运行时插件能力)
那么我们看一下我们引入的web依赖spring-web包下有什么:
META-INF/services/javax.servlet.ServletContainerInitializer该文件就是Servlet3.0的SPI用到的文件
文件内容为:
org.springframework.web.SpringServletContainerInitializer
而SpringServletContainerInitializer实现了接口ServletContainerInitializer
我们首先说一下这个类
三、SpringServletContainerInitializer
该类的结构为:
@HandlesTypes(WebApplicationInitializer.class)
public class SpringServletContainerInitializer
    implements ServletContainerInitializer {
注解@HandlesTypes的意思是MVC会找到容器中所有该类的子类,然后传到onStartup()方法参数中,下我们就看看这个方法
下面这个方法的意义就是找到感兴趣的类(非抽象类和接口),然后也是依次调用他们的
onStartup()方法。这2个onStartup()方法不要搞混了,处理时机不同,参数也不同
@Override
public void onStartup(@Nullable Set<Class<?>> webAppInitializerClasses,// 感兴趣的类,WebApplicationInitializer的实现类
                      ServletContext servletContext) {//要被初始化的servlet context

    List<WebApplicationInitializer> initializers = new LinkedList<>();

    // 遍历感兴趣的类
    for (Class<?> waiClass : webAppInitializerClasses) {
        if (!waiClass.isInterface() && // 不要接口
            !Modifier.isAbstract(waiClass.getModifiers()) && // 不要抽象类
            WebApplicationInitializer.class.isAssignableFrom(waiClass)) {

            // 往initializers里加 new 感兴趣的类,而感兴趣的是WebApplicationInitializer
            initializers.add((WebApplicationInitializer)
                             ReflectionUtils.accessibleConstructor(waiClass).newInstance());
        }
    }

    // 排序可以看AnnotationAwareOrderComparator
    AnnotationAwareOrderComparator.sort(initializers);
    // 依次调用他们的onStartup()方法
    for (WebApplicationInitializer initializer : initializers) {
        initializer.onStartup(servletContext);// 传入了容器,如tomcat
    }
}
那么我们有哪些感兴趣的类呢?不妨看看他的实现类

下面我们看看这几个实现类的作用
四、WebApplicationInitializer
我们先不管具体的实现类,我们先看看抽象类是什么作用,这样子类继承这些抽象类的时候就可以继承这些抽象类的功能,从而简化开发。
如图,主要有下面三个抽象类,它们是父子继承关系

红色字是下面方法的onStartup()方法体,最下面的
AbstractAnnotationConfigDispatcherServletInitializer类没有重写该方法
有了这个思路我们就开始往下看吧
public abstract class AbstractContextLoaderInitializer
    implements WebApplicationInitializer {

    @Override
    public void onStartup(ServletContext servletContext) throws ServletException {
        registerContextLoaderListener(servletContext);
    }

    protected void registerContextLoaderListener(ServletContext servletContext) {
        // 该方法在AbstractAnnotationConfigDispatcherServletInitializer中被实现
        WebApplicationContext rootAppContext = createRootApplicationContext();

        // 包装为监听器
        ContextLoaderListener listener = new ContextLoaderListener(rootAppContext);
        listener.setContextInitializers(getRootApplicationContextInitializers());
        // 放到tomcat容器中
        servletContext.addListener(listener);
    }
在AbstractAnnotationConfigDispatcherServletInitializer中的createRootApplicationContext();实现为:
protected WebApplicationContext createRootApplicationContext() {
    Class<?>[] configClasses = getRootConfigClasses();
    if (!ObjectUtils.isEmpty(configClasses)) {
        // 基于注解的web容器
        AnnotationConfigWebApplicationContext context = new AnnotationConfigWebApplicationContext();
        context.register(configClasses);
        return context;
    }
    else {
        return null;
    }
}
那么registerDispatcherServlet(servletContext);是做什么的呢?
2)AbstractDispatcherServletInitializer
首先了解一下父子容器的结构
// 注册DispatcherServlet到tomcat中
protected void registerDispatcherServlet(ServletContext servletContext) {// 参数为要注册的容器
    // DispatcherServlet的名字
    String servletName = getServletName();

    // 创建一个web的ioc容器
    WebApplicationContext servletAppContext = createServletApplicationContext();

    // 创建servlet并注册到web容器
    FrameworkServlet dispatcherServlet = createDispatcherServlet(servletAppContext);

    dispatcherServlet.setContextInitializers(getServletApplicationContextInitializers());

    // 注册dispatcherServlet到tomcat
    ServletRegistration.Dynamic registration = servletContext.addServlet(servletName, dispatcherServlet);

    // 设置dispatcherServlet初始化时机、映射url、异步
    registration.setLoadOnStartup(1);
    registration.addMapping(getServletMappings());
    registration.setAsyncSupported(isAsyncSupported());

    // 遍历注册过滤器
    Filter[] filters = getServletFilters();
    for (Filter filter : filters) {
        registerServletFilter(servletContext, filter);
    }

    // 扩展接口
    customizeRegistration(registration);
}
3)AbstractAnnotationConfigDispatcherServletInitializer
3)、AbstractAnnotationConfigDispatcherServletInitializer:注解方式配置的DispatcherServlet初始化器
- 创建根容器:createRootApplicationContext()
getRootConfigClasses();传入一个配置类 - 创建web的ioc容器: createServletApplicationContext();
获取配置类;getServletConfigClasses();
public abstract class AbstractAnnotationConfigDispatcherServletInitializer
    extends AbstractDispatcherServletInitializer {

    @Override
    @Nullable
    protected WebApplicationContext createRootApplicationContext() {
        Class<?>[] configClasses = getRootConfigClasses();
        if (!ObjectUtils.isEmpty(configClasses)) {
            AnnotationConfigWebApplicationContext context = new AnnotationConfigWebApplicationContext();
            context.register(configClasses);
            return context;
        }
        else {
            return null;
        }
    }

    @Override
    protected WebApplicationContext createServletApplicationContext() {
        AnnotationConfigWebApplicationContext context = new AnnotationConfigWebApplicationContext();
        Class<?>[] configClasses = getServletConfigClasses();
        if (!ObjectUtils.isEmpty(configClasses)) {
            context.register(configClasses);
        }
        return context;
    }
总结:
1)、AbstractContextLoaderInitializer:创建根容器;createRootApplicationContext();
2)、AbstractDispatcherServletInitializer:
			创建一个web的ioc容器;createServletApplicationContext();
			创建了DispatcherServlet;createDispatcherServlet();
			将创建的DispatcherServlet添加到ServletContext中; // servlet上下文
				getServletMappings();
3)、AbstractAnnotationConfigDispatcherServletInitializer:注解方式配置的DispatcherServlet初始化器
			创建根容器:createRootApplicationContext()
					getRootConfigClasses();传入一个配置类
			创建web的ioc容器: createServletApplicationContext();
					获取配置类;getServletConfigClasses();
总结
1、web容器在启动的时候,会扫描每个jar包下的META-INF/services/javax.servlet.ServletContainerInitializer
2、加载这个文件指定的类SpringServletContainerInitializer
3、spring的应用一启动会加载感兴趣的WebApplicationInitializer接口的下的所有组件;
4、并且为WebApplicationInitializer组件创建对象(组件不是接口,不是抽象类)
	1)、AbstractContextLoaderInitializer:创建根容器;createRootApplicationContext();
	2)、AbstractDispatcherServletInitializer:
			创建一个web的ioc容器;createServletApplicationContext();
			创建了DispatcherServlet;createDispatcherServlet();
			将创建的DispatcherServlet添加到ServletContext中;
				getServletMappings();
	3)、AbstractAnnotationConfigDispatcherServletInitializer:注解方式配置的DispatcherServlet初始化器
			创建根容器:createRootApplicationContext()
					getRootConfigClasses();传入一个配置类
			创建web的ioc容器: createServletApplicationContext();
					获取配置类;getServletConfigClasses();

总结:
	以注解方式来启动SpringMVC;继承AbstractAnnotationConfigDispatcherServletInitializer;
实现抽象方法指定DispatcherServlet的配置信息;

===========================
定制SpringMVC;
1)、@EnableWebMvc:开启SpringMVC定制配置功能;
	<mvc:annotation-driven/>;

2)、配置组件(视图解析器、视图映射、静态资源映射、拦截器。。。)
	extends WebMvcConfigurerAdapter
为了不用写接口的实现才用适配器类
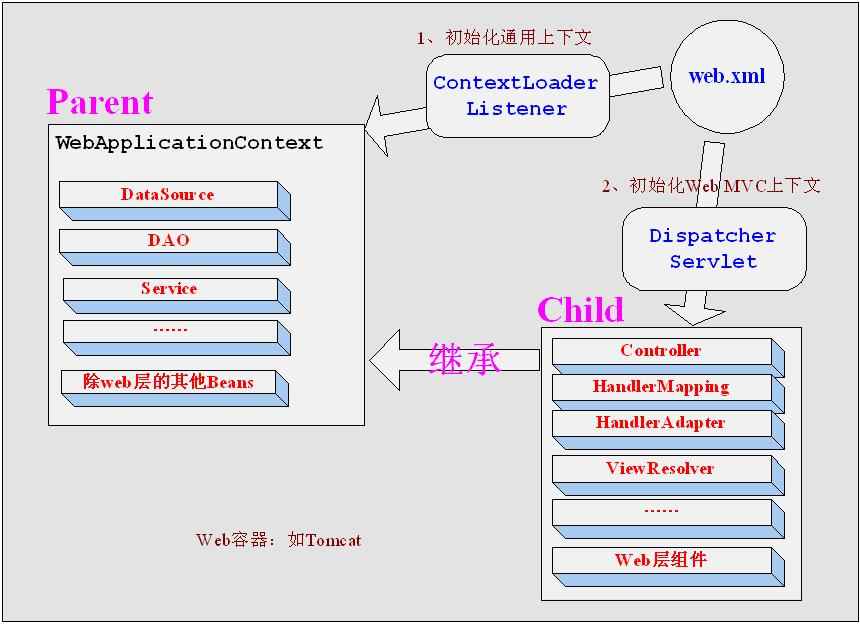
五、父子容器

上图中显示了2个WebApplicationContext实例,为了进行区分,分别称之为:Servlet WebApplicationContext、Root WebApplicationContext。 其中:
ServletWebApplicationContext:这是对J2EE三层架构中的web层进行配置,如控制器(controller)、视图解析器(view resolvers)等相关的bean。通过spring mvc中提供的DispatchServlet来加载配置,通常情况下,配置文件的名称为spring-servlet.xml。RootWebApplicationContext:这是对J2EE三层架构中的service层、dao层进行配置,如业务bean,数据源(DataSource)等。通常情况下,配置文件的名称为applicationContext.xml。在web应用中,其一般通过ContextLoaderListener来加载。
我们在配置过程中,通常是将两个容器进行bean的隔离。所谓bean的隔离,其实就是分别存储不同的bean类型对象。也就是在bean的声明时,有目的的将不同的bean配置在两个容器的xml文件中,防止所有的bean都在一个配置文件中,也就是一个容器里。
作用
父子容器的作用主要是划分框架边界。
在J2EE三层架构中,在service层我们一般使用spring框架, 而在web层则有多种选择,如spring mvc、struts等。因此,通常对于web层我们会使用单独的配置文件。例如在上面的案例中,一开始我们使用spring-servlet.xml来配置web层,使用applicationContext.xml来配置service、dao层。如果现在我们想把web层从spring mvc替换成struts,那么只需要将spring-servlet.xml替换成Struts的配置文件struts.xml即可,而applicationContext.xml不需要改变。
事实上,如果你的项目确定了只使用spring和spring mvc的话,你甚至可以将service 、dao、web层的bean都放到spring-servlet.xml中进行配置,并不是一定要将service、dao层的配置单独放到applicationContext.xml中,然后使用ContextLoaderListener来加载。在这种情况下,就没有了Root WebApplicationContext,只有Servlet WebApplicationContext。
- Tomcat在启动时给每个Web应用创建一个全局的上下文环境,这个上下文就是ServletContext,其为后面的Spring容器提供宿主环境。
- Tomcat在启动过程中触发容器初始化事件,Spring的
ContextLoaderListener会监听到这个事件,它的contextInitialized()方法会被调用,在这个方法中,Spring会初始化全局的Spring根容器,这个就是Spring的IoC容器,IoC容器初始化完毕后,Spring将其存储到ServletContext中,便于以后来获取。 - Tomcat在启动过程中还会扫描Servlet,一个Web应用中的Servlet可以有多个,以SpringMVC中的DispatcherServlet为例,这个Servlet实际上是一个标准的前端控制器,用以转发、匹配、处理每个Servlet请求。
Servlet一般会延迟加载,当第一个请求达到时,Tomcat&Jetty发现DispatcherServlet还没有被实例化,就调用DispatcherServlet的init方法,DispatcherServlet在初始化的时候会建立自己的容器,叫做SpringMVC 容器,用来持有Spring MVC相关的Bean。同时,Spring MVC还会通过ServletContext拿到Spring根容器,并将Spring根容器设为SpringMVC容器的父容器,请注意,Spring MVC容器可以访问父容器中的Bean,但是父容器不能访问子容器的Bean, 也就是说Spring根容器不能访问SpringMVC容器里的Bean。说的通俗点就是,在Controller里可以访问Service对象,但是在Service里不可以访问Controller对象。

web.xml解读
上面配置了Root容器和Web容器,但是还有一项非常重要的工作没有做,那就是要去加载这两个容器的配置文件。那么如何让springmvc框架去为我们加载配置文件呢,这就用到了springmvc框架的基础配置文件web.xml,这个配置文件是spring在启动时最先加载的配置文件,如果我们在这个配置文件中,由引入了咱们自己写的Root容器和Web容器的配置文件,那么springmvc框架在加载自己的web.xml时,会顺带着把我们定义的两个容器的配置文件也一起加载了,达到我们的目的。
在web.xml中我们配置了监听器
    <!--spring监听器-->
    <listener>
        <listener-class>org.springframework.web.context.ContextLoaderListener</listener-class>
    </listener>
ContextLoaderListener会被优先初始化时,其会根据<context-param>元素中contextConfigLocation参数指定的配置文件路径,在这里就是"/WEB-INF/”,来创建WebApplicationContext实例。 并调用ServletContext的setAttribute方法,将其设置到ServletContext中,属性的key为”org.springframework.web.context.WebApplicationContext.ROOT”,最后的”ROOT"字样表明这是一个 Root WebApplicationContext。
<context-param>
    <param-name>contextConfigLocation</param-name>
    <param-value>classpath:spring-root.xml</param-value>
</context-param>
监听器和过滤器几个标签的顺序,是固定的,不可以随便的更换。
最后,我们配置了DispatcherServlet,这是Springmvc容器的必备过滤器,
<!--注册DispatcherServlet-->
    <servlet>
        <servlet-name>dispatcher</servlet-name>
        <servlet-class>org.springframework.web.servlet.DispatcherServlet</servlet-class>
        <init-param>
            <param-name>contextConfigLocation</param-name>
            <param-value>/WEB-INF/spring/spring-mvc.xml</param-value>
        </init-param>
        <load-on-startup>1</load-on-startup>
    </servlet>
    <servlet-mapping>
        <servlet-name>dispatcher</servlet-name>
        <url-pattern>/*</url-pattern>
    </servlet-mapping>
这里我们在<servlet-class>类方法中使用了<init-param>标签,也就是给指定的方法传入初始化参数,也就是我们自定义的参数,那么这里,我们传入的参数名称是contextConfigLocation,值是classpath:spring-mvc.xml,瞄向的正是我们刚才自己配置的Web容器,所以当springmvc框架加载到这几行代码时,就会去读取我们指定的Web容器配置文件,将Web容器中的内容进行加载。这里必须强调,要使用<init-param>标签将web容器的路径进行指定,否则web容器将无法加载,那我们的配置文件就等于没写。最终会创建Servlet WebApplicationContext。同时,其会调用ServletContext的getAttribute方法来判断是否存在Root WebApplicationContext。如果存在,则将其设置为自己的parent。这就是父子上下文(父子容器)的概念。
父子容器的作用在于,当我们尝试从child context(即:Servlet WebApplicationContext)中获取一个bean时,如果找不到,则会委派给parent context (即Root WebApplicationContext)来查找。
如果我们没有通过ContextLoaderListener来创建Root WebApplicationContext,那么Servlet WebApplicationContext的parent就是null,也就是没有parent context
六、重读xml配置
1)web.xml
之前我们用web.xml方式配置时,一般配置为:
<?xml version="1.0" encoding="UTF-8"?>

<web-app version="3.0" xmlns="http://java.sun.com/xml/ns/javaee"
    xmlns:xsi="http://www.w3.org/2001/XMLSchema-instance"
    xsi:schemaLocation="http://java.sun.com/xml/ns/javaeehttp://java.sun.com/xml/ns/javaee/web-app_3_0.xsd">

    <context-param>
        <param-name>contextConfigLocation</param-name>
        <param-value>/WEB-INF/spring.xml</param-value>
    </context-param>

    <!--spring监听器-->
    <listener>
        <listener-class>org.springframework.web.context.ContextLoaderListener</listener-class>
    </listener>

    <!--注册DispatcherServlet-->
    <servlet>
        <servlet-name>dispatcher</servlet-name>
        <servlet-class>org.springframework.web.servlet.DispatcherServlet</servlet-class>
        <init-param>
            <param-name>contextConfigLocation</param-name>
            <param-value>/WEB-INF/spring/spring-mvc.xml</param-value>
        </init-param>
        <load-on-startup>1</load-on-startup>
    </servlet>
    <servlet-mapping>
        <servlet-name>dispatcher</servlet-name>
        <url-pattern>/*</url-pattern>
    </servlet-mapping>

</web-app>
上面的意思是,分别通过监听器和dispatcher来加载spring根容器和mvc子容器
一般web.xml中还有post请求编解码过滤器、rest请求过滤器,这些配置在前面。
2)spring.xml
Servlet容器(tomcat、jetty)启动时,使用ContextLoaderListener读取 web.xml中的contextConfigLocation全局参数,初始化spring容器,如果没有这 个参数,那么ContextLoaderListener会加载/WEBINF/applicationContext.xml文件; spring容器主要用于整合struts1、Struts2;
<?xml version="1.0" encoding="UTF-8"?>
<!--标准的spring的配置文件-->
<beans xmlns="http://www.springframework.org/schema/beans"
       xmlns:tx="http://www.springframework.org/schema/tx"
       xmlns:context="http://www.springframework.org/schema/context"
       xmlns:aop="http://www.springframework.org/schema/aop"
       xmlns:xsi="http://www.w3.org/2001/XMLSchema-instance"
       xsi:schemaLocation="
       http://www.springframework.org/schema/beans
   http://www.springframework.org/schema/beans/spring-beans-4.3.xsd
       http://www.springframework.org/schema/tx
   http://www.springframework.org/schema/tx/spring-tx-4.3.xsd
       http://www.springframework.org/schema/context
   http://www.springframework.org/schema/context/spring-context-4.3.xsd
       http://www.springframework.org/schema/aop
   http://www.springframework.org/schema/aop/spring-aop-4.3.xsd
        ">

    <context:component-scan base-package="com.golden">
        <!-- 扫描@Service和@Repository注解 -->
        <context:include-filter type="annotation" expression="org.springframework.stereotype.Service"/>
        <context:include-filter type="annotation" expression="org.springframework.stereotype.Repository"/>

        <!-- 排除@Controller、@RestController、@ControllerAdvice【用于全局异常处理】 -->
        <context:exclude-filter type="annotation" expression="org.springframework.stereotype.Controller" />
        <context:exclude-filter type="annotation" expression="org.springframework.web.bind.annotation.RestController" />
        <context:exclude-filter type="annotation" expression="org.springframework.web.bind.annotation.ControllerAdvice" />
    </context:component-scan>

    <!-- 1. 数据源 -->
    <!-- 驱动名称、链接地址、用户名、密码 -->
    <bean id="dataSource" class="com.alibaba.druid.pool.DruidDataSource">
        <property name="driverClassName" value="com.mysql.jdbc.Driver" />
        <property name="url" value="jdbc:mysql://127.0.0.1:3306/test?serverTimezone=GMT" />
        <property name="username" value="root" />
        <property name="password" value="root" />
    </bean>

    <!-- 2. SqlSessionFactoryBean -->
    <!-- 属性: Bean别名、数据源、mapper位置、插件 【config.xml】-->
    <!-- typeAliasesPackage\dataSource\mapperLocations\plugins -->
    <bean name="sqlSessionFactory" class="org.mybatis.spring.SqlSessionFactoryBean">
        <property name="dataSource" ref="dataSource" />
        <property name="mapperLocations" value="classpath:mappers/*.xml" />
        <property name="typeAliasesPackage" value="com.golden.bean" />
        <property name="plugins">
            <array>
                <!--5.0版本前是PageHelper-->
                <bean class="com.github.pagehelper.PageInterceptor">
                    <!-- 调用setProperties()方法 -->
                    <property name="properties">
                        <props>
                            <prop key="helperDialect">mysql</prop>
                            <prop key="resonable">true</prop>
                        </props>
                    </property>
                </bean>
            </array>
        </property>
    </bean>

    <!-- 3. MapperScannerConfigurer: 扫描mapper接口,创建代理类,并将代理类加载到spring容器中 -->
    <bean class="org.mybatis.spring.mapper.MapperScannerConfigurer">
        <property name="basePackage" value="com.golden.mapper" />
        <!--如果有多个FactoryBean的话,可以使用这种方式指定一下-->
        <property name="sqlSessionFactoryBeanName" value="sqlSessionFactory" />
    </bean>

    <!-- aspectj方式配置声明式事务 -->
    <!-- 事务管理器 -->
    <bean id="tx" class="org.springframework.jdbc.datasource.DataSourceTransactionManager">
        <property name="dataSource" ref="dataSource" />
    </bean>

    <!-- 事务的通知 -->
    <tx:advice id="txAdvice" transaction-manager="tx">
        <tx:attributes>
            <tx:method name="add*" propagation="REQUIRED" isolation="DEFAULT" rollback-for="Throwable"/>
            <tx:method name="insert*" propagation="REQUIRED" isolation="DEFAULT" rollback-for="Throwable"/>
            <tx:method name="update*" propagation="REQUIRED" isolation="DEFAULT" rollback-for="Throwable"/>
            <tx:method name="delete*" propagation="REQUIRED" isolation="DEFAULT" rollback-for="Throwable"/>
            <tx:method name="del*" propagation="REQUIRED" isolation="DEFAULT" rollback-for="Throwable"/>
        </tx:attributes>
    </tx:advice>

    <aop:config>
        <!-- 切入点 -->
        <aop:pointcut id="tx-point" expression="execution(* com.golden.service..*.*(..))" />
        <!-- 将事务通知与切入点关联起来 -->
        <aop:advisor advice-ref="txAdvice" pointcut-ref="tx-point" />
    </aop:config>

    <!--注解版事务-->
    <tx:annotation-driven transaction-manager="tx" />

</beans>
以上Root容器配置文件,里面包含了所有需要扫描的Bean,限定类型为:Service和Repository。像@Controller、@RestController、@ControllerAdvice注解,统统拦截住不去扫描,因为这些注解是接下来Web容器需要扫描的。由此可以看出,这些基础的Bean类型,在Root容器中扫描过,就需要在Web容器中剔除,属于有你没我的状态,以此来实现完全隔离。
初次之外,还配置了持久层的相关内容,例如:spring整合Mybatis的相关配置和事务管理器的配置。这些都不属于web相关内容,而是持久层的内容,所以配置在root容器中。
3)springmvc.xml
<?xml version="1.0" encoding="UTF-8"?>
<!--标准的spring的配置文件-->
<beans xmlns="http://www.springframework.org/schema/beans"
       xmlns:mvc="http://www.springframework.org/schema/mvc"
       xmlns:context="http://www.springframework.org/schema/context"
       xmlns:xsi="http://www.w3.org/2001/XMLSchema-instance"
       xsi:schemaLocation="
                           http://www.springframework.org/schema/beans
                           http://www.springframework.org/schema/beans/spring-beans-4.3.xsd
                           http://www.springframework.org/schema/mvc
                           http://www.springframework.org/schema/mvc/spring-mvc-4.3.xsd
                           http://www.springframework.org/schema/context
                           http://www.springframework.org/schema/context/spring-context-4.3.xsd">

    <!-- 容器隔离 -->
    <context:component-scan base-package="com.golden">
        <!--指定 spring mvc 扫描的注解-->
        <!--@Controller @RestController @ControllerAdvice-->
        <context:include-filter type="annotation" expression="org.springframework.stereotype.Controller" />
        <context:include-filter type="annotation" expression="org.springframework.web.bind.annotation.RestController" />
        <context:include-filter type="annotation" expression="org.springframework.web.bind.annotation.ControllerAdvice" />

        <!--指定不扫描的注解-->
        <!--@Service  @Respository-->
        <context:exclude-filter type="annotation" expression="org.springframework.stereotype.Service" />
        <context:exclude-filter type="annotation" expression="org.springframework.stereotype.Repository" />
    </context:component-scan>

    <mvc:annotation-driven />

    <mvc:default-servlet-handler />

    <mvc:resources mapping="/pics/**" location="file:d:/upload/" />
    <mvc:resources mapping="/**" location="/static/" />

    <!--整合Thymeleaf-->
    <!--SpringResourceTemplateResovler-->
    <bean id="templateResolver" class="org.thymeleaf.spring5.templateresolver.SpringResourceTemplateResolver">
        <!--5个属性-->
        <property name="prefix" value="/templates/" />
        <property name="suffix" value=".html" />
        <property name="templateMode" value="HTML" />
        <property name="characterEncoding" value="UTF-8" />
        <!-- 在开发环境中,将cacheable设置为false,进行热加载 -->
        <!--正式环境中,是true-->
        <property name="cacheable" value="false" />
    </bean>

    <bean id="templateEngine" class="org.thymeleaf.spring5.SpringTemplateEngine">
        <property name="templateResolver" ref="templateResolver"/>
    </bean>

    <bean class="org.thymeleaf.spring5.view.ThymeleafViewResolver">
        <property name="templateEngine" ref="templateEngine"/>
        <!--如果不写这个,返回到页面的中文将乱码-->
        <property name="characterEncoding" value="UTF-8" />
    </bean>

    <!-- 文件上传解析器 -->
    <!-- id的值是multipartResolver -->
    <bean id="multipartResolver" class="org.springframework.web.multipart.commons.CommonsMultipartResolver">
        <!-- 允许上传的文件大小:2MB -->
        <property name="maxUploadSize" value="2097152" />
    </bean>


    <!-- 配置拦截器 -->
    <!-- 配置登录拦截器 -->
    <mvc:interceptors>
        <mvc:interceptor>
            <mvc:mapping path="/**"/>
            <mvc:exclude-mapping path="/js/**" />
            <mvc:exclude-mapping path="/user/toLogin" />
            <mvc:exclude-mapping path="/user/login" />
            <bean class="com.golden.interceptor.LoginInterceptor" />
        </mvc:interceptor>
    </mvc:interceptors>

</beans>
注解式代替xml
下面我们也说了mvc的SPI机制,其实他是Servlet 3.0被设计用来支持编码配置servlet容器,他通过使用spring的SPI规范代替传统的web.xml配置方式。
他利用了是spring的SPI规范注入了一个ServletContainerInitializer类。
操作机制:如果spring-web JAR包被放到类路径下,先会实例化SpringServletContainerInitializer类,在实例化SpringServletContainerInitializer后,会调用onStartup方法,而该方法会让感兴趣的类(WebApplicationInitializer)被加载了
加载机制是利用了ServiceLoader#load(Class)方法在spring-web JAR包下,检测到META-INF/services/javax.servlet.ServletContainerInitializer这个文件,可以看 https://download.oracle.com/javase/6/docs/technotes/guides/jar/jar.html#Service%20Provider
spring的WebApplicationInitializer的关系:spring的SPI包含了一个方法WebApplicationInitializer#onStartup(ServletContext),该方法类似于ServletContainerInitializer#onStartup(Set, ServletContext)
SpringServletContainerInitializer负责实例化和派发ServletContext给用户定义的WebApplicationInitializer实现。具体工作是由WebApplicationInitializer负责的,具体工作包括初始化ServletContext
该类应该被视为面向用户SPI的supporting infrastructure,如果没有WebApplicationInitializer实现类,该从起将不起作用
容器并没有绑定到mvc上,而是spring-web JAR包中关联着。可以被视为方便注解开发ServletContext。也就是说任何三大组件
servlet, listener, or filter可以注册到WebApplicationInitializer,而不仅仅是MVC的组件。
该类不支持继承,他应该被视为一个中间类
1)初始化器
//web容器启动的时候创建对象;调用方法来初始化容器以前前端控制器
public class MyWebAppInitializer extends AbstractAnnotationConfigDispatcherServletInitializer {

	//获取根容器的配置类;(Spring的配置文件)   父容器;
	@Override
	protected Class<?>[] getRootConfigClasses() {
		// TODO Auto-generated method stub
		return new Class<?>[]{RootConfig.class};
	}

	//获取web容器的配置类(SpringMVC配置文件)  子容器;
	@Override
	protected Class<?>[] getServletConfigClasses() {
		// TODO Auto-generated method stub
		return new Class<?>[]{AppConfig.class};// WebMvcConfigurerAdapter
	}

	//获取DispatcherServlet的映射信息
	//  /:拦截所有请求(包括静态资源(xx.js,xx.png)),但是不包括*.jsp;
	//  /*:拦截所有请求;连*.jsp页面都拦截;jsp页面是tomcat的jsp引擎解析的;
	@Override
	protected String[] getServletMappings() {
		// TODO Auto-generated method stub
		return new String[]{"/"};
	}
}
2)MVC配置
AppConfig
//SpringMVC只扫描Controller;子容器
//useDefaultFilters=false 禁用默认的过滤规则;
@ComponentScan(value="com.atguigu",includeFilters={
		@Filter(type=FilterType.ANNOTATION,classes={Controller.class})
},useDefaultFilters=false)//禁用默认的过滤规则
@EnableWebMvc
public class AppConfig  extends WebMvcConfigurerAdapter  {

	//定制

	//视图解析器
	@Override
	public void configureViewResolvers(ViewResolverRegistry registry) {
		//默认所有的页面都从 /WEB-INF/ xxx .jsp
		//registry.jsp();
		registry.jsp("/WEB-INF/views/", ".jsp");
	}

	//静态资源访问
	@Override
	public void configureDefaultServletHandling(DefaultServletHandlerConfigurer configurer) {
		configurer.enable();
	}

	//拦截器
	@Override
	public void addInterceptors(InterceptorRegistry registry) {
		//super.addInterceptors(registry);
		registry.addInterceptor(new MyFirstInterceptor()).addPathPatterns("/**");
	}

}
3)spring配置
RootConfig
package com.atguigu.config;


//Spring不扫描@Controller
@ComponentScan(value="com.atguigu",excludeFilters={
		@Filter(type=FilterType.ANNOTATION,classes={Controller.class})
})
public class RootConfig {

}
七、静态资源处理
- Web容器中注册的Bean都是直接与web请求密切关联的,由最开始的@Controller @RestController @ControllerAdvice注解扫描器的配置;
- 使用
<mvc:annotation-driven />,Spring会默认帮我们注册处理请求,参数和返回值的类。主要是实现了以下两个接口:HandlerMapping与HandlerAdapter。 - 使用
<mvc:default-servlet-handler />,会在Spring MVC上下文中定义一个DefaultServletHttpRequestHandler,它会像一个检查员,对进入DispatcherServlet的URL进行筛查,- 如果发现是静态资源的请求,就将该请求转由Web应用服务器默认的Servlet处理,
- 如果不是静态资源的请求,才由DispatcherServlet继续处理。
- 一般Web应用服务器默认的Servlet名称是"default",因此DefaultServletHttpRequestHandler可以找到它。如果你所有的Web应用服务器的默认Servlet名称不是"default",则需要通过default-servlet-name属性显示指定:
<mvc:default-servlet-handler default-servlet-name="所使用的Web服务器默认使用的Servlet名称" />
- 使用
<mvc:resources mapping="" location="">:<mvc:default-servlet-handler />将静态资源的处理经由Spring MVC框架交回Web应用服务器处理。而<mvc:resources />更进一步,由Spring MVC框架自己处理静态资源,并添加一些有用的附加值功能。- 首先,<mvc:resources />允许静态资源放在任何地方,如WEB-INF目录下、类路径下等,你甚至可以将JavaScript等静态文件打到JAR包中。通过location属性指定静态资源的位置,由于location属性是Resources类型,因此可以使用诸如"classpath:"等的资源前缀指定资源位置。传统Web容器的静态资源只能放在Web容器的根路径下,<mvc:resources />完全打破了这个限制。
- 其次,<mvc:resources />依据当前著名的Page Speed、YSlow等浏览器优化原则对静态资源提供优化。你可以通过cacheSeconds属性指定静态资源在浏览器端的缓存时间,一般可将该时间设置为一年,以充分利用浏览器端的缓存。在输出静态资源时,会根据配置设置好响应报文头的Expires 和 Cache-Control值。
- 在接收到静态资源的获取请求时,会检查请求头的Last-Modified值,如果静态资源没有发生变化,则直接返回303相应状态码,提示客户端使用浏览器缓存的数据,而非将静态资源的内容输出到客户端,以充分节省带宽,提高程序性能。
- 整合Thymeleaf,包括:SpringResourceTemplateResolver、SpringTemplateEngine、ThymeleafViewResolver
- 文件上传解析器,用于前端文件上传时使用。
- 各种拦截器。例如:登录请求拦截器,用来检测用户是否登录成功,如果没有登录则无权访问其他页面。需要提前将拦截器写好,在这里注册
八、注册web组件
有了上面的经验,我们用它往容器中注册普通servlet、过滤器、监听器
/**
	 * 1)、使用ServletContext注册Web组件(Servlet、Filter、Listener)
	 以前加注册的方式我们自己写代码的时候可以加上@HandlesTypes,但是第三方包如果是原来的web.xml可以配置在其中,但现在没有了xml,我们可以利用ServletContext给他注册进来
	 * 2)、使用编码的方式,在项目启动的时候给ServletContext里面添加组件;
	 * 		必须在项目启动的时候来添加;
	 * 		1)、ServletContainerInitializer得到的ServletContext;
	 * 		2)、ServletContextListener得到的ServletContext;
	 */
@HandlesTypes(value={HelloService.class})//传入感兴趣的类型;
public class MyServletContainerInitializer
    implements ServletContainerInitializer {


    @Override//应用启动的时候,会运行onStartup方法;
    public void onStartup(Set<Class<?>> arg0, //感兴趣的类型的所有子类
                          ServletContext sc) {//代表当前Web应用的ServletContext;一个Web应用一个ServletContext;

        //注册组件  ServletRegistration
        ServletRegistration.Dynamic servlet = sc.addServlet("userServlet", new UserServlet());
        //配置servlet的映射信息 // 处理/user请求
        servlet.addMapping("/user");

        //注册Listener
        sc.addListener(UserListener.class);

        //注册Filter  FilterRegistration
        FilterRegistration.Dynamic filter = sc.addFilter("userFilter", UserFilter.class);
        //配置Filter的映射信息
        filter.addMappingForUrlPatterns(EnumSet.of(DispatcherType.REQUEST),//过滤类型
                                        true,
                                        "/*");//要拦截的路径,所有请求
自定义web监听器
/**
 * 监听项目的启动和停止
 */
public class UserListener implements ServletContextListener {

	//监听ServletContext销毁
	@Override
	public void contextDestroyed(ServletContextEvent arg0) {
		System.out.println("UserListener...contextDestroyed...");
	}

	//监听ServletContext启动初始化
	@Override
	public void contextInitialized(ServletContextEvent arg0) {
		ServletContext servletContext = arg0.getServletContext();
		System.out.println("UserListener...contextInitialized...");
	}
}
自定义web过滤器
public class UserFilter implements Filter {

	@Override
	public void destroy() {}

	@Override
	public void doFilter(ServletRequest arg0, ServletResponse arg1, FilterChain arg2)
			throws IOException, ServletException {
		System.out.println("UserFilter...doFilter...");
		arg2.doFilter(arg0, arg1);
	}

	@Override
	public void init(FilterConfig arg0) throws ServletException {}
}
附录
定制SpringMVC;
1)、@EnableWebMvc:开启SpringMVC定制配置功能;
	相当于<mvc:annotation-driven/>;

2)、配置组件(视图解析器、视图映射、静态资源映射、拦截器。。。)
	通过继承extends WebMvcConfigurerAdapter
DispatcherServlet
protected void doDispatch(HttpServletRequest request, HttpServletResponse response) throws Exception {
		HttpServletRequest processedRequest = request;
		HandlerExecutionChain mappedHandler = null;
		boolean multipartRequestParsed = false;

		WebAsyncManager asyncManager = WebAsyncUtils.getAsyncManager(request);

		try {
			ModelAndView mv = null;
			Exception dispatchException = null;

			try {
				processedRequest = checkMultipart(request);
				multipartRequestParsed = (processedRequest != request);

				// Determine handler for the current request.
				mappedHandler = getHandler(processedRequest);
				if (mappedHandler == null) {
					noHandlerFound(processedRequest, response);
					return;
				}

				// Determine handler adapter for the current request.
				HandlerAdapter ha = getHandlerAdapter(mappedHandler.getHandler());

				// Process last-modified header, if supported by the handler.
				String method = request.getMethod();
				boolean isGet = "GET".equals(method);
				if (isGet || "HEAD".equals(method)) {
					long lastModified = ha.getLastModified(request, mappedHandler.getHandler());
					if (new ServletWebRequest(request, response).checkNotModified(lastModified) && isGet) {
						return;
					}
				}

				if (!mappedHandler.applyPreHandle(processedRequest, response)) {
					return;
				}

				// Actually invoke the handler.
				mv = ha.handle(processedRequest, response, mappedHandler.getHandler());

				if (asyncManager.isConcurrentHandlingStarted()) {
					return;
				}

				applyDefaultViewName(processedRequest, mv);
				mappedHandler.applyPostHandle(processedRequest, response, mv);
			}
			catch (Exception ex) {
				dispatchException = ex;
			}
			catch (Throwable err) {
				// As of 4.3, we're processing Errors thrown from handler methods as well,
				// making them available for @ExceptionHandler methods and other scenarios.
				dispatchException = new NestedServletException("Handler dispatch failed", err);
			}
			processDispatchResult(processedRequest, response, mappedHandler, mv, dispatchException);
		}
		catch (Exception ex) {
			triggerAfterCompletion(processedRequest, response, mappedHandler, ex);
		}
		catch (Throwable err) {
			triggerAfterCompletion(processedRequest, response, mappedHandler,
					new NestedServletException("Handler processing failed", err));
		}
		finally {
			if (asyncManager.isConcurrentHandlingStarted()) {
				// Instead of postHandle and afterCompletion
				if (mappedHandler != null) {
					mappedHandler.applyAfterConcurrentHandlingStarted(processedRequest, response);
				}
			}
			else {
				// Clean up any resources used by a multipart request.
				if (multipartRequestParsed) {
					cleanupMultipart(processedRequest);
				}
			}
		}
	}
pom
没有xml的时候,在pom.xml里写打包方式是war时会报错,设置好maven-war-plugin解决
<project xmlns="http://maven.apache.org/POM/4.0.0" xmlns:xsi="http://www.w3.org/2001/XMLSchema-instance" xsi:schemaLocation="http://maven.apache.org/POM/4.0.0 http://maven.apache.org/xsd/maven-4.0.0.xsd">
    <modelVersion>4.0.0</modelVersion>
    <groupId>com.atguigu</groupId>
    <artifactId>springmvc-annotation</artifactId>
    <version>0.0.1-SNAPSHOT</version>
    <packaging>war</packaging>

    <dependencies>
        <dependency>
            <groupId>org.springframework</groupId>
            <artifactId>spring-webmvc</artifactId>
            <version>4.3.11.RELEASE</version>
        </dependency>

        <dependency>
            <groupId>javax.servlet</groupId>
            <artifactId>servlet-api</artifactId>
            <version>3.0-alpha-1</version>
            <!--Tomcat里也有这个包,所以打包的时候不要他-->
            <scope>provided</scope>
        </dependency>
    </dependencies>

    <build>
        <plugins>
            <plugin>
                <groupId>org.apache.maven.plugins</groupId>
                <artifactId>maven-war-plugin</artifactId>
                <version>2.4</version>
                <configuration>
                    <!--没有web.xml时不要报错-->
                    <failOnMissingWebXml>false</failOnMissingWebXml>
                </configuration>
            </plugin>
            <plugin>
                <groupId>org.apache.maven.plugins</groupId>
                <artifactId>maven-compiler-plugin</artifactId>
                <configuration>
                    <source>6</source>
                    <target>6</target>
                </configuration>
            </plugin>
            <plugin>
                <groupId>org.apache.maven.plugins</groupId>
                <artifactId>maven-compiler-plugin</artifactId>
                <version>3.1</version>
                <configuration>
                    <source>1.8</source>
                    <target>1.8</target>
                </configuration>
            </plugin>
        </plugins>
    </build>
</project>
实战
// 自己启动一个tomcat
main(){
    Tomcat tomcat = new Tomcat();
    tomcat.setPort(80);
    tomcat.addWebapp("/","C:/tomcat");
    tomcat.start();
    tomcat.getServer.await();
}

// 把下面这个类写到ServletContainerInitializer文件中
// main启动,然后SPI加载到容器,容器加载到WebApplicationInitializer,调用它的方法
@ComponentScan()
public class MyWebApplicationinitializer implements WebApplicationInitializer{
    @Override
    public void onStartup(ServletContext servletContext){// 前面传过来的参数

        // 创建WebApplication
        AnnotationConfigWebApplication webAC = new AnnotationConfigWebApplication();
        webAC.register(MyWebApplicationinitializer.class);//开启包扫描
        webAC.refresh();

        DispatcherServlet dispatcherServlet = new DispatcherServlet(webAC );
        // 往容器里加servlet
        ServletRegistration.Dynamic dynamic=  servletContext.addServlet("myDis",dispatcherServlet);
        dynamic.setLoadOnstartup(1);
        dynamic.addMapping("/");
    }
}

public class MyWebApplicationInitializer implements WebApplicationInitializer {

    @Override
    public void onStartup(ServletContext servletContext) {

        // Load Spring web application configuration
        AnnotationConfigWebApplicationContext context = new AnnotationConfigWebApplicationContext();
        context.register(AppConfig.class);

        DispatcherServlet servlet = new DispatcherServlet(context);
        // 他有一个返回值
        ServletRegistration.Dynamic registration = servletContext.addServlet("app", servlet);
        registration.setLoadOnStartup(1);
        registration.addMapping("/app/*");
    }
}
相当于
<web-app>

    <listener>
        <listener-class>org.springframework.web.context.ContextLoaderListener</listener-class>
    </listener>

    <context-param>
        <param-name>contextConfigLocation</param-name>
        <param-value>/WEB-INF/app-context.xml</param-value>
    </context-param>

    <servlet>
        <servlet-name>app</servlet-name>
        <servlet-class>org.springframework.web.servlet.DispatcherServlet</servlet-class>
        <init-param>
            <param-name>contextConfigLocation</param-name>
            <param-value></param-value>
        </init-param>
        <load-on-startup>1</load-on-startup>
    </servlet>

    <servlet-mapping>
        <servlet-name>app</servlet-name>
        <url-pattern>/app/*</url-pattern>
    </servlet-mapping>

</web-app>
标签:xml,web,容器,SpringMVC,spring,SPI,ServletContext,servlet 来源: https://blog.csdn.net/hancoder/article/details/120379717
本站声明: 1. iCode9 技术分享网(下文简称本站)提供的所有内容,仅供技术学习、探讨和分享; 2. 关于本站的所有留言、评论、转载及引用,纯属内容发起人的个人观点,与本站观点和立场无关; 3. 关于本站的所有言论和文字,纯属内容发起人的个人观点,与本站观点和立场无关; 4. 本站文章均是网友提供,不完全保证技术分享内容的完整性、准确性、时效性、风险性和版权归属;如您发现该文章侵犯了您的权益,可联系我们第一时间进行删除; 5. 本站为非盈利性的个人网站,所有内容不会用来进行牟利,也不会利用任何形式的广告来间接获益,纯粹是为了广大技术爱好者提供技术内容和技术思想的分享性交流网站。