标签:return String void 客网 第七章 new Override 仿牛 public
Spring Security简介
简介
Spring Security是一个专注于为Java应用程序提供身份认证,它的强大之处在于可以轻松拓展以满足其他自定义的需求。
特征
对身份的认证和授权提供全面的、可拓展的支持。
防止各种攻击,如会话固定攻击、点击劫持、csrf攻击。
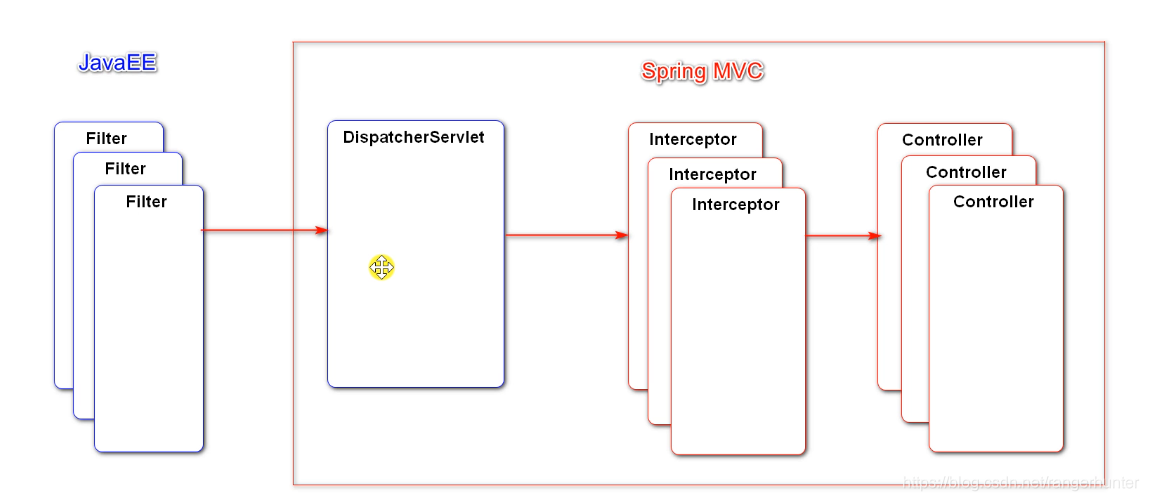
支持与Servlet API、Spring MVC等Web技术集成。
 在spring4all上可以学习关于Spring Security的信息。
首先是引入依赖,spring-boot-starter-security。
在User里
// true: 账号未过期.
    @Override
    public boolean isAccountNonExpired() {
        return true;
    }
    // true: 账号未锁定.
    @Override
    public boolean isAccountNonLocked() {
        return true;
    }
    // true: 凭证未过期.
    @Override
    public boolean isCredentialsNonExpired() {
        return true;
    }
    // true: 账号可用.
    @Override
    public boolean isEnabled() {
        return true;
    }
    @Override
    public Collection<? extends GrantedAuthority> getAuthorities() {
        List<GrantedAuthority> list = new ArrayList<>();
        list.add(new GrantedAuthority() {
            @Override
            public String getAuthority() {
                switch (type) {
                    case 1:
                        return "ADMIN";
                    default:
                        return "USER";
                }
            }
        });
        return list;
    }
在UserService上
@Service
public class UserService implements UserDetailsService {
    @Autowired
    private UserMapper userMapper;
    public User findUserByName(String username) {
        return userMapper.selectByName(username);
    }
    @Override
    public UserDetails loadUserByUsername(String username) throws UsernameNotFoundException {
        return this.findUserByName(username);
    }
}
在Config里写SercurityConfig
@Configuration
public class SecurityConfig extends WebSecurityConfigurerAdapter {
    @Autowired
    private UserService userService;
    @Override
    public void configure(WebSecurity web) throws Exception {
        // 忽略静态资源的访问
        web.ignoring().antMatchers("/resources/**");
    }
    // AuthenticationManager: 认证的核心接口.
    // AuthenticationManagerBuilder: 用于构建AuthenticationManager对象的工具.
    // ProviderManager: AuthenticationManager接口的默认实现类.
    @Override
    protected void configure(AuthenticationManagerBuilder auth) throws Exception {
        // 内置的认证规则
        // auth.userDetailsService(userService).passwordEncoder(new Pbkdf2PasswordEncoder("12345"));
        // 自定义认证规则
        // AuthenticationProvider: ProviderManager持有一组AuthenticationProvider,每个AuthenticationProvider负责一种认证.
        // 委托模式: ProviderManager将认证委托给AuthenticationProvider.
        auth.authenticationProvider(new AuthenticationProvider() {
            // Authentication: 用于封装认证信息的接口,不同的实现类代表不同类型的认证信息.
            @Override
            public Authentication authenticate(Authentication authentication) throws AuthenticationException {
                String username = authentication.getName();
                String password = (String) authentication.getCredentials();
                User user = userService.findUserByName(username);
                if (user == null) {
                    throw new UsernameNotFoundException("账号不存在!");
                }
                password = CommunityUtil.md5(password + user.getSalt());
                if (!user.getPassword().equals(password)) {
                    throw new BadCredentialsException("密码不正确!");
                }
                // principal: 主要信息; credentials: 证书; authorities: 权限;
                return new UsernamePasswordAuthenticationToken(user, user.getPassword(), user.getAuthorities());
            }
            // 当前的AuthenticationProvider支持哪种类型的认证.
            @Override
            public boolean supports(Class<?> aClass) {
                // UsernamePasswordAuthenticationToken: Authentication接口的常用的实现类.
                return UsernamePasswordAuthenticationToken.class.equals(aClass);
            }
        });
    }
    @Override
    protected void configure(HttpSecurity http) throws Exception {
        // 登录相关配置
        http.formLogin()
                .loginPage("/loginpage")
                .loginProcessingUrl("/login")
                .successHandler(new AuthenticationSuccessHandler() {
                    @Override
                    public void onAuthenticationSuccess(HttpServletRequest request, HttpServletResponse response, Authentication authentication) throws IOException, ServletException {
                        response.sendRedirect(request.getContextPath() + "/index");
                    }
                })
                .failureHandler(new AuthenticationFailureHandler() {
                    @Override
                    public void onAuthenticationFailure(HttpServletRequest request, HttpServletResponse response, AuthenticationException e) throws IOException, ServletException {
                        request.setAttribute("error", e.getMessage());
                        request.getRequestDispatcher("/loginpage").forward(request, response);
                    }
                });
        // 退出相关配置
        http.logout()
                .logoutUrl("/logout")
                .logoutSuccessHandler(new LogoutSuccessHandler() {
                    @Override
                    public void onLogoutSuccess(HttpServletRequest request, HttpServletResponse response, Authentication authentication) throws IOException, ServletException {
                        response.sendRedirect(request.getContextPath() + "/index");
                    }
                });
        // 授权配置
        http.authorizeRequests()
                .antMatchers("/letter").hasAnyAuthority("USER", "ADMIN")
                .antMatchers("/admin").hasAnyAuthority("ADMIN")
                .and().exceptionHandling().accessDeniedPage("/denied");
        // 增加Filter,处理验证码
        http.addFilterBefore(new Filter() {
            @Override
            public void doFilter(ServletRequest servletRequest, ServletResponse servletResponse, FilterChain filterChain) throws IOException, ServletException {
                HttpServletRequest request = (HttpServletRequest) servletRequest;
                HttpServletResponse response = (HttpServletResponse) servletResponse;
                if (request.getServletPath().equals("/login")) {
                    String verifyCode = request.getParameter("verifyCode");
                    if (verifyCode == null || !verifyCode.equalsIgnoreCase("1234")) {
                        request.setAttribute("error", "验证码错误!");
                        request.getRequestDispatcher("/loginpage").forward(request, response);
                        return;
                    }
                }
                // 让请求继续向下执行.
                filterChain.doFilter(request, response);
            }
        }, UsernamePasswordAuthenticationFilter.class);
        // 记住我
        http.rememberMe()
                .tokenRepository(new InMemoryTokenRepositoryImpl())
                .tokenValiditySeconds(3600 * 24)
                .userDetailsService(userService);
    }
}
修改HomeController
public class HomeController {
    @RequestMapping(path = "/index", method = RequestMethod.GET)
    public String getIndexPage(Model model) {
        // 认证成功后,结果会通过SecurityContextHolder存入SecurityContext中.
        Object obj = SecurityContextHolder.getContext().getAuthentication().getPrincipal();
        if (obj instanceof User) {
            model.addAttribute("loginUser", obj);
        }
        return "/index";
    }
    @RequestMapping(path = "/discuss", method = RequestMethod.GET)
    public String getDiscussPage() {
        return "/site/discuss";
    }
    @RequestMapping(path = "/letter", method = RequestMethod.GET)
    public String getLetterPage() {
        return "/site/letter";
    }
    @RequestMapping(path = "/admin", method = RequestMethod.GET)
    public String getAdminPage() {
        return "/site/admin";
    }
    @RequestMapping(path = "/loginpage", method = {RequestMethod.GET, RequestMethod.POST})
    public String getLoginPage() {
        return "/site/login";
    }
    // 拒绝访问时的提示页面
    @RequestMapping(path = "/denied", method = RequestMethod.GET)
    public String getDeniedPage() {
        return "/error/404";
    }
}
修改之前的登录
登录检查
之前采用拦截器实习登录检查,这是简单的权限管理方案,现在将其废弃。
废弃原来的WebMvcConfig的拦截器设置。
授权配置
对当前系统内包含的所有的请求,分配访问权限(普通用户、版主、管理员)。
在常量接口上新增
/**
     * 权限:普通用户
     */
    String AUTHORITY_USER = "user";
    /**
     * 权限:管理员
     */
    String AUTHORITY_ADMIN = "admin";
    /**
     * 权限:版主
     */
    String AUTHORITY_MODERATOR = "moderator";
SecurityConfig
@Configuration
public class SecurityConfig extends WebSecurityConfigurerAdapter implements CommunityConstant {
    @Override
    public void configure(WebSecurity web) throws Exception {
        web.ignoring().antMatchers("/resources/**");
    }
    @Override
    protected void configure(HttpSecurity http) throws Exception {
        //授权
        http.authorizeRequests()
                .antMatchers(
                        "/user/setting",
                        "/user/upload",
                        "/discuss/add",
                        "/comment/add/**",
                        "/letter/**",
                        "/notice/**",
                        "/like",
                        "/follow",
                        "/unfollow"
                ).hasAnyAuthority(
                        AUTHORITY_USER,
                        AUTHORITY_ADMIN,
                        AUTHORITY_MODERATOR
                )
                .anyRequest().permitAll()
                .and().csrf().disable();
        //权限不够时的处理
        http.exceptionHandling()
                .authenticationEntryPoint(new AuthenticationEntryPoint() {
                    //没有登录
                    @Override
                    public void commence(HttpServletRequest request, HttpServletResponse response, AuthenticationException e) throws IOException, ServletException {
                        String xRequestedWith = request.getHeader("x-requested-with");
                        if("XMELHttpRequest".equals(xRequestedWith)){
                            response.setContentType("application/plain;charset=utf-8");
                            PrintWriter writer = response.getWriter();
                            writer.write(CommunityUtil.getJSONString(403, "你还没有登录哦!"));
                        }else {
                            response.sendRedirect(request.getContextPath() + "/login");
                        }
                    }
                })
                .accessDeniedHandler(new AccessDeniedHandler() {
                    //权限不足
                    @Override
                    public void handle(HttpServletRequest request, HttpServletResponse response, AccessDeniedException e) throws IOException, ServletException {
                        String xRequestedWith = request.getHeader("x-requested-with");
                        if("XMELHttpRequest".equals(xRequestedWith)){
                            response.setContentType("application/plain;charset=utf-8");
                            PrintWriter writer = response.getWriter();
                            writer.write(CommunityUtil.getJSONString(403, "你没有访问此功能的权限!"));
                        }else {
                            response.sendRedirect(request.getContextPath() + "/denied");
                        }
                    }
                });
        //Security底层默认拦截/logout请求,进行退出处理
        //覆盖它默认的逻辑并能执行我们自己的退出的代码
        http.logout().logoutUrl("/securitylogout");
    }
}
在UserService
public Collection<? extends GrantedAuthority> getAuthorities(int userId){
        User user = this.findUserById(userId);
        List<GrantedAuthority> list = new ArrayList<>();
        list.add(new GrantedAuthority(){
            @Override
            public String getAuthority() {
                switch (user.getType()){
                    case 1:
                        return AUTHORITY_ADMIN;
                    case 2:
                        return AUTHORITY_MODERATOR;
                    default:
                        return AUTHORITY_USER;
                }
            }
        });
        return list;
    }
认证方案
绕过Security认证系统,采用原来的认证方案。
修改LoginTicketInterceptor
@Component
public class LoginTicketInterceptor implements HandlerInterceptor {
    @Autowired
    private UserService userService;
    @Autowired
    private HostHolder hostHolder;
    @Override
    public boolean preHandle(HttpServletRequest request, HttpServletResponse response, Object handler) throws Exception {
        // 从cookie中获取凭证
        String ticket = CookieUtil.getValue(request, "ticket");
        if (ticket != null) {
            // 查询凭证
            LoginTicket loginTicket = userService.findLoginTicket(ticket);
            // 检查凭证是否有效
            if (loginTicket != null && loginTicket.getStatus() == 0 && loginTicket.getExpired().after(new Date())) {
                // 根据凭证查询用户
                User user = userService.findUserById(loginTicket.getUserId());
                // 在本次请求中持有用户
                hostHolder.setUser(user);
                //构建用户认证的结果,并存入SecurityContent,以便于Security进行授权
                Authentication authentication = new UsernamePasswordAuthenticationToken(
                        user, user.getPassword(), userService.getAuthorities(user.getId()));
                SecurityContextHolder.setContext(new SecurityContextImpl(authentication));
            }
        }
        return true;
    }
    @Override
    public void postHandle(HttpServletRequest request, HttpServletResponse response, Object handler, ModelAndView modelAndView) throws Exception {
        User user = hostHolder.getUser();
        if (user != null && modelAndView != null) {
            modelAndView.addObject("loginUser", user);
        }
    }
    @Override
    public void afterCompletion(HttpServletRequest request, HttpServletResponse response, Object handler, Exception ex) throws Exception {
        hostHolder.clear();
        SecurityContextHolder.clearContext();
    }
}
csrf配置
csrf是其他用户获得客户端的cookie和ticket从而访问了服务器,security可以生成TOKEN数据,是隐藏的,防止csrf攻击。
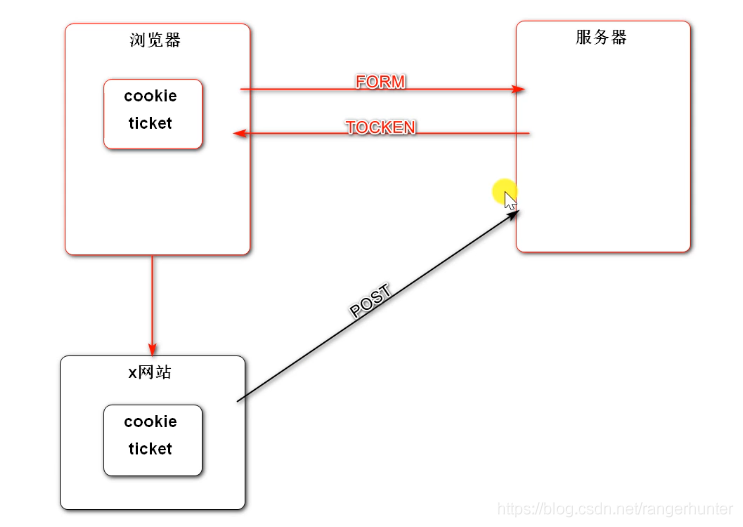
security自带有这个功能的实现,对于表单的提交,但是对于异步请求就没有实现。需要自己去实现。
在需要提交异步请求的位置
<meta name="_csrf" th:content="${_csrf.token}">
    <meta name="_csrf_header" th:content="${_csrf.headerName}">
在对应的js文件
//发送AJAX请求之前,将SCRF令牌设置到请求的消息头中。
    var token = $("meta[name='_csrf']").attr("content");
    var header = $("meta[name='_csrf_header']").attr("content");
    $(document).ajaxSend(function (e, xhr, options) {
        xhr.setRequestHeader(header, token);
    });
防止csrf攻击,表单,AJAX的配置。
一般需要对所有的异步请求都要配,不然就是不安全的,无法通过,也可以不做配置,那么在授权的时候需要.and().csrf().disable();
置定,加精,删除
功能实现
点击置顶,修改帖子的类型。
点击,“加精”、“删除”,修改帖子的状态。
在数据层,在DiscussPostMapper上增加方法
int updateType(int id, int type);
int updateStatus(int id, int status);
在discuss-mapper.xml下
<update id="updateType">
        update discuss_post set type = #{type} where id = #{id}
    </update>
    <update id="updateStatus">
        update discuss_post set status = #{status} where id = #{id}
    </update>
在DiscussPostService下增加方法
    public int updateType(int id, int type){
        return discussPostMapper.updateType(id, type);
    }
    public int updateStatus(int id, int status){
        return discussPostMapper.updateStatus(id, status);
    }
在DiscusspostController下
// 置顶
    @RequestMapping(path = "/top", method = RequestMethod.POST)
    @ResponseBody
    public String setTop(int id) {
        discussPostService.updateType(id, 1);
        // 触发发帖事件
        Event event = new Event()
                .setTopic(TOPIC_PUBLISH)
                .setUserId(hostHolder.getUser().getId())
                .setEntityType(ENTITY_TYPE_POST)
                .setEntityId(id);
        eventProducer.fireEvent(event);
        return CommunityUtil.getJSONString(0);
    }
    // 加精
    @RequestMapping(path = "/wonderful", method = RequestMethod.POST)
    @ResponseBody
    public String setWonderful(int id) {
        discussPostService.updateStatus(id, 1);
        // 触发发帖事件
        Event event = new Event()
                .setTopic(TOPIC_PUBLISH)
                .setUserId(hostHolder.getUser().getId())
                .setEntityType(ENTITY_TYPE_POST)
                .setEntityId(id);
        eventProducer.fireEvent(event);
        return CommunityUtil.getJSONString(0);
    }
    // 删除
    @RequestMapping(path = "/delete", method = RequestMethod.POST)
    @ResponseBody
    public String setDelete(int id) {
        discussPostService.updateStatus(id, 2);
        // 触发删帖事件
        Event event = new Event()
                .setTopic(TOPIC_DELETE)
                .setUserId(hostHolder.getUser().getId())
                .setEntityType(ENTITY_TYPE_POST)
                .setEntityId(id);
        eventProducer.fireEvent(event);
        return CommunityUtil.getJSONString(0);
    }
在EventConsumer上消费删帖事件
// 消费删帖事件
    @KafkaListener(topics = {TOPIC_DELETE})
    public void handleDeleteMessage(ConsumerRecord record) {
        if (record == null || record.value() == null) {
            logger.error("消息的内容为空!");
            return;
        }
        Event event = JSONObject.parseObject(record.value().toString(), Event.class);
        if (event == null) {
            logger.error("消息格式错误!");
            return;
        }
        elasticsearchService.deleteDiscussPost(event.getEntityId());
    }
为置顶、加精、删除绑定3个js单击事件。
$(function(){
    $("#topBtn").click(setTop);
    $("#wonderfulBtn").click(setWonderful);
    $("#deleteBtn").click(setDelete);
});
// 置顶
function setTop() {
    $.post(
        CONTEXT_PATH + "/discuss/top",
        {"id":$("#postId").val()},
        function(data) {
            data = $.parseJSON(data);
            if(data.code == 0) {
                $("#topBtn").attr("disabled", "disabled");
            } else {
                alert(data.msg);
            }
        }
    );
}
// 加精
function setWonderful() {
    $.post(
        CONTEXT_PATH + "/discuss/wonderful",
        {"id":$("#postId").val()},
        function(data) {
            data = $.parseJSON(data);
            if(data.code == 0) {
                $("#wonderfulBtn").attr("disabled", "disabled");
            } else {
                alert(data.msg);
            }
        }
    );
}
// 删除
function setDelete() {
    $.post(
        CONTEXT_PATH + "/discuss/delete",
        {"id":$("#postId").val()},
        function(data) {
            data = $.parseJSON(data);
            if(data.code == 0) {
                location.href = CONTEXT_PATH + "/index";
            } else {
                alert(data.msg);
            }
        }
    );
}
权限管理
版主可以执行“置顶”、“加精”操作。
在SecurityConfig下配置权限。
.antMatchers(
                        "/discuss/top",
                        "/discuss/wonderful"
                )
                .hasAnyAuthority(
                        AUTHORITY_MODERATOR
                )
                .antMatchers(
                        "/discuss/delete"
                )
                .hasAnyAuthority(
                        AUTHORITY_ADMIN
                )
管理员可以看到“删除”按钮
在html页面上,增加xmlns:sec=“http://www.thymeleaf.org/extras/spring-security”,在每个按钮处,引入权限控制
<button type="button" class="btn btn-danger btn-sm" id="topBtn"
                            th:disabled="${post.type==1}" sec:authorize="hasAnyAuthority('moderator')">置顶</button>
                        <button type="button" class="btn btn-danger btn-sm" id="wonderfulBtn"
                            th:disabled="${post.status==1}" sec:authorize="hasAnyAuthority('moderator')">加精</button>
                        <button type="button" class="btn btn-danger btn-sm" id="deleteBtn"
                            th:disabled="${post.status==2}" sec:authorize="hasAnyAuthority('admin')">删除</button>
Themleaf做了和Spring security相关的包,可以在github下载,可以在Mavenreposity下载导包。
Redis高级数据类型
HyperLogLog
采用一种基数算法,用于完成独立数据的统计,特点是占用空间小,无论统计多少数据,只占用12K的内存空间,不足的是统计不精确,误差在0.81%。
//统计20万个重复数据的独立总数。
    @Test
    public void testHyperLogLog(){
        String redisKey = "test:hll:01";
        for (int i = 1; i <= 100000; i++) {
            redisTemplate.opsForHyperLogLog().add(redisKey, i);
        }
        for (int i = 1; i <= 100000; i++) {
            int r = (int)(Math.random() * 100000 + 1);
            redisTemplate.opsForHyperLogLog().add(redisKey, r);
        }
        Long size = redisTemplate.opsForHyperLogLog().size(redisKey);
        System.out.println(size);
    }
    //将3组数据合并,再统计合并后的重复数据的独立总数
    @Test
    public void testHyperLogLogUnion(){
        String redisKey2 = "test:hll:02";
        for (int i = 1; i <= 10000; i++) {
            redisTemplate.opsForHyperLogLog().add(redisKey2, i);
        }
        String redisKey3 = "test:hll:03";
        for (int i = 5001; i <= 15000; i++) {
            redisTemplate.opsForHyperLogLog().add(redisKey3, i);
        }
        String redisKey4 = "test:hll:04";
        for (int i = 10001; i <= 20000; i++) {
            redisTemplate.opsForHyperLogLog().add(redisKey4, i);
        }
        String unionKey = "test:hll:union";
        redisTemplate.opsForHyperLogLog().union(unionKey, redisKey2, redisKey3, redisKey4);
        long size = redisTemplate.opsForHyperLogLog().size(unionKey);
        System.out.println(size);
    }
Bitmap
不是一种独立的数据结构,实际上就是字符串。支持按位存取数据,可以将其看成是byte数组。适合储存大量的连续的布尔值,比如记录签到。
//统计一组数据的布尔值
    @Test
    public void testBitMap(){
        String redisKey = "test:bm:01";
        //记录
        redisTemplate.opsForValue().setBit(redisKey, 1, true);
        redisTemplate.opsForValue().setBit(redisKey, 4, true);
        redisTemplate.opsForValue().setBit(redisKey, 7, true);
        //查询
        System.out.println(redisTemplate.opsForValue().getBit(redisKey, 0));
        System.out.println(redisTemplate.opsForValue().getBit(redisKey, 1));
        System.out.println(redisTemplate.opsForValue().getBit(redisKey, 2));
        //统计
         Object obj = redisTemplate.execute(new RedisCallback() {
            @Override
            public Object doInRedis(RedisConnection connection) throws DataAccessException {
                return connection.bitCount(redisKey.getBytes());
            }
        });
        System.out.println(obj);
    }
    //统计3组数据的布尔值,并对这3组数据做OR运算
    @Test
    public void testBitMapOperation(){
        String redisKey2 = "test:bm:02";
        redisTemplate.opsForValue().setBit(redisKey2, 0, true);
        redisTemplate.opsForValue().setBit(redisKey2, 1, true);
        redisTemplate.opsForValue().setBit(redisKey2, 2, true);
        String redisKey3 = "test:bm:03";
        redisTemplate.opsForValue().setBit(redisKey3, 2, true);
        redisTemplate.opsForValue().setBit(redisKey3, 3, true);
        redisTemplate.opsForValue().setBit(redisKey3, 4, true);
        String redisKey4 = "test:bm:04";
        redisTemplate.opsForValue().setBit(redisKey3, 4, true);
        redisTemplate.opsForValue().setBit(redisKey3, 5, true);
        redisTemplate.opsForValue().setBit(redisKey3, 6, true);
        String redisKey = "test:bm:or";
        Object obj = redisTemplate.execute(new RedisCallback() {
            @Override
            public Object doInRedis(RedisConnection connection) throws DataAccessException {
                connection.bitOp(RedisStringCommands.BitOperation.OR,
                        redisKey.getBytes(), redisKey2.getBytes(), redisKey3.getBytes(), redisKey4.getBytes());
                return connection.bitCount(redisKey.getBytes());
            }
        });
        System.out.println(obj);
        System.out.println(redisTemplate.opsForValue().getBit(redisKey,0));
        System.out.println(redisTemplate.opsForValue().getBit(redisKey,1));
        System.out.println(redisTemplate.opsForValue().getBit(redisKey,2));
        System.out.println(redisTemplate.opsForValue().getBit(redisKey,3));
        System.out.println(redisTemplate.opsForValue().getBit(redisKey,4));
        System.out.println(redisTemplate.opsForValue().getBit(redisKey,5));
        System.out.println(redisTemplate.opsForValue().getBit(redisKey,6));
    }
网站数据统计
UV(Unique Vistor)
独立访客,需要对用户IP排重统计数据
每次访问都要进行统计,采用HyperLogLog,性能好,且储存空间小。
DAU(Daily Active User)
日活跃用户,需通过用户ID重排统计数据。
访问过1次,则认为其活跃。
Bitmap,性能好、且可以统计准确数据。
这些功能是通过redis实现的,在RedisKeyUtil下
private static final String SPLIT = ":";
    private static final String PREFIX_UV = "uv";
    private static final String PREFIX_DAU = "dau";
    //单日UV
    public static String getUVKey(String date){
        return PREFIX_UV + SPLIT + date;
    }
    //区间UV
    public static String getUVKey(String startDate, String endDate){
        return PREFIX_UV + SPLIT + startDate + SPLIT + endDate;
    }
    //单日活跃用户
    public static String getDAUKey(String date){
        return PREFIX_DAU + SPLIT + date;
    }
    //区间活跃用户
    public static String getDAUKey(String startDate, String endDate){
        return PREFIX_DAU + SPLIT + startDate + SPLIT + endDate;
    }
DataService
@Service
public class DataService {
    @Autowired
    private RedisTemplate redisTemplate;
    private SimpleDateFormat df = new SimpleDateFormat("yyyyMMdd");
    //将指定的IP计入UV
    public void recordUV(String ip){
        String redisKey = RedisKeyUtil.getUVKey(df.format(new Date()));
        redisTemplate.opsForHyperLogLog().add(redisKey, ip);
    }
    //统计指定日期范围内的日期
    public long calculateUV(Date start, Date end){
        if(start == null || end == null){
            throw new IllegalArgumentException("参数不能为空!");
        }
        //整理改日期范围内的key
        List<String> keyList = new ArrayList<>();
        Calendar calendar = Calendar.getInstance();
        calendar.setTime(start);
        while (!calendar.getTime().after(end)){
            String key = RedisKeyUtil.getUVKey(df.format(calendar.getTime()));
            keyList.add(key);
            calendar.add(Calendar.DATE, 1);
        }
        //合并这些数据
        String redisKey = RedisKeyUtil.getUVKey(df.format(start), df.format(end));
        redisTemplate.opsForHyperLogLog().union(redisKey, keyList.toArray());
        //返回这个统计的结果
        return redisTemplate.opsForHyperLogLog().size(redisKey);
    }
    //将指定用户记录DAU
    public void recordDAU(int userId){
        String redisKey = RedisKeyUtil.getDAUKey(df.format(new Date()));
        redisTemplate.opsForValue().setBit(redisKey, userId, true);
    }
    //统计指定日期范围内的DAU
    public long calculateDAU(Date start, Date end){
        if(start == null || end == null){
            throw new IllegalArgumentException("参数不能为空!");
        }
        //整理改日期范围内的key
        List<byte[]> keyList = new ArrayList<>();
        Calendar calendar = Calendar.getInstance();
        calendar.setTime(start);
        while (!calendar.getTime().after(end)){
            String key = RedisKeyUtil.getDAUKey(df.format(calendar.getTime()));
            keyList.add(key.getBytes());
            calendar.add(Calendar.DATE, 1);
        }
        //进行OR运算
        return (long)redisTemplate.execute(new RedisCallback() {
            @Override
            public Object doInRedis(RedisConnection connection) throws DataAccessException {
                String redisKey = RedisKeyUtil.getDAUKey(df.format(start), df.format(end));
                connection.bitOp(RedisStringCommands.BitOperation.OR,
                        redisKey.getBytes(), keyList.toArray(new byte[0][0]));
                return connection.bitCount(redisKey.getBytes());
            }
        });
    }
}
编写拦截器DataInterceptor
@Component
public class DataInterceptor implements HandlerInterceptor {
    @Autowired
    private DataService dataService;
    @Autowired
    private HostHolder hostHolder;
    @Override
    public boolean preHandle(HttpServletRequest request, HttpServletResponse response, Object handler) throws Exception {
        //统计UV
        String ip = request.getRemoteHost();
        dataService.recordUV(ip);
        //统计DAU
        User user = hostHolder.getUser();
        if(user != null){
            dataService.recordDAU(user.getId());
        }
        return true;
    }
}
在WebConfig配置拦截器。
写Datacontroller
@Controller
public class DataController {
    @Autowired
    private DataService dataService;
    //统计页面
    @RequestMapping(path = "data", method = {RequestMethod.GET, RequestMethod.POST})
    public String getDataPage(){
        return "/site/admin/data";
    }
    //处理统计网址UV
    @RequestMapping(path = "/data/uv", method = RequestMethod.POST)
    public String getUV(@DateTimeFormat(pattern = "yyyy-MM-dd") Date start,
                        @DateTimeFormat(pattern = "yyyy-MM-dd")Date end, Model model){
        long uv = dataService.calculateUV(start, end);
        model.addAttribute("uvResult", uv);
        model.addAttribute("uvStartDate", start);
        model.addAttribute("uvEndDate", end);
        return "forward:/data";
    }
    //统计活跃用户
    @RequestMapping(path = "/data/dau", method = RequestMethod.POST)
    public String getDAU(@DateTimeFormat(pattern = "yyyy-MM-dd") Date start,
                        @DateTimeFormat(pattern = "yyyy-MM-dd")Date end, Model model){
        long dau = dataService.calculateDAU(start, end);
        model.addAttribute("dauResult", dau);
        model.addAttribute("dauStartDate", start);
        model.addAttribute("dauEndDate", end);
        return "forward:/data";
    }
}
我们这个数据查看页面也是需要一定的权限才能打开,所以我们需要对权限进行一个管理,如果权限不到位,无法访问
.antMatchers(
                        "/discuss/delete",
                        "/data/**"
                )
                .hasAnyAuthority(
                        AUTHORITY_ADMIN
                )
任务调度与执行
JDK线程池
ExecutorService
private static final Logger logger = LoggerFactory.getLogger(ThreadPoolTests.class);
    //JDK普通线程池
    private ExecutorService executorService = Executors.newFixedThreadPool(5);
    private void sleep(long m){
        try {
            Thread.sleep(m);
        } catch (InterruptedException e) {
            e.printStackTrace();
        }
    }
    //1.JDK普通线程池
    @Test
    public void testExecutorService(){
        Runnable task = new Runnable() {
            @Override
            public void run() {
                logger.debug("Hello ExecutorService");
            }
        };
        for (int i = 1; i <= 10; i++) {
            executorService.submit(task);
        }
        sleep(10000);
    }
ScheduledExecutorService
//JDK可执行定时任务的线程池
    private ScheduledExecutorService scheduledExecutorService = Executors.newScheduledThreadPool(5);
    //2.JDK定时任务线程池
    @Test
    public void testScheduledExecutorService(){
        Runnable task = new Runnable() {
            @Override
            public void run() {
                logger.debug("Hello ScheduledExecutorService");
            }
        };
        scheduledExecutorService.scheduleAtFixedRate(task, 10000, 1000, TimeUnit.MILLISECONDS);
        sleep(30000);
    }
Spring线程池
ThreadPoolTaskExecutor
//Spring普通线程池
    @Autowired
    private ThreadPoolTaskExecutor taskExecutor;
    //3.Spring普通线程池
    @Test
    public void testThreadPoolTaskExecutor(){
        Runnable task = new Runnable() {
            @Override
            public void run() {
                logger.debug("Hello ThreadPoolTaskExecutor");
            }
        };
        for (int i = 0; i < 10 ; i++) {
            taskExecutor.submit(task);
        }
        sleep(10000);
    }
ThreadPoolTaskScheduler
//Spring可执行定时任务的线程池
    @Autowired
    private ThreadPoolTaskScheduler taskScheduler;
    //4.Spring定时任务线程池
    @Test
    public void testThreadPoolTaskScheduler(){
        Runnable task = new Runnable() {
            @Override
            public void run() {
                logger.debug("Hello ThreadPoolTaskScheduler");
            }
        };
        Date startTime = new Date(System.currentTimeMillis() + 10000);
        taskScheduler.scheduleAtFixedRate(task, startTime, 1000);
        sleep(30000);
    }
注意Spring的线程池可以自己在Application里做配置
# TaskExecutionProperties
spring.task.execution.pool.core-size=5
spring.task.execution.pool.max-size=15
spring.task.execution.pool.queue-capacity=100
Spring的这种调用是可以简化的,在AlphaService里
//可以让该方法在多线程的环境下,被异步的调用。
    @Async
    public void execute1(){
        logger.debug("execute1");
    }
    @Scheduled(initialDelay = 10000, fixedRate = 1000)
    public void execute2(){
        logger.debug("execute2");
    }
添加ThreadPoolConfig
@Configuration
@EnableScheduling
@EnableAsync
public class ThreadPoolConfig {
}
可以进行简化的调用
//5.Spring普通线程池(简化)
    @Test
    public void testThreadPoolTaskExecutorSimple(){
        for (int i = 0; i <10 ; i++) {
            alphaService.execute1();
        }
        sleep(10000);
    }
    //6.Spring定时任务线程池(简化)
    @Test
    public void testThreadPoolTaskSchedulerSimple(){
        sleep(30000);
    }
分布式定时任务
Spring Quartz
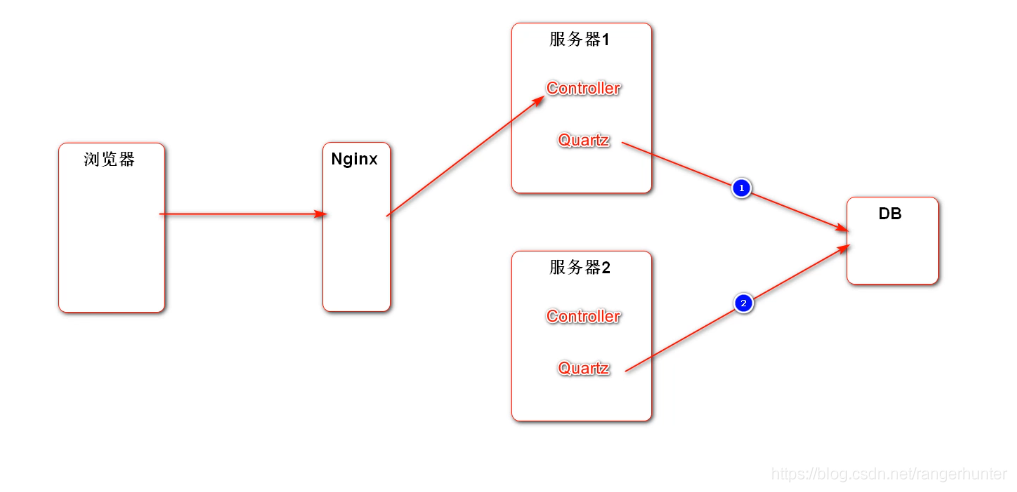
Quartz是在数据库调用的,所以需要导入表在SQL里,还需要引入spring-boot-quart依赖。
在AlphaJob下
public class AlphaJob implements Job {
    @Override
    public void execute(JobExecutionContext context) throws JobExecutionException {
        System.out.println(Thread.currentThread().getName() + ": execute a quartz job.");
    }
}
配置QuartzConfig文件
//配置-> 数据库 -> 调用
@Configuration
public class QuartzConfig {
    //FactoryBean可简化Bean的实例化过程:
    //1.通过FactoryBean封装了Bean的实例化过程.
    //2.将FactoryBean装配到Spring容器里.
    //3.将FactoryBean注入给其他的Bean
    //4.该Bean得到的是FactoryBean所管理的对象实例.
    //配置JobDetail
    @Bean
    public JobDetailFactoryBean alphaJobDetail(){
        JobDetailFactoryBean factoryBean = new JobDetailFactoryBean();
        factoryBean.setJobClass(AlphaJob.class);
        factoryBean.setName("alphaJob");
        factoryBean.setGroup("alphaJobGroup");
        factoryBean.setDurability(true);
        factoryBean.setRequestsRecovery(true);
        return factoryBean;
    }
    //配置Trigger(SimpleTriggerFactoryBean, CronTriggerFactoryBean)
    @Bean
    public SimpleTriggerFactoryBean alphaTrigger(JobDetail alphaJobDetail){
        SimpleTriggerFactoryBean factoryBean = new SimpleTriggerFactoryBean();
        factoryBean.setJobDetail(alphaJobDetail);
        factoryBean.setName("alphaTrigger");
        factoryBean.setGroup("alphaTriggerGroup");
        factoryBean.setRepeatInterval(3000);
        factoryBean.setJobDataMap(new JobDataMap());
        return factoryBean;
    }
}
在application.properties做配置
# QuartzProperties
spring.quartz.job-store-type=jdbc
spring.quartz.scheduler-name=communityScheduler
spring.quartz.properties.org.quartz.scheduler.instanceId=AUTO
spring.quartz.properties.org.quartz.jobStore.class=org.quartz.impl.jdbcjobstore.JobStoreTX
spring.quartz.properties.org.quartz.jobStore.driverDelegateClass=org.quartz.impl.jdbcjobstore.StdJDBCDelegate
spring.quartz.properties.org.quartz.jobStore.isClustered=true
spring.quartz.properties.org.quartz.threadPool.class=org.quartz.simpl.SimpleThreadPool
spring.quartz.properties.org.quartz.threadPool.threadCount=5
• 1
• 2
• 3
• 4
• 5
• 6
• 7
• 8
• 9
编写test代码
@RunWith(SpringRunner.class)
@SpringBootTest
@ContextConfiguration(classes = CommunityApplication.class)
public class QuartzTests {
    @Autowired
    private Scheduler scheduler;
    @Test
    public void testDeleteJob(){
        try {
            boolean result = scheduler.deleteJob(new JobKey("alphaJob", "alphaJobGroup"));
            System.out.println(result);
        } catch (SchedulerException e) {
            e.printStackTrace();
        }
    }
}
如何对帖子进行热度的计算
一般的帖子,时间越久,量化的分数越低,而点赞和回复的数量越多,量化的分数越高。一般对点赞回复增加的分数做一个log取对数,增加刚刚发布的时候回复点赞的影响,随着时间的推移,时间的负面作用体现,分数下降,这点和实际的情况相似。
用Redis来实现,每隔5分钟统计一次分数,但是也不是都统计,把被点赞,回复,或者刚刚发布的帖子放入需要计算的redis的set里,隔一段时间计算分数重排。
现在RedisKeyUtil下
private static final String SPLIT = ":";
    private static final String PREFIX_POST = "post";
    //帖子分数
    public static String getPostScoreKey(){
        return PREFIX_POST + SPLIT + "score";
    }
在DiscussPostController里,对加精,发帖。加入set
//计算帖子分数
        String redisKey = RedisKeyUtil.getPostScoreKey();
        redisTemplate.opsForSet().add(redisKey, id);
在CommentController和LikeController判断点赞的是帖子,再加入set里。
编写PostScoreRefreshjob
public class PostScoreRefreshJob implements Job, CommunityConstant {
    private static final Logger logger = LoggerFactory.getLogger(PostScoreRefreshJob.class);
    @Autowired
    private RedisTemplate redisTemplate;
    @Autowired
    private DiscussPostService discussPostService;
    @Autowired
    private LikeService likeService;
    @Autowired
    private ElasticsearchService elasticsearchService;
    //牛客纪元
    private static final Date epoch;
    static {
        try {
            epoch = new SimpleDateFormat("yyyy-MM-dd HH:mm:ss").parse("2014-08-01 00:00:00");
        } catch (ParseException e) {
            throw new RuntimeException("初始化牛客纪元失败!", e);
        }
    }
    @Override
    public void execute(JobExecutionContext context) throws JobExecutionException {
        String redisKey = RedisKeyUtil.getPostScoreKey();
        BoundSetOperations operations = redisTemplate.boundSetOps(redisKey);
        if(operations.size() == 0){
            logger.info("[任务取消] 没有需要刷新的帖子!");
            return;
        }
        logger.info("[任务开始] 正在刷新帖子分数:" + operations.size());
        while (operations.size()>0){
            this.refresh((Integer)operations.pop());
        }
        logger.info("[任务结束] 帖子分数刷新完毕!");
    }
    private void refresh(int postId){
        DiscussPost post = discussPostService.findDiscussPostById(postId);
        if(post == null){
            logger.error("该帖子不存在: id = " + postId);
            return;
        }
        //是否精华
        boolean wonderful = post.getStatus() == 1;
        //评论数量
        int commentCount = post.getCommentCount();
        //点赞数量
        long likeCount = likeService.findEntityLikeCount(ENTITY_TYPE_POST, postId);
        //计算权重
        double w = (wonderful ? 75 : 0) + commentCount * 10 + likeCount * 2;
        //分数 = 帖子权重 + 距离天数
        double score = Math.log10(Math.max(w, 1))
                + (post.getCreateTime().getTime() - epoch.getTime())/(1000 * 3600 * 24);
        //更新帖子分数
        discussPostService.updateScore(postId, score);
        //同步搜素的数据
        post.setScore(score);
        elasticsearchService.saveDiscussPost(post);
    }
}
写QuartzConfig
//配置-> 数据库 -> 调用
@Configuration
public class QuartzConfig {
    //FactoryBean可简化Bean的实例化过程:
    //1.通过FactoryBean封装了Bean的实例化过程.
    //2.将FactoryBean装配到Spring容器里.
    //3.将FactoryBean注入给其他的Bean
    //4.该Bean得到的是FactoryBean所管理的对象实例.
    //刷新帖子分数任务
    @Bean
    public JobDetailFactoryBean postScoreRefreshJobDetail(){
        JobDetailFactoryBean factoryBean = new JobDetailFactoryBean();
        factoryBean.setJobClass(PostScoreRefreshJob.class);
        factoryBean.setName("postScoreRefreshJob");
        factoryBean.setGroup("communityJobGroup");
        factoryBean.setDurability(true);
        factoryBean.setRequestsRecovery(true);
        return factoryBean;
    }

    @Bean
    public SimpleTriggerFactoryBean postScoreRefreshTrigger(JobDetail postScoreRefreshJobDetail){
        SimpleTriggerFactoryBean factoryBean = new SimpleTriggerFactoryBean();
        factoryBean.setJobDetail(postScoreRefreshJobDetail);
        factoryBean.setName("postScoreRefreshTrigger");
        factoryBean.setGroup("postScoreRefreshTriggerGroup");
        factoryBean.setRepeatInterval(1000 * 60 * 5);
        factoryBean.setJobDataMap(new JobDataMap());
        return factoryBean;
    }
}
在DiscussPostMapper接口上增加更新分数的方法
int updateScore(int id, double score);
在discusspost-mapper上增加更新分数,并对排序方式更新,增加判断排序方式的判断参数。对由此产生变化,调用该方法的进行更新。
<update id="updateScore">
        update discuss_post set score = #{score} where id = #{id}
    </update>
    <select id="selectDiscussPosts" resultType="DiscussPost">
        select <include refid="selectFields"></include>
        from discuss_post
        where status != 2
        <if test="userId!=0">
            and user_id = #{userId}
        </if>
        <if test="orderMode==0">
            order by type desc, create_time desc
        </if>
        <if test="orderMode==1">
            order by type desc, score desc, create_time desc
        </if>
        limit #{offset}, #{limit}
    </select>
标签:return,String,void,客网,第七章,new,Override,仿牛,public 来源: https://www.cnblogs.com/xiaochenNN/p/14840990.html
本站声明: 1. iCode9 技术分享网(下文简称本站)提供的所有内容,仅供技术学习、探讨和分享; 2. 关于本站的所有留言、评论、转载及引用,纯属内容发起人的个人观点,与本站观点和立场无关; 3. 关于本站的所有言论和文字,纯属内容发起人的个人观点,与本站观点和立场无关; 4. 本站文章均是网友提供,不完全保证技术分享内容的完整性、准确性、时效性、风险性和版权归属;如您发现该文章侵犯了您的权益,可联系我们第一时间进行删除; 5. 本站为非盈利性的个人网站,所有内容不会用来进行牟利,也不会利用任何形式的广告来间接获益,纯粹是为了广大技术爱好者提供技术内容和技术思想的分享性交流网站。