标签:VNC Configure server Raw TigerVNC user file Linux vncserver
VNC
Virtual Network Computing (VNC) 是一个图形化桌面共享系统, 可以远程连接计算机, 使用键盘和鼠标.
本文包含 在RHEL8上,安装和配置 VNC server 的步骤 . 我们还会展示如何通过SSH通道安全的连接.
Prerequisites
To follow this guide, you need to be logged in as a user with sudo privileges on your remote CentOS machine.
Installing Desktop Environment
Generally, servers don’t have a desktop environment installed. If the machine you want to connect to doesn’t have GUI, the first step is to install it. Otherwise, skip this step.
Run the following command to install Gnome, the default desktop environment in CentOS 8 on your remote machine:
sudo dnf groupinstall "Server with GUI"Depending on your system, downloading and installing the Gnome packages and dependencies may take some time.
Installing VNC Server
TigerVNC is an actively maintained high-performance open-source VNC server. It is available in the default CentOS repositories. To install it, type:
sudo dnf install tigervnc-serverConfiguring VNC Server
In CentOS 8, TigerVNC is configured using the systemd daemon.
In this example, we’ll show you how to configure TigerVNC for one or more VNC users.
-
Use the
vncpasswdcommand to set up the password. Run the command as the user that will access the VNC server, do not usesudo:vncpasswdYou will be prompted to enter and confirm the password and whether to set it as a view-only password. If you choose to set up a view-only password, the user will not be able to interact with the VNC instance with the mouse and the keyboard.
The first time the
vncpasswdcommand is run, it will create and store the password file in the user’s~/.vncdirectory.Password: Verify: Would you like to enter a view-only password (y/n)? n A view-only password is not usedIf you’re adding a second user, switch to it and set the password with
vncpasswd. -
The next step is to configure TigerVNC to use Gnome. VNC reads the user configuration settings from the
~/.vnc/configfile. Open the file and add the following:vim ~/.vnc/configsession=gnome geometry=1920x1200 localhost alwayssharedThe
sessionoption specifies the session you want to start, and thegeometryoption specifies the size of the VNC desktop.Save and close the file . If you’re adding multiple users, repeat the same step.
-
TigerVNC ships with a file that allows you to map a user to a particular port. The mapping is configured in the
/etc/tigervnc/vncserver.usersfile:sudo vim /etc/tigervnc/vncserver.usersThe file uses
<display_port>=<username>syntax. In the example below, we are mapping display port:1to user linuxize. Use the same format to add more users.# TigerVNC User assignment # # This file assigns users to specific VNC display numbers. # The syntax is <display>=<username>. E.g.: # # :2=andrew # :3=lisa :1=linuxize:1is the display port number on which the VNC server will run. In our case, the server is running on TCP port5901(5900+1). If you map another user, for example, to display port:2, the server will also listen on port5902(5900+2).What is important to understand is that when working with VNC servers,
:Xis a display port that refers to5900+X.
Starting the Tigervnc Server
Once you’re done with the configuration, the last step is to start the VNC server.
To start and enable the VNC service for the user mapped to the display port :1, enter:
sudo systemctl enable vncserver@:1 --nowThe VNC server will listen on port 5901, as we discussed in the previous section.
You can verify that the service is successfully started with:
sudo systemctl status vncserver@:1● vncserver@:1.service - Remote desktop service (VNC)
Loaded: loaded (/usr/lib/systemd/system/vncserver@.service; enabled; vendor preset: disabled)
Active: active (running) since Thu 2020-12-17 21:49:41 UTC; 8s ago
...
To enable VNC for other users, simply replace 1 with the display port mapped to the user.
Connecting to VNC server
VNC is not an encrypted protocol and can be subject to packet sniffing. The recommended approach is to create an SSH tunnel to securely forward traffic from your local machine on port 5901 to the remote server on the same port.
Set Up SSH Tunneling on Linux and macOS
If you run Linux, macOS, or any other Unix-based operating system on your machine, you can easily create a tunnel using the following ssh command:
ssh -L 5901:127.0.0.1:5901 -N -f -l username remote_server_ipYou will be prompted to enter the user password.
Do not forget to replace username and server_ip_address with your username and the IP address of your server.
Set Up SSH Tunneling on Windows
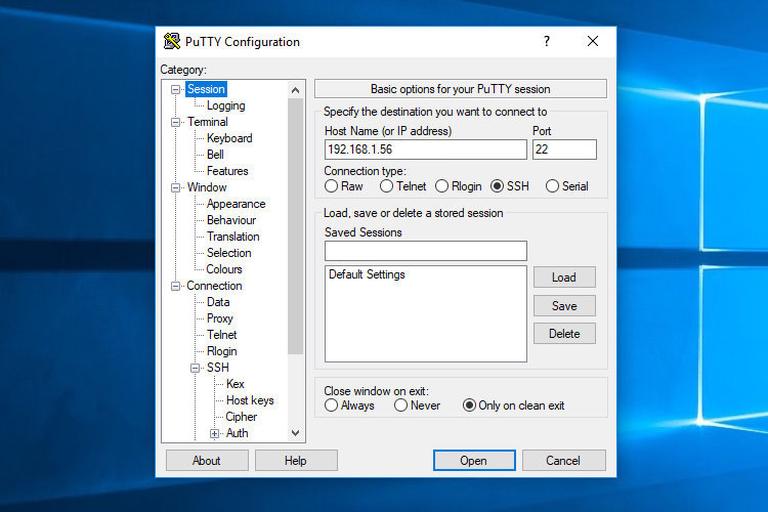
Windows users can set up SSH Tunneling using PuTTY .
Open Putty and enter your server IP Address in the Host name or IP address field.
Under the Connection menu, expand SSH and select Tunnels. Enter the VNC server port (5901) in the Source Port field, enter server_ip_address:5901 in the Destination field and click on the Add button as shown in the image below:
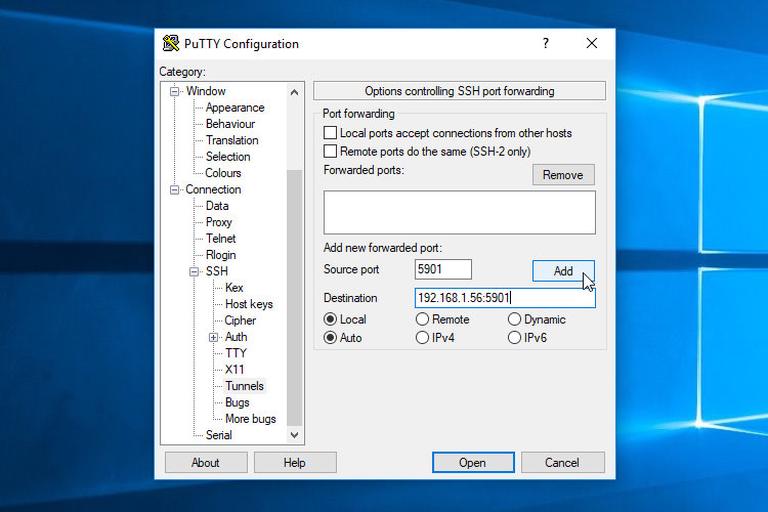
Go back to the Session page to save the settings so that you do not need to enter them each time. To login to the remote server, select the saved session and click on the Open button.
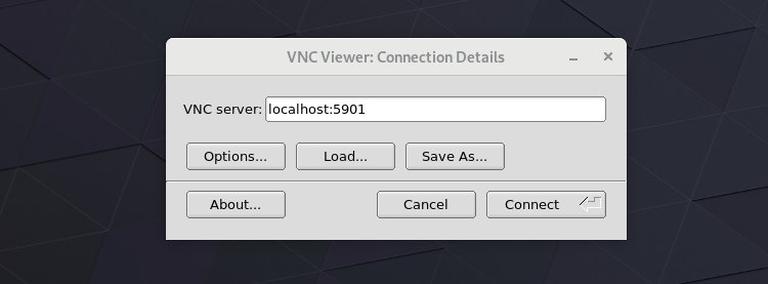
Connecting using Vncviewer
To connect to the remote Server, open your VNC viewer, and enter localhost:5901.
You can use any VNC viewer such as TigerVNC, TightVNC, RealVNC, UltraVNC, Vinagre, and VNC Viewer for Google Chrome .
We’re using TigerVNC:
Enter the password when prompted, and you should see the default Gnome desktop. It should look something like this:
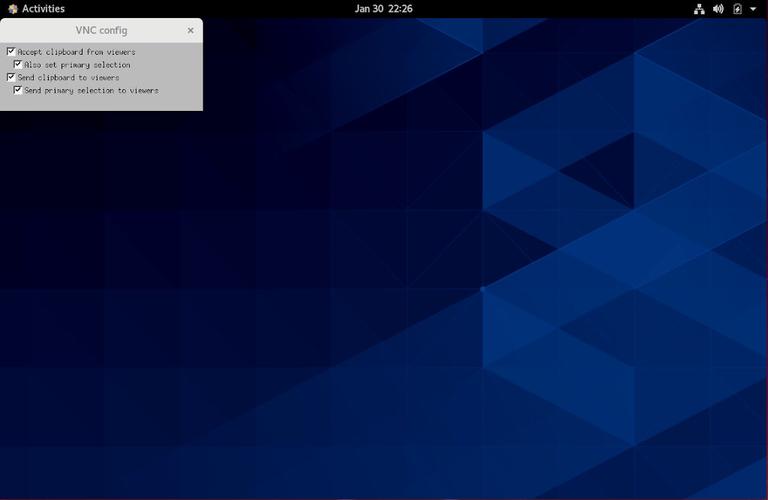
That’s it! You can now start working on your remote desktop from your local machine using your keyboard and mouse.
Conclusion
We’ve shown you how to set up a VNC server and connect to a remote CentOS 8 machine.
Feel free to leave a comment if you have any questions.
环境
- Red Hat Enterprise Linux 7
- Red Hat Enterprise Linux 8.0
- Red Hat Enterprise Linux 8.1
- Red Hat Enterprise Linux 8.2
- tigervnc-server
问题
- How to use the graphical user interface of remote RHEL systems through virtual network computing (VNC)?
- How to configure VNC in RHEL 8.0 to 8.2?
决议
For RHEL 8.3+ (tigervnc-server-1.10.1-7.el8) please see Are there any changes to the default vncserver configuration in RHEL8.3.0?
Automatic Configuration
Red Hat Access Labs provides a VNC Configurator tool for automatically generating a VNC configuration based on your environment and deployment goals. The VNC Configurator incorporates the information included in this document but makes it easier to generate valid and support-recommended configurations.
Note: This tool can not be used for RHEL8.
Manual Configuration Details
Installing the basic VNC service
-
To install the required packages, run the following command as root:
Raw# yum -y install tigervnc-server tigervncNote:
- For VNC to be useful, it also requires that the X Windows System is installed along with a window manager.
- If a graphical desktop environment is not already installed, please refer to: How to install a graphical interface in Red Hat Enterprise Linux
Configuring the VNC service
-
Create a VNC user account(if not already exist) for specific user(s) that will need to access the system via VNC.
Raw# useradd <username> # passwd <username>e.g:
Raw# useradd testuser1 # passwd testuser1 -
After that login as the user and create a vncpassword.
Raw$ vncpasswd -
To create a VNC server configuration file for user, copy the original VNC config file and edit it for the user.
eg:
Raw# cp /lib/systemd/system/vncserver@.service /etc/systemd/system/vncserver@:1.service -
Edit the
/etc/systemd/system/vncserver@:1.servicefile with text editor and replace the string “USER” with appropriate vncuser’s username. In this example the user will be “testuser1”. -
Change the
vncserver@:<num>.servicenumber for each instance. You should create one unit file per user.Note:
- If the user is root, change the path in
PIDFileline to/root/.vnc/%H%i.pid. Not applicable for RHEL7.8(and above) and RHEL8.2.0. - Starting with RHEL 7.8 and RHEL8.2.0 the unit file looks differently than what is above. Aside from the
<USER>replacement, do not replace the rest of the unit text.
- If the user is root, change the path in
-
To add more users create a new
“vncserver@:#.service”file as mentioned above and change the “USER” string to other user. -
To pass options to the VNC server, such as resolution, color depth, etc, add these options to the
RawExecStart=per the following example:ExecStart=/sbin/runuser -l testuser1 -c "/usr/bin/vncserver %i -geometry 1024x768 -depth 24"Note:
- Starting with RHEL7.4 the supported server options to pass to vncserver upon invocation has been moved to a new file named ‘config’ in
~/.vnc/directory. So there will be no need to add those option in above mentioned line.
- Starting with RHEL7.4 the supported server options to pass to vncserver upon invocation has been moved to a new file named ‘config’ in
-
Next configure firewall to accept incoming connections for VNC. Execute this command to open ports related to VNC in the firewall.
Raw# firewall-cmd --permanent --zone=public --add-port 5901/tcpThis command only opens TCP port 5901 for incoming connections. The same command can also be used to open additional ports when required.
Reload the firewall to make firewall rules effective
Raw# firewall-cmd --reload -
Reload the configuration:
Raw# systemctl daemon-reload
Enable and start the vnc service:
-
To ensure the service will start at system startup:
Raw# systemctl enable vncserver@:1.service -
To start the service if its not already started:
Raw# systemctl start vncserver@:1.service
Configuring Desktop Environment:
-
The user specific configuration files of vnc resides in ‘.vnc’ directory in user’s home directory. (e.g.
/home/username/.vnc/). Open.vnc/xstartupin your favourite editor and edit as below. -
Restart vnc server service after making any changes in configuration file.
For Gnome
-
The ‘xstartup’ file should look like this
Raw# cat ~/.vnc/xstartup #!/bin/sh [ -x /etc/vnc/xstartup ] && exec /etc/vnc/xstartup [ -r $HOME/.Xresources ] && xrdb $HOME/.Xresources vncconfig -iconic & dbus-launch --exit-with-session gnome-session &
For KDE
-
The ‘xstartup’ file should look like this
Raw# cat ~/.vnc/xstartup #!/bin/sh [ -x /etc/vnc/xstartup ] && exec /etc/vnc/xstartup [ -r $HOME/.Xresources ] && xrdb $HOME/.Xresources #vncconfig -iconic & #dbus-launch --exit-with-session gnome-session & startkde &
Connecting with a VNC client:
-
Rawvncviewercommand can be used to connect from a remote Linux machine to the proper VNC-based X session. If the remote system is running Windows, a Windows-based VNC viewer program can be freely downloaded from the website http://www.tigervnc.org/# vncviewer vncserver-ipaddress:N -
To connect to the user display using the vncviewer client, replace N with the number of the VNC-based X session for the desired user.
-
If connecting using a port number instead of display number, most vnc clients will require the syntax of vncserver-ipaddress::portnumber.
Raw# vncviewer vncserver-ipaddress::59XXe.g:
Raw# vncviewer vncserver-ipaddress::5901
SOLUTION 已验证 - 已更新 2020年十二月25日12:16 - English
环境
- Red Hat Enterprise Linux 8.3
- tigervnc-server-1.10.1-7.el8
问题
- Vnc server does not start after upgrade to RHEL 8.3.
- VNC server does not start after installing tigervnc-server-1.10.1-7.el8
- Unable to start Xvnc process using
vncservercommand - How to configure VNC server in RHEL 8.3?
- The Xvnc configuration steps mentioned in How to configure Virtual Network Computing (VNC) in Red Hat Enterprise Linux 7/8 - 8.2? do not work for RHEL 8.3
决议
Install the required packages
To install the required packages, run the following command as root:
Raw# yum -y install tigervnc-server tigervnc
Note: If a graphical desktop environment is not already installed, please refer to: How to install a graphical interface in Red Hat Enterprise Linux
Changes in the Tigervnc server configuration files
The vncserver configuration file's location has changed in the latest version of tigervnc-server. The default configuration files are now available in the /etc/tigervnc/ directory. There are three main files in this directory:
- vncserver.users
- vncserver-config-defaults
- vncserver-config-mandatory
Add a user mapping in /etc/tigervnc/vncserver.users
With this option the administrators can map a user to a particular port. The mapping should be done in /etc/tigervnc/vncserver.users configuration file.
:x=user
For example:
Raw:1=vncuser1
:2=vncuser2
Note:- Red Hat Enterprise Linux only supports one unique user per GUI session per unique system. Therefore, use one vnc session per user. Do not configure multiple vnc session for single user. For details, refer: How many GUI sessions can I log a user into?
Configure Xvnc options
To configure Xvnc parameters, open vncserver-config-defaults configuration file. This file is for the default Xvnc configuration and will be applied to every user unless any of the following applies:
- The user has its own configuration in
$HOME/.vnc/config - The same option with different value is configured in
vncserver-config-mandatoryconfiguration file, which replaces the default configuration and has even a higher priority than the per-user configuration. This option is for system administrators when they want to force particular Xvnc options.
The format of the configuration file is also quite simple as the configuration is as below:
Raw option=value
For example:
Raw session=gnome
#securitytypes=vncauth,tlsvnc
#desktop=sandbox
#geometry=2000x1200
#localhost
#alwaysshared
Note:- The only required parameter here is session=. It should match the name of a session desktop file from /usr/share/xsessions directory. The default option here for supported deployments will be session=gnome. Please see relevant documentation for any third party/upstream GUIs provided by the vendor/community.
Set vnc password
Set a password for each user in order to be able to start the Tigervnc server. In order to create a password, run the following command as the user you will be starting the server for.
Raw$ vncpasswd
Note:- This must be set while logged in as the user. You cannot set this as root/other administrators with the command vncpasswd username command in RHEL 8.
If vncserver was previously used on the system, make sure the $HOME/.vnc folder created by vncpasswd have the correct SELinux context. There are two possible options to ensure that:
- Delete the
$HOME/.vncfolder and recreate it again by creating the password one more time - Alternatively run the command:
$ restorecon -RFv /home/<USER>/.vnc
Start the Tigervnc server
Finally start the server using systemd service. To do so just run,
RawAs root user:
# systemctl start vncserver@\:$x.service
As non-root user:
$ sudo systemctl start vncserver@\:$x.service
Replace the $x by the actual number configured in /etc/tigervnc/vncserver.users.
$ sudo systemctl start vncserver@\:1.service
It will start a Tigervnc server for user vncuser1 with a GNOME session.
Note:- If you are utilizing vino (screen sharing), note that it shares ports with VNC. Do not utilize any ports that may cause a conflict. To determine what vino port may be used by a given user, have that user run 'gsettings get org.gnome.desktop.remote-access alternative-port` while logged in to the local graphical console.
Configure the firewall to accept incoming connections
Execute the following command to open VNC ports in the firewall.
Raw# firewall-cmd --permanent --zone=public --add-port 5901/tcp
This command only opens TCP port 5901 for incoming connections. The same command can also be used to open additional ports when required. You may need to consider rich rules for your use case. The above is merely a generic rule that will open up blanket access to port 5901, or whichever port was specified.
Reload the firewall to make firewall rules effective
Raw# firewall-cmd --reload
Note:-
- If vncserver was previously configured using systemd, delete the previous systemd configuration files(eg: /etc/systemd/system/vncserver@.service), otherwise this service file will be used in place of the latest configuration file.
- For vnc server configuration on the RHEL7.x and RHEL8.2.0, refer: How to access the GUI of remote RHEL system via Virtual Network Computing (VNC)?
Limitations:-
- Users will not be able to start a Tigervnc server for a user already logged into a graphical session.
- Avoid running the server as the
rootuser as it's not a safe thing to do. While running the server as therootshould work in general, it's not recommended to do so and there might be some things which are not working properly. Refer: Is logging in to the GUI as the root user supported in Red Hat Enterprise Linux?
根源
The previous Tigervnc versions had a wrapper script called vncserver which could be run as a user manually to start Xvnc process. The usage was quite simple as can be started by executing the following command:
$ vncserver :x [vncserver options] [Xvnc options]
While this was working just fine, there were issues when users wanted to start a Tigervnc server using systemd. For these reasons things were completely changed and there is now a new way how this all is supposed to work.
There are additional updates to SELinux policy that require that the policy be updated as well, otherwise the VNC Server will not start on older point releases. Mixing SELinux policy packages from newer point releases on to older point releases is subject to cause additional problems. Best practice will be to fully update if you wish to use the aforementioned version of tigervnc.
参考:
[1] How to Install and Configure VNC on CentOS 8
[2] How to configure Virtual Network Computing (VNC) in Red Hat Enterprise Linux 7/8 - 8.2?
[3] Are there any changes to the default vncserver configuration in RHEL8.3?
标签:VNC,Configure,server,Raw,TigerVNC,user,file,Linux,vncserver 来源: https://www.cnblogs.com/firestar277/p/14672432.html
本站声明: 1. iCode9 技术分享网(下文简称本站)提供的所有内容,仅供技术学习、探讨和分享; 2. 关于本站的所有留言、评论、转载及引用,纯属内容发起人的个人观点,与本站观点和立场无关; 3. 关于本站的所有言论和文字,纯属内容发起人的个人观点,与本站观点和立场无关; 4. 本站文章均是网友提供,不完全保证技术分享内容的完整性、准确性、时效性、风险性和版权归属;如您发现该文章侵犯了您的权益,可联系我们第一时间进行删除; 5. 本站为非盈利性的个人网站,所有内容不会用来进行牟利,也不会利用任何形式的广告来间接获益,纯粹是为了广大技术爱好者提供技术内容和技术思想的分享性交流网站。