标签:数据库 MySQL 192.168 sec mysql root 主从
MySQL主从
目录主从简介
在现代企业中,数据显得尤为重要,而存储数据的数据库选择又五花八门,但无论是何种数据库,均存在着一种隐患。
想几个问题:
- 用一台数据库存放数据,若此数据库服务器宕机了导致数据丢失怎么办?
- 业务量大了,数据多了,访问的人多了,一台数据库无法保证服务质量了怎么办?
主从作用
- 实时灾备,用于故障切换
- 读写分离,提供查询服务
- 备份,避免影响业务
主从形式
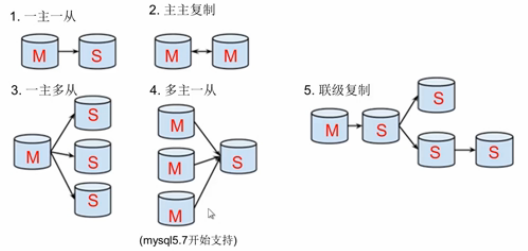
- 一主一从
- 主主复制
- 一主多从---扩展系统读取的性能,因为读是在从库读取的
- 多主一从---5.7开始支持
- 联级复制
主从复制原理
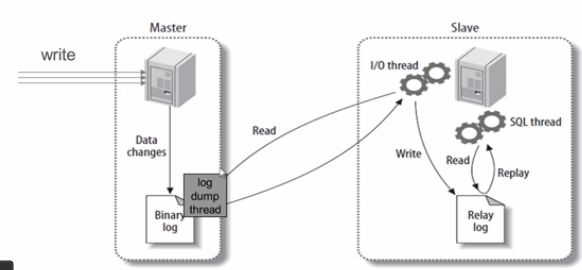
主从复制步骤:
- 主库将所有的写操作记录到binlog日志中并生成一个log dump线程,将binlog日志传给从库的I/O线程
- 从库生成两个线程,一个I/O线程,一个SQL线程
- I/O线程去请求主库的binlog,并将得到的binlog日志写到relay log(中继日志) 文件中
- SQL线程,会读取relay log文件中的日志,并解析成具体操作,来实现主从的操作一致,达到最终数据一致的目的
主从复制配置
主从复制配置步骤:
- 确保从数据库与主数据库里的数据一样
- 在主数据库里创建一个同步账号授权给从数据库使用
- 配置主数据库(修改配置文件)
- 配置从数据库(修改配置文件)
需求:
搭建两台MySQL服务器,一台作为主服务器,一台作为从服务器,主服务器进行写操作,从服务器进行读操作
环境说明:
| 数据库角色 | IP | 应用与系统版本 | 有无数据 |
|---|---|---|---|
| 主数据库 | 192.168.244.120 | centos8/redhat8 mysql-5.7 | 有数据 |
| 从数据库 | 192.168.244.121 | centos8/redhat8 mysql-5.7 | 无数据 |
mysql安装
分别在主从两台服务器上安装mysql-5.7版本,此处略过安装步骤,若有疑问请参考《mysql基础》与《mysql进阶》两篇文章。
mysql主从配置
确保从数据库与主数据库里的数据一样
为确保从数据库与主数据库里的数据一样,先全备主数据库并还原到从数据库中
主数据库
注:以下示例皆添加了免输入密码配置,所以有些命令没有添加指定用户和密码相关参数
#现有以下数据库和表
mysql> show databases;
+--------------------+
| Database           |
+--------------------+
| information_schema |
| centos             |
| linux              |
| mysql              |
| performance_schema |
| sys                |
+--------------------+
6 rows in set (0.00 sec)

mysql> use linux ;
Reading table information for completion of table and column names
You can turn off this feature to get a quicker startup with -A

Database changed
mysql> show tables;
+-----------------+
| Tables_in_linux |
+-----------------+
| tb_1            |
+-----------------+
1 row in set (0.00 sec)

mysql> select * from tb_1;
+----+------+------+
| id | name | age  |
+----+------+------+
|  1 | lisa |   18 |
|  2 | tom  |   20 |
+----+------+------+
2 rows in set (0.00 sec)

#全备数据库,全备时需要开启另外一个终端开启读锁,避免在备份期间有其他人在写入导致数据不一致
mysql> flush tables with read lock;
Query OK, 0 rows affected (0.00 sec)
[root@rh1 ~]# mysqldump  --all-databases > /opt/all-$(date '+%Y%m%d').sql
#将文件传送到从库
[root@rh1 ~]# scp /opt/all-20220731.sql  root@192.168.244.121:/opt/
The authenticity of host '192.168.244.121 (192.168.244.121)' can't be established.
ECDSA key fingerprint is SHA256:ShBbLlHCHD5+Y2KtMhx1xmbpqt1DLgWg1mS7/pNysuw.
Are you sure you want to continue connecting (yes/no/[fingerprint])? y
Please type 'yes', 'no' or the fingerprint: yes
Warning: Permanently added '192.168.244.121' (ECDSA) to the list of known hosts.
root@192.168.244.121's password:
all-20220731.sql                                                  100%  856KB  55.8MB/s   00:00
#直接退出就可以解除读锁
mysql> quit
Bye
从数据库
[root@rh2 ~]# mysql < /opt/all-20220731.sql
[root@rh2 ~]# mysql -e 'show databases;'
+--------------------+
| Database           |
+--------------------+
| information_schema |
| centos             |
| linux              |
| mysql              |
| performance_schema |
| sys                |
+--------------------+
在主数据库里创建一个同步账号授权给从数据库使用
主数据库
mysql> create user 'miya'@'192.168.244.121' identified by '1234';
Query OK, 0 rows affected (0.01 sec)

mysql> grant replication slave on *.* to 'miya'@'192.168.244.121';
Query OK, 0 rows affected (0.00 sec)
配置主数据库
[root@rh1 ~]# vim /etc/my.cnf
[mysqld]
basedir = /usr/local/mysql
datadir = /opt/data
socket = /tmp/mysql.sock
port = 3306
pid-file = /opt/data/mysql.pid
user = mysql
skip-name-resolve
server-id = 10   #数据库服务器唯一标识符,主库的server-id值必须比从库的小,优先级比从库大
log-bin = mysql_bin #启用binlog日志
#重启mysql服务
[root@rh1 ~]# systemctl restart mysqld
[root@rh1 ~]# ss -tanl | grep 3306
LISTEN    0         80                       *:3306                   *:*
#查看主库的状态
mysql> show master status;
+------------------+----------+--------------+------------------+-------------------+
| File             | Position | Binlog_Do_DB | Binlog_Ignore_DB | Executed_Gtid_Set |
+------------------+----------+--------------+------------------+-------------------+
| mysql_bin.000001 |      154 |              |                  |                   |
+------------------+----------+--------------+------------------+-------------------+
1 row in set (0.00 sec)
配置从数据库
[root@rh2 ~]# vim /etc/my.cnf
[mysqld]
basedir = /usr/local/mysql
datadir = /opt/data
socket = /tmp/mysql.sock
port = 3306
pid-file = /opt/data/mysql.pid
user = mysql
skip-name-resolve
server-id = 20		#设置从库的唯一标识符,从库的server-id值必须比主库的大,优先级比主数据库小
relay-log = mysql-relay-bin		#启用中继日志relay-log
#重启mysql服务
[root@rh2 ~]# systemctl restart mysqld
[root@rh2 ~]# ss -tanl
State     Recv-Q     Send-Q         Local Address:Port         Peer Address:Port
LISTEN    0          128                  0.0.0.0:22                0.0.0.0:*
LISTEN    0          80                         *:3306                    *:*
LISTEN    0          128                     [::]:22                   [::]:*
#配置并启动主从配置
mysql> change master to
    -> master_host='192.168.244.120',
    -> master_user='miya',
    -> master_password='1234',
    -> master_log_file='mysql-bin.000001',
    -> master_log_pos=154;
Query OK, 0 rows affected, 2 warnings (0.05 sec)

mysql> start slave;
Query OK, 0 rows affected (0.00 sec)
#查看从服务器状态
mysql> show slave status \G
*************************** 1. row ***************************
               Slave_IO_State: Waiting for master to send event
                  Master_Host: 192.168.244.120
                  Master_User: miya
                  Master_Port: 3306
                Connect_Retry: 60
              Master_Log_File: mysql_bin.000001
          Read_Master_Log_Pos: 154
               Relay_Log_File: mysql-relay-bin.000002
                Relay_Log_Pos: 320
        Relay_Master_Log_File: mysql_bin.000001
             Slave_IO_Running: Yes  #这一行必须为yes,如果出现Connecting,可以尝试在主服务器上关闭防火墙
            Slave_SQL_Running: Yes	#这一行必须为yes
测试验证
在主服务器的表tb_1中插入数据
mysql> insert tb_1(name,age) value('mariya',22);
Query OK, 1 row affected (0.06 sec)

mysql> select * from tb_1;
+----+--------+------+
| id | name   | age  |
+----+--------+------+
|  1 | lisa   |   18 |
|  2 | tom    |   20 |
|  3 | mariya |   22 |
+----+--------+------+
3 rows in set (0.00 sec)
在从数据库中查看数据是否同步
mysql> select  * from tb_1;
+----+--------+------+
| id | name   | age  |
+----+--------+------+
|  1 | lisa   |   18 |
|  2 | tom    |   20 |
|  3 | mariya |   22 |
+----+--------+------+
3 rows in set (0.00 sec)
标签:数据库,MySQL,192.168,sec,mysql,root,主从 来源: https://www.cnblogs.com/Archer-x/p/16537903.html
本站声明: 1. iCode9 技术分享网(下文简称本站)提供的所有内容,仅供技术学习、探讨和分享; 2. 关于本站的所有留言、评论、转载及引用,纯属内容发起人的个人观点,与本站观点和立场无关; 3. 关于本站的所有言论和文字,纯属内容发起人的个人观点,与本站观点和立场无关; 4. 本站文章均是网友提供,不完全保证技术分享内容的完整性、准确性、时效性、风险性和版权归属;如您发现该文章侵犯了您的权益,可联系我们第一时间进行删除; 5. 本站为非盈利性的个人网站,所有内容不会用来进行牟利,也不会利用任何形式的广告来间接获益,纯粹是为了广大技术爱好者提供技术内容和技术思想的分享性交流网站。